Table of Contents
One of your first steps in organizing your project’s audio signal flow is to first organize the various objects within the Actor-Mixer Hierarchy. In earlier lessons, you’ve placed various sound objects into a container to both organize similar sounds together and to use the container’s properties to quickly apply features such as pitch randomization to all of the objects contained within. Organizing objects of a similar type together is a good place to start when trying to manage the hundreds or even thousands of sounds that you may integrate into a game.
You’ll begin by placing all of the sounds associated with various items our Wwizard may find as he explores the many levels available in Cube, such as the teleporter, Wwizard's hat, and more, into an Actor-Mixer object.
-
Open the Lesson 5 project and expand the Default Work Unit in the Actor-Mixer Hierarchy.

The Lesson 5 project has a variety of new Sound SFX objects and Events already configured to provide you with more content to work with as you begin to learn how to organize more developed projects.
![[Tip]](/images/wwise101/?source=wwise101&id=tip.png)
Take time later to explore the project and see how the provided content is assembled. The general structure and approach should now be familiar to you.
-
In the Project Explorer's Audio tab, select Default Work Unit, and then click the Create new 'Actor-Mixer' button.

-
Name the newly created Actor-Mixer Items.

-
Select everything below Footsteps with the exception of Cube_Main_Theme and Heartbeat. Drag your selection into the Items Actor-Mixer.

-
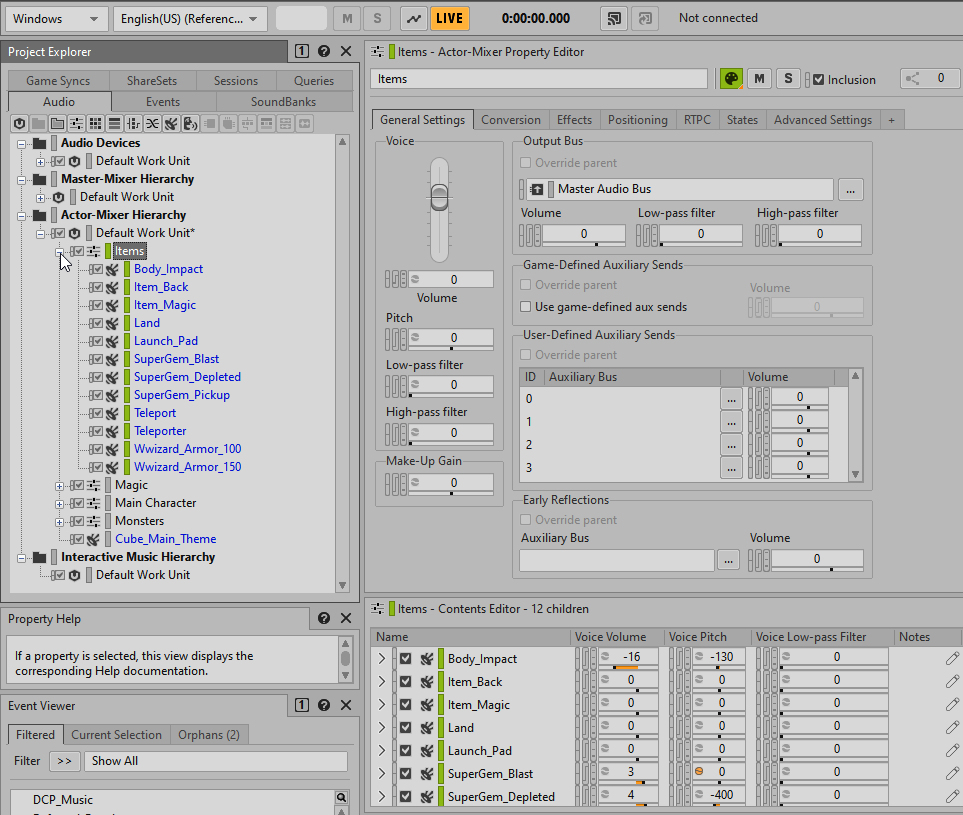
In the Project Explorer, select the newly created Items Actor-Mixer.
Now that your items are contained within the Items Actor-Mixer, you need to clearly understand what an Actor-Mixer is, and more importantly, what an Actor-Mixer isn’t.
Because of its name, you may have the impression that all of the audio signals that are output from the various objects contained within, are combined together, and that the Volume fader found in the Actor-Mixer’s General Settings tab acts something like a master fader for the overall volume of these combined signals. This is not the case! While its name might imply otherwise, the Actor-Mixer doesn’t actually mix anything, and none of the sounds contained within the Actor-Mixer are ever mixed together.
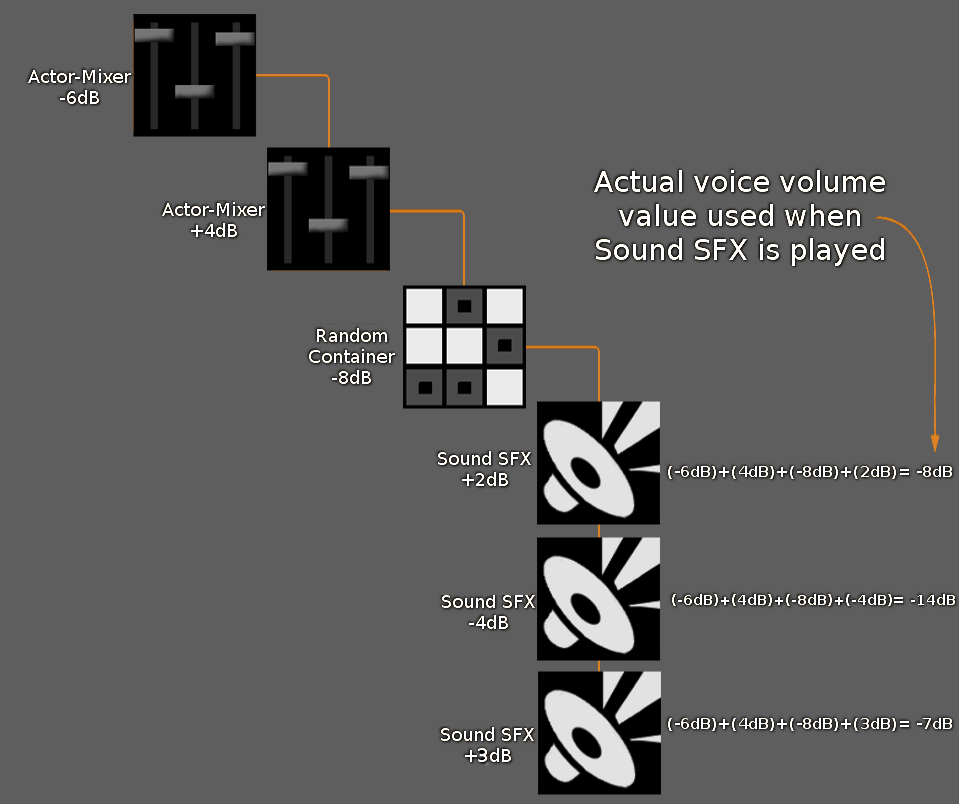
Instead, the value for properties with numeric variables such as Voice Volume or Low-pass filter represent an offset value for the same property of items contained within. For example, if the Voice Volume property for the Actor-Mixer is -3, then 3 dB would be subtracted from the Voice Volume of every object contained within, even though you don’t see that value when looking directly at those objects contained within. The effect is cumulative, so if an Actor-Mixer is contained within another Actor-Mixer or any other object such as a Random or Sequence Container that also has a Voice Volume parameter, then all of the offsets are added together to determine what volume value should be used each time the sound source is played.
Turning the Voice Volume property all the way down on an Actor-Mixer that sits at the highest level of the hierarchy, results in the same reduction of the Voice Volume (-96 dB) for all of its contained objects. Essentially, you have done the equivalent of going to each individual object within and turned all of their Voice Volumes down. But, even such a drastic reduction would not necessarily silence the objects because the cumulative Voice Volumes of the hierarchy could still make them audible if they increased the total enough to offset the -96 dB. Study the following diagram to see the cumulative effect on the Voice Volume property when a Sound SFX object is embedded within other objects.
For properties that have absolute value settings where relative offsets don’t apply, things work differently. An example of one of these absolute values is an object’s Output Bus Assignment, which you’ll explore in the next exercise.
Now that you have an understanding of Actor-Mixers, you’ll place all sounds directly associated with the main character into their own Actor-Mixer; however, you’ll do this using a different approach.
-
Select the Defeated, Jump, Pain, Footsteps, and Heartbeat objects. Right-click one of these selected objects and then choose New Parent >Actor-Mixer.

-
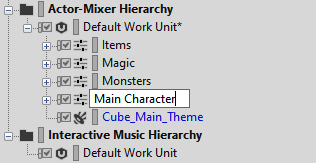
Name the new Actor-Mixer Main Character.
Now you have a project that makes it much easier to find specific types of sounds. To go a step further with this, you can color-code objects. While you can color-code your objects for any purpose you like, here you'll color-code based on the Actor-Mixer groupings you've just created. Setting a color on a parent object, will propagate that color to all of its children. This will make it easier to identify what category of sound an object is related to in various views throughout Wwise.
-
Right-click the Items Actor-Mixer and choose Set Color.

You see a color selector appear.

-
Choose the green square in the color selector and then expand the Items Actor-Mixer.
You see a green color indicator to the left of each object name. Setting colors now helps you more quickly identify objects in the various views used throughout Wwise, so you should create colors for the remaining Actor-Mixers.
-
For the remaining Actor-Mixers, set Magic to blue, Main Character to purple, and Monsters to red, and then collapse the Actor-Mixers.
