Table of Contents
An Auxiliary Send (Aux Send) is an additional output an object can use to send audio at a uniquely controlled volume to a special bus called an Auxiliary Bus. One of the most common applications for Auxiliary Busses is to provide a way for a lot of different sources to have a special Effect, such as a reverb or echo applied. The signal being sent to an Auxiliary Bus triggers the Effect, which is then later combined with the unaffected dry signal.
In Cube, the player moves in a world filled with pre-defined zones that represent types of ambient spaces. When the player enters one of these zones, the game can then send specialized Wwise calls that can be used to activate an Auxiliary Bus that’s been set up with a corresponding ambient Effect like a large hall reverb. You’ll now configure Wwise with a 'Reverb' Effect so that it can react in this way. First, create an Auxiliary Bus in the Master-Mixer Hierarchy where the 'Reverb' Effect will live. Since Reverb is part of the environment, you’ll create this new bus within the Environmental bus you created earlier.
-
Select the Environmental Audio Bus object and click Create new 'Auxiliary Bus'.

In game play, the ambient reverb Effects are particularly obvious as you walk through the various corridors within the game maps.
-
Name the new bus env_corridor.

Now that you have the Auxiliary Bus, you’ll need to add the Effect plug-in that is used to generate the reverb.
-
Select the env_corridor Auxiliary Bus and select the Effects tab in the Property Editor.

In the Auxiliary Bus Property Editor, you’ll see that there’s an Effect section with four positions where effect plug-ins can be installed. There are many different Effect plug-ins available in Wwise. You’ll now install a basic reverb to give a sense of space to all sounds that are heard within the environment.
-
In the Effects group, click the [>>] selector button for the first Effect row, and choose Wwise RoomVerb > Rooms > Room_Small.

The Effect is now installed in the first slot.

Effect plug-ins have various parameters that can be modified to tailor the sound.
-
Click the […] button in the Edit column at the right side of the Effect row.

You now see all the parameters that pertain to the Wwise RoomVerb plug-in. Later, when you start playing the game and hear the reverb, you can come back here and make adjustments to reverb settings like decay time and high frequency damping to tailor the room sound to your liking.
Now you need to choose which of the Sound SFX objects in the Actor-Mixer Hierarchy will feed the signal to the small room reverb in the Auxiliary Bus you just configured.
-
Close the Effect Editor.
-
In the Actor-Mixer Hierarchy, select the Main Character Actor-Mixer, and display the General Settings tab in the Property Editor.

You now need to assign the Auxiliary Bus you want to send the signal to. There are two ways to do this. The first option is to manually assign this within Wwise.
-
In the first Auxiliary Bus row, click the […] browse button.

The Project Explorer opens displaying the Master-Mixer Hierarchy and any Auxiliary Bus objects that are available for selection.

-
Select the env_corridor Auxiliary Bus and click OK.
![[Tip]](/images/wwise101/?source=wwise101&id=tip.png)
You can drag and drop an Auxiliary Bus object from the Project Explorer to the User-Defined Auxiliary Sends list to quickly add a send.
You’ll now be able to hear the room reverb Effect you set up when you play any of the objects contained within the Main Character Actor-Mixer.
-
Select an object within the Main Character Actor-Mixer and listen for the reverb when you play it.
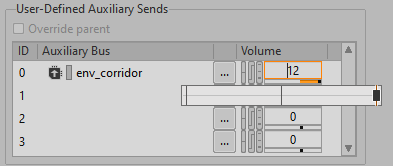
If you want to increase or decrease the reverb Effect, you can adjust the Volume control to the right of the env_corridor assignment.
-
Select the Main Character Actor-Mixer, turn up the env_corridor Volume. Then re-select and play the object you chose to hear the additional reverb.
![[Note]](/images/wwise101/?source=wwise101&id=note.png)
Now that you can hear the reverb, you can go back to the reverb plug-in settings you saw in step 5 and adjust them to your liking.
The second way that an object can send a signal to an Auxiliary Bus is to have the game itself send messages to Wwise indicating what auxiliary bus a sound should be sent to and at what level. This is how Cube works. As you walk through the maps in Cube, the level editor has zones configured so that when the player enters the zone, the auxiliary send volume going to a specific auxiliary bus is turned up and when the player leaves the zone, it is then turned down. This creates a dynamic change to the reverb based on the player’s physical position.
To use this approach you need to first unassign env_corridor in the User-Defined Auxiliary Sends group.
-
Select the Main Character Actor_Mixer, right-click the env_corridor assignment and choose Set User Auxiliary Send 0 > None.
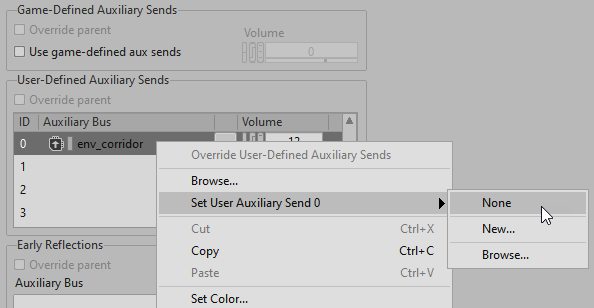
To use Game-Defined Auxiliary Sends, all you need to do is activate them with a check box.
-
Select the Use game-defined aux sends check box for all Actor-Mixers.

Now, when playing the game, the objects contained within the Main Character Actor-Mixer are able to recognize the Wwise game calls that indicate when to turn the env_corridor auxiliary sends up or down. At the end of the lesson you’ll play Cube and you’ll be able to hear the reverb come in and out as you move through different areas of the map.
The Volume control beneath the Use game-defined aux sends check box is used to offset the values being transmitted from the game engine so that you can adjust to your liking without having to ask a programmer to make the adjustments for you.