Table of Contents
The overall approach to setting up a multi-sampled instrument in Wwise is to create a separate Sound SFX object for each audio file that will be used in the multi-sampled instrument. The trick is to make it so that the Sound SFX object only responds to MIDI notes that are within the range of notes intended for that single sound. To accomplish this, you’ll use the MIDI filtering features available for a Sound SFX object.
For the Suling Sound SFX object, notice below in the Filters group the Key Range value. This sets the range of notes that this particular Sound SFX object will respond to.
-
Set the Filters’ Key Range properties to C#5 for the Min and F5 for the Max values and play the track.

You can hear that some of the notes no longer play. Only the notes that fall within the range you defined will be heard.
![[Tip]](/images/wwise201/?source=wwise201&id=tip.png)
This same principle works with MIDI values such as velocity, so that softly played notes can trigger one sound, while harder hit sounds trigger another.
For the suling, a variety of recordings have been made with the musician playing specific pitches that can each be brought in as a unique Sound SFX object. You’ll need to repeat the process you used in the last few exercises, but it can become quite tedious to do this considering that some multi-sampled sounds could consist of hundreds of audio files. To speed up the process you’ll use a few shortcuts in creating the same end result.
Now that you understand the basic idea of how a Sound SFX object can react to MIDI information, you won’t need the Suling Sound SFX object anymore.
-
Delete the Suling Sound SFX object you just created.
-
Right-click the Music Work Unit and choose Import Audio Files. Click the Add Folders button and navigate to the Wwise-201 Cube Music > Boss > Boss-D > Boss-D Suling Samples folder and click Select Folder.

Remember that the filenames indicate the pitch that the note was played at. This is very helpful for assigning the Root Note position.
Also notice that by default, the folder in the file structure will be used to create a Virtual Folder in the Project Explorer. This is not what you want. Instead, you want to have the Sound SFX objects contained within a single object that can have the ability to play all of the contained Sound SFX objects simultaneously. The object for this job is called the Blend Container and it will later become the MIDI Target for the Boss-D-Sampler-Suling Music Track.
-
Change the first line to say Blend Container and click the Import button.

A Boss-D Suling Samples Blend Container appears in the Project Explorer.
If you have multiple samples for the same pitch of a note, you can use a Random Container to create more variety for a single note.
-
Select the Boss-D Suling Samples Blend Container and click the MIDI tab in the Property Editor.

Here you see the same MIDI settings you saw in a Sound SFX object. For this parent object, you’re going to leave the default values just as they are, but using the Keymap Editor will allow you to view the properties you need to adjust for all child objects contained within.
-
Click the Keymap Editor button.

You see a list of each the Suling Sound SFX objects contained within.
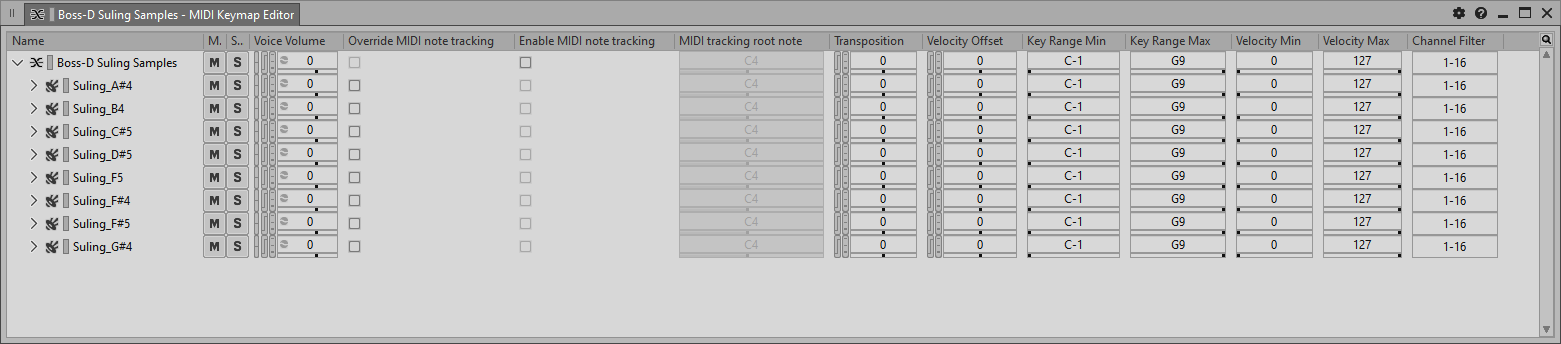
The advantage of the Keymap Editor is that you can see the common MIDI properties you’ve adjusted before for all individual objects contained within a nicely displayed single window.
Now you can quickly move through the list and override the MIDI note tracking and enable MIDI note tracking.
-
For each line, first click the Override MIDI note tracking check box and then the Enable MIDI note tracking check box.

The next step is to adjust the MIDI tracking root note and set the key range for each object. The Root Note is simply the note name documented in the object name.
-
Adjust the MIDI tracking root note to match the note referenced in the object name.

We will set the Key Range Min values so that they match the Root Note; however, the Key Range Max range value is a bit more complex to calculate. If the Key Ranges between two Sound SFX objects overlap, it’s possible one MIDI note could play two audio files. For this reason the Key Range Max value should be set to one note below the next object’s Key Range Min value. This means that the Root Note of an object will be allowed to cover playing sounds for any incoming MIDI note messages up to where the next Sound SFX object takes over. The problem at first is that the list is alphabetized according to the object names, so the note names aren’t listed in the same order as they appear on a keyboard. You can change that by clicking the column header for the MIDI tracking root note.
-
Click the MIDI tracking root note column header and then adjust the Key Range Min and Key Range Max property for each object. Enter the Key Range Min values so that they match the MIDI tracking root note (except for Suling_F#4 which should be set to C-1 so the mapping covers the entire MIDI range). Enter the Key Range Max values so they don’t overlap another object. Reference the following image to verify your work.

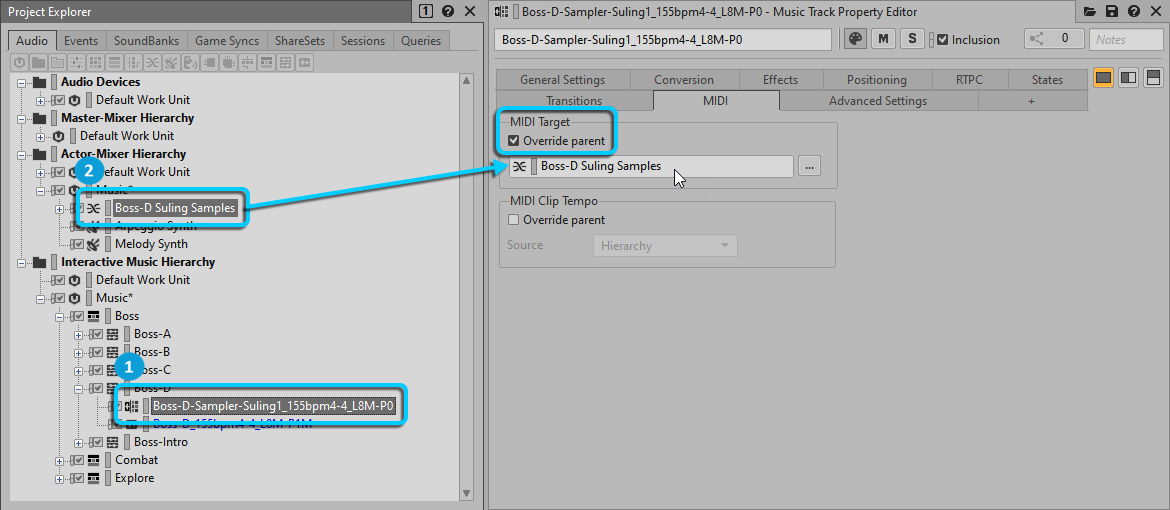
Now, your last step is to reassign the Boss-D-Suling1 Music Track to the Boss-D Suling Samples Blend Container.
-
Select the Boss-D-Suling1 Music Track and drag the Boss-D Suling Samples Blend Container to the MIDI Target field.
-
Play the Boss-D Music Segment.
You can now hear that all the notes play, but each has a distinctive audio file that’s being referenced, adding to the realism and minimizing sonic redundancy.
Remember that you still have the Boss-D-Sampler-Suling Music Track set to force play the first Random Step Sub-Track. You’ll want to turn that off to hear the various versions of the Suling track.
-
Open the Music Editor and turn off the Force Usage for the Boss-D-Sampler-Suling Music Track. The Profiler layout will show you specifically what’s occurring when the MIDI Music Tracks play, including showing you each MIDI note being processed and the resulting Sound SFX object that is played as a result.
-
Unpin the Transport Control, then select the Boss Music Playlist and play.
-
Start a capture session and go to the Profiler layout.

Notice that you can see all of the various MIDI data represented in the Capture Log, and you can easily see the various Sampler objects being triggered in the Schematic View.
-
Click Stop Capture.
The boss music wasn’t composed to play until the boss fight that occurs at the end of the map. You might, however, find it fun to listen to what you’ve implemented while playing the earlier parts of the level. If you want to do so, select Music in the Event Viewer and drag and drop the Boss Music Playlist Container from the Project Explorer onto the Combat music in the Event Property Editor. Otherwise, you can leave the sound design as is.
-
Generate the SoundBanks and play Cube!
Now you can hear how the decades old MIDI protocol can be used in modern video games when used in cooperation with the Wwise Synth One and sample-based instruments. Now that you have a lot of strategies for creating immense variety in your score, move on to the next lesson to begin learning how the game itself can drive that score.