Table of Contents
Currently, a Switch track doesn’t transition to a different Sub-Track until the next defined transition point, which is by default set to the Exit Cue. This is why you don’t hear any change unless you stop and replay the Music Segment. You need to hear the transition much sooner than that in order to provide the audible feedback to the player in a meaningful way.
-
With the Combat-A Music Segment selected in the Project Explorer, select the Combat-A-Gtr1 track header in the Music Segment Editor, then click the Transitions tab in the Music Track Property Editor.

The Transitions tab is a very powerful editing tool that provides numerous options for how and when music transitions between segments and playlists. This is controlled with the use of something called Transition rules, and the list of these rules can get quite long. You’ll explore this idea more deeply in the next lesson, but for now, you only need to work with the default rule that occupies the first line. When used within a Switch Music Track, this single rule is by default saying that when you’re transitioning from any Sub-Track to any other Sub-Track, don’t transition until the currently playing Sub-Track reaches the Exit Cue. You need to modify the rule so that the transition can happen earlier.
-
Select the “Any to Any” transition row.

-
In the Source group box, set the Exit source at property to Next Bar.

Now the transition will happen as soon as the next downbeat occurs.
-
Play the Combat-A Music Segment, adjust the Health Switch Group, and listen to the transition between the Sub-Tracks.
![[Tip]](/images/wwise201/?source=wwise201&id=tip.png)
Use the solo button to isolate the Combat-A-Gtr1 track to better hear the result.
While the transition is now working, it feels a bit abrupt. It would be helpful to have a crossfade when transitioning between the various guitar tracks. This can be accomplished with the Fade features.
-
Click the Fade-out check box.

You’ve now indicated that a Fade-out should occur on the track that’s playing when exiting to a different track. However, you still need to adjust the Fade-out time by editing the Fade-out.
-
Click the Fade-out Edit button.

A window opens showing an image of how the transition is functioning.
-
Set the Time property to 0.5 and press Enter.

-
Close the Music Fade Editor window and play to test your adjustment.
While you now hear a Fade-out of the track that’s being left, you need to do a Fade-in on the track that’s being transitioned to.
-
Select the Fade-in check box and click the Edit button.

-
Set the Fade-in Time to 0.5 and listen to the transition while playing and adjusting the Switch.
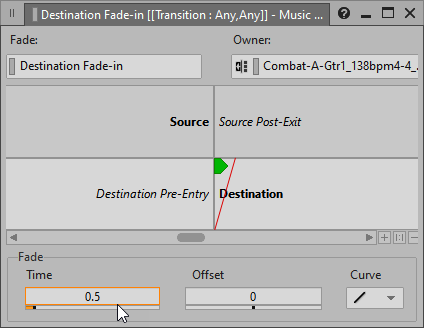
While the transition is smoother, the problem is that—musically speaking—you’d want to clearly hear the downbeat of the section that’s being transitioned to at full volume. To accomplish this you can offset the transition point relative to the destination’s Entry Cue. In this case, setting the Offset a half second early means that by the time the half second Fades that you have set are complete, the downbeat of the transition to Sub-Track will be at full volume.
-
Set the Offset property to -0.5.

-
Close the Music Fade Editor window.
-
Listen to the transition while playing and adjusting the Switch Group.
Now you’re done configuring the Switch Music Track for the Combat Main A music.
-
Repeat the steps in this and the previous two exercises so that the guitar in Combat Main B and Combat Bridge will behave in the same manner.