Table of Contents
First, let's create a script from Unity and make a Wwise-Type Event class variable. A variable is a way to store information in a script that can then be exposed in the Inspector, allowing us to easily set its value from the Unity editor. To achieve this, we will create a new script and modify its contents, adding a single line of code. If this is your first time using a code editor, not to worry; we will be exploring the code and the code editor along the way.
-
In Unity, go to Audiokinetic > Certification > 301 > Lesson 4 and select Posting Events using Wwise-Types.

-
In the Hierarchy, select the Player game object.

This time, instead of adding a premade component, we'll make our own.
-
In the Inspector, click Add Component and go to New Script.

Once you have selected the New Script option, you will be able name the script as desired. Make sure that you check for spelling mistakes in the next step, as it can be slightly complicated to rename a script later on. You will be reusing this script and you might want to be able to compare your script with the snippets in the certification. You will be writing scripts in C Sharp, so make sure not to change the Language property.
-
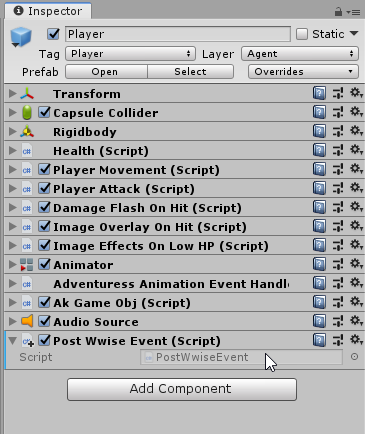
Type in PostWwiseEvent and click Create and Add.

In the Inspector, you'll see the PostWwiseEvent component you just created. This script is automatically stored in your project, and you can access it either from in the Project window or by double-clicking on it.
![[Note]](/images/wwise301/?source=wwise301&id=note.png)
It may take a moment for Unity to fully integrate your script into the project, so be sure to wait until you see the name of your new script next to the checkbox before proceeding to open the script.
-
Double-click the PostWwiseEvent area in the Script property.
As part of your Unity installation, the Visual Studio (MonoDevelop on Mac) code editor should now open and display the contents of the script in a new tab. Visual Studio or MonoDevelop looks very similar to a basic text editor as changes are done using text, but is specifically used to edit code, like what's in the Unity scripts. It will number your lines for easier reference and display the text with syntax highlighting, meaning that it will color the text according to code category (like classes, functions, properties, etc). It will also assist you in writing code by suggesting possible function or property names, and it will underline in red under code with errors.
Visual Studio (MonoDevelop on Mac) is included in the Unity Installation. If an undesired code editor or If no code editor has opened, go to the Unity menu > Edit > Preferences > External Tools and select your prefered code editor. Should you by any chance not have it installed, refer to the Unity Installation in the Introduction.
Let's take a look at how a script will look by default. Notice that the script is not empty, and you've already got a few things prepared.

The screenshot above shows you how the script is displayed in the code editor, but in this certification scripts will mostly be presented as below.
using System.Collections;
using System.Collections.Generic;
using UnityEngine;

public class PostWwiseEvent : MonoBehaviour {

    // Use this for initialization.
    void Start () {

    }

    // Update is called once per frame.
    void Update () {

    }
}
For convenience, all script content shown in this certification can be copied and pasted into the script that you make. Should you accidentally delete a script, skip an exercise, or have other problems where your script won't run, you can delete all text in your code editor, then copy the related script text from the Reference Scripts section and paste it into the code editor.
Let's go through the different parts of this script.
-
Namespaces: Topmost in the script you will find a few lines with the word 'using' in front. This keyword means that it's a namespace, which is a collection of classes and will make it easier for you to write scripts.
using System.Collections;
using System.Collections.Generic;
using UnityEngine;
-
The Class: Below the namespaces, you will find a class set to MonoBehaviour. This is the container for all variables, properties and functions you'll be using. Everything declared in this class will have to be placed in between the starting '{' and ending curly braces '}', letting the class know what parts of the script belong to it.
public class PostWwiseEvent : MonoBehaviour {
    // Use this for initialization.
    void Start () {

    }

    // Update is called once per frame.
    void Update () {

    }
}
The content that you declare inside the script name class will be usable when the script is added in the Scene. All visible variables will appear below the script name.

-
Functions: Inside the class you will find two functions: Start() and Update(). These are encapsulated pieces of code that are called either by Unity or other scripts. Start() is called on executing the Scene. Update is called in every frame the game is running, but after Start() has been called.

In front of the function name you'll find the return type, but throughout the entire certification you will keep this as void, meaning it returns nothing.
    // Use this for initialization.
    void Start () {

    }
    // Update is called once per frame.
    void Update () {

    }
Above each function you will find a line of text starting with a double slash '//'. This is known as a single-line comment, and is used by developers to add comments and descriptions for properties, functions, and so on; all text to the right of the '//' symbol is ignored by Unity.
Notice that the opening curly brace '{' is on the same line as the class or function name. This is simply the coding style used in this certification to reduce the length of the script snippets, but it will not affect the script.
To expose a property for use in the Inspector, you need to add the property to the PostWwiseEvent class. This means that in the code it must appear within the opening and closing curly braces of the class, but also outside of the Start() and Update() functions.
Besides following this certificate, you can also check out Unity's beginners guide to scripting - Learning C# in unity for beginners.
Now, what is it that you will be adding to the script? Here you need to make a property that will contain information about your Event. A property is declared in three parts: the access modifier, the property type, and the name you assign it.

The Access Modifier describes whether the property should be visible from outside the script. As we need Unity to be aware of the property and add it in the Inspector, it needs to be public.
If you are using Visual Studio, you might quickly discover that the editor will suggest what to write in a dropdown menu below the text. This is referred to as IntelliSense. This feature might not be available in all code editors, and if so, you may need to write the text manually rather than using the dropdown menu to create your script.
-
-
Inside the PostWwiseEvent : MonoBehaviour class but outside a function, select an empty line and type public.
Throughout the certification, scripts like the one below will highlight in orange font the changes you are to apply.
using System.Collections;
using System.Collections.Generic;
using UnityEngine;

public class PostWwiseEvent : MonoBehaviour {
    public
    // Use this for initialization.
    void Start () {

    }

    // Update is called once per frame.
    void Update () {

    }
}
In our case, we need the property to be of the 'Event' Wwise-Type class. All Wwise-Type classes can be retrieved by writing 'AK.Wwise.', followed by the type of class (Event, RTPC, State, and so on). The Wwise-Type Event class is therefore declared as 'AK.Wwise.Event'.
-
Continued after public, add a single space and then AK.Wwise.Event.
public class PostWwiseEvent : MonoBehaviour {
    public AK.Wwise.Event
    // Use this for initialization.
    public void Start () {

    }
You've now declared the type of property, but for the sake of identification you also need to provide a name for the property which will be visible from the Inspector.
The name of the property does not have to be related to the specific Event in your Wwise project you are going to select. It is effectively a label for the property drawer so that a sound designer knows what type of Wwise object can go there. For example, you might want to name your Wwise Event with something representing the sound (like Enemy_Explosion), but then in your game call it something representing when that sound is played (like EnemyDeath) so the Level designer understands when the sound is called.
-
Continued from Ak.Wwise.Event, add a single space and write MyEvent.
public class PostWwiseEvent : MonoBehaviour {
    public AK.Wwise.Event MyEvent
Lastly and very importantly, this type of programming language (C#) needs to know when the line is ending, which is declared by a semicolon (;). Line endings are a way for the code editor to make heads or tails of your code. This means that without these semicolons, the code editor might not be able to detect where the error lies and, consequently, may sometimes even display an incorrect help message. As such, if you get odd help messages or see your code underlined in red, this might be an indication that you need a semicolon or curly brace somewhere in your script.
-
Continued from AK.Wwise.Event MyEvent, add a semicolon (;).
public class PostWwiseEvent : MonoBehaviour {
    public AK.Wwise.Event MyEvent;
You've now created your first property, a public Event property called 'MyEvent'. However, Unity will remain unaware of the changes in the script until you save it.
-
Press CTRL+S on Windows, or CMD+S on Mac to Save the script.

![[Tip]](/images/wwise301/?source=wwise301&id=tip.png) | |
|
When saving a script in your Code Editor and returning to Unity, Unity will need to load the changes you have made and might be unresponsive for a short period of time while the changes are being loaded. |
You will now be able to see the property drawer in the Unity Inspector under the PostWwiseEvent script.

As you used the Wwise-Type Event class, you will automatically get a button where you can select any Wwise Event from your Wwise Project. However, our code is incomplete at this point; it knows it can use an Event Wwise Type, but it doesn't know what to do with it yet.
In the next section, you'll add functionality to the script, enabling it to post the Event onto a game object, and then you'll choose a specific Event from the Inspector.