-
-
-
-
-
-
-
-
-
-
-
-
-
-
-
-
Reflect
-
-
-
-
-
-
-
-
-
-
-
-
-
-
-
-
-
-
|
Wwise Unreal Integration Documentation
|
So far, we have built everything directly in our level, using prebuilt actors or adding components to individual actor instances. It's also possible to use the various spatial audio components to construct a Blueprint actor that can be replicated throughout the level. In this section we will build a replica of the structure from section Unreal Project Preparation, using a Blueprint class so that it can be easily added or spawned throughout the world.
 | Note: The Preparation for the Spatial Audio Tutorials must be completed prior to starting this tutorial. |
Setting Up a Blueprint Class
AkLateReverbComponent and AkRoomComponent rely on containment tests to check whether a given game object position lies within their parent PrimitiveComponent. Simple collision is used for this check. You should therefore use a parent PrimitiveComponent that has simple collision. For example, you could use a box collision, sphere collision, or capsule collision component. If the PrimitiveComponent has no simple collision, the containment test will simply use the component bounds, which may be less accurate.
It is also possible to add simple collision to a mesh asset in Unreal (refer to Setting Up Collision With Static Meshes). However, for complex meshes, such as those with doorways and openings, it is sometimes necessary to 'use complex collision as simple' in the collision settings for the mesh (refer to Simple Vs Complex Collision). For example, this setting might be required to allow a character to enter a room through a doorway but still collide with the walls. When this setting is used, the containment tests for AkLateReverbComponent and AkRoomComponent will fail, as the simple collision will be ignored, and the mesh's full trimesh will be used. The simple collision tests used by AkLateReverbComponent and AkRoomComponent do not support trimeshes. For that reason, the recommended setup in a Blueprint class is to have a simple collision component as the parent when using AkLateReverbComponent component and AkRoomComponent. For example, the simple collision component could be a box, sphere, or capsule. If you have a specific mesh for a room or building, the simple collision component(s) could be added to the mesh as a child component(s).
| Note: It is possible to combine complex collision with simple collision by using two versions of the mesh. See Combining Simple and Complex Collision for an explanation on how this can be achieved. |
| Note: We will use assets from the Unreal Demo Game available from the Wwise Launcher. To use these assets in your project, download the Unreal Demo Game and locate the wanted assets in the explorer under $<YourWwiseProjectsFolder>/WwiseDemoGame/Content. Then copy and paste the desired assets to the Content folder of your working project. |
- In the content browser, right-click and select Blueprint Class.
- Select Actor as the base class, and call the new class 'SpatialAudioBP'.
- Double-click SpatialAudioBP to open the class, and click on the Viewport tab.
- Ensure the root component is selected and click Add Component > Static Mesh.
Click on the new static mesh component and select the mesh in the Details panel.
- In this example, the SpatialAudioDemoMesh used in section Unreal Project Preparation is selected.
- If you use the SpatialAudioDemoMesh, you need to select SpatialAudioDemoMeshMaterial in the Materials section.
 Set the Mesh and Material of the Static Mesh Component
Note:
Automatic assignment of rooms to portals only works for convex meshes. Concave meshes (e.g. L-shaped rooms) do not produce accurate portal room intersection.Add a box collision component for each of the individual rooms and doorways in the mesh.
- In this tutorial, the box collision components are called: BoxRoomLarge, BoxRoomSmall, BoxPortalInner, and BoxPortalOuter.
 Add Box Collision Components for the Rooms and Portals in Your Mesh
Repositioning Box Collision Components
At this point, all of the box collision components are positioned in the same place; on top of each other. We'll reposition, scale, and rotate them so that they align with the rooms and doorways. The easiest way to do this is to use the Orthographic view. (The following steps are specific to the SpatialAudioDemoMesh, but similar steps can be performed for other meshes.)
| Note: When aligning rooms and portals to the mesh in this tutorial, don't worry if they're not perfectly aligned or centered. Just be sure to roughly cover the correct areas. When designing a real environment, you can use the Transform section of the Details panel to input exact values. |
In the Viewport tab, click Perspective and change the view to Top.
- You are now looking down on the scene from above and it's rendered using wireframe.
 Orthographic Top View
- Select BoxRoomLarge and move it down along the y-axis until it's in the middle of the large room in the mesh.
Scale BoxRoomLarge along the x and y axes until its size matches the dimensions of the large room. (You can switch to scale by pressing R or selecting the Scale widget in the Viewport tab).
 Position and Scale Large Room on X and Y Axes
Select BoxRoomSmall and scale it along the x and y axes until its size matches the dimensions of the small room.
 Position and Scale Rooms on X and Y Axes
Select BoxPortalInner and zoom in on the wireframe until you see the extents of the inner doorway on the mesh.
 Locate Extents of the Doorway on the Wireframe Mesh
Move BoxPortalInner to the middle of the doorway and then scale it along the x-axis such that it covers the extent of the doorway.
 Position and Scale Inner Portal Box to Cover the Doorway
Select BoxPortalOuter and rotate it so that its local y dimension is pointing out of the doorway.
Note:
This is necessary because portals have front rooms and back rooms which are automatically assigned by detecting the closest intersecting room along the portal's y dimension. In the case of the BoxPortalOuter, the 'back' (in local coordinate space) will be connected to the small room in our mesh, and the 'front' will not be connected to any room.Rotate BoxPortalOuter around the z-axis by 90 degrees. This can be achieved by typing '90' into the z-axis Rotation text box in the Transform section of the Details panel.
 Rotate Outer Portal Box to Point its Local Y-Axis Out of the Door
- Move the BoxPortalOuter over the outer doorway and scale it so that it covers the extent of the door.
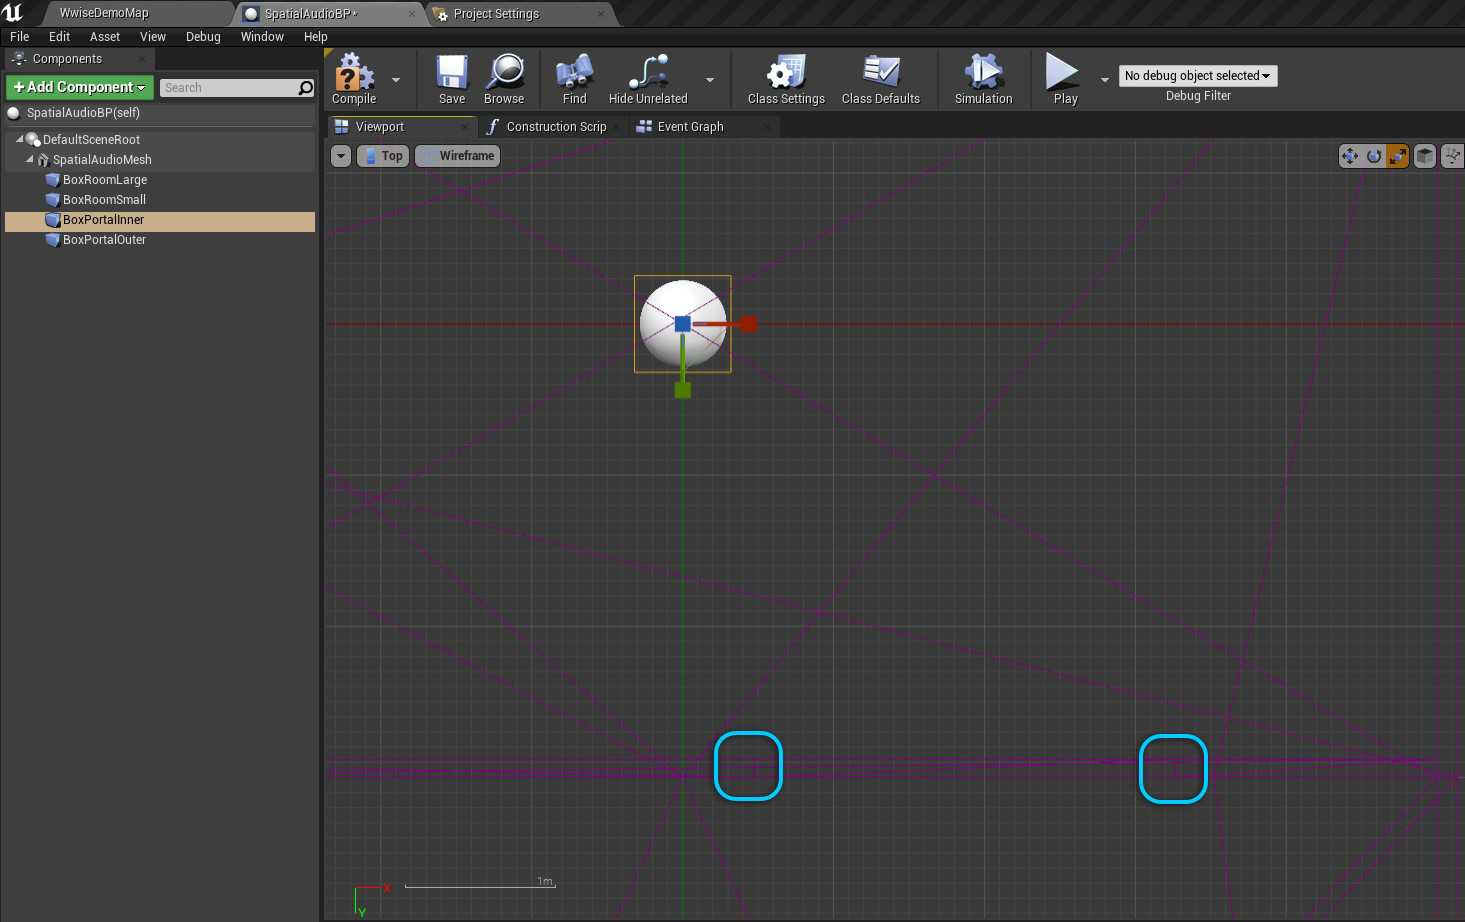
In the top view, ensure all rooms and portals are aligned with the mesh, as shown:
 Rooms and Portals Correctly Aligned in Top View
- You now need to reposition and scale the box collision components on the z-axis. In the Viewport tab, click Top and change the view to Back.
Select BoxRoomLarge and BoxRoomSmall and scale both along the z-axis so that they match the dimensions of the room.
 Scale Room Boxes on Z-Axis
Select BoxPortalOuter and BoxPortalInner and move them down to the center of the doorways, then scale them along the z-axis so they match the dimensions of the doors.
 Position and Scale Portal Boxes on Z-Axis
Setting Up Rooms and Portals
We will now add AkRoom components to the rooms, and AkPortal components to the portals.
- One by one, select each of the box collision components and then select Add Component.
For each box collision component, create a room or portal component (as appropriate) with a name similar to the parent. The result should be as shown:
 Add AkRoom Components to the Room Boxes and AkPortal Components to the Portal Boxes
Note:
Be sure to add the components to the correct parent. For example, when adding AkRoomLarge to the large room, make sure BoxRoomLarge is selected before clicking Add Component.AkRoomComponent and AkPortalComponent are generic components that can be added to any primitive component. See AkRoomComponent and AkPortalComponent for more information.
To confirm that the portals have valid placement, select the Visualize Rooms and Portals option in the Integration Settings.
 Visualize Rooms and Portals Option in the Integration Settings
Lines are now drawn between connected rooms and portals. If portals have invalid placement, they will be visualized in red.
 Portal Room Connections Visualized in the Viewport
Note:
A portal has invalid placement if it is not connected to any room, or if the same room is connected to both sides. See AkPortalComponent for further information.- Deselect the Visualize Rooms and Portals option in the Integration Settings.
Adding Geometry and Late Reverb
The last two items to add to the Blueprint class are AkGeometry and AkLateReverb components.
- Add an AkGeometry component to the static mesh component.
Add an AkLateReverb component to the BoxRoomLarge box collision component.
 AkGeometry and AkLateReverb Added to the Blueprint Class
- Click on the AkLateReverb component.
- In the Details panel, set the aux bus to LargeRoom.
Verifying your Setup
The Blueprint class is now ready to use. We can drag an instance of the class into the world.
- Drag an instance of SpatialAudioBP from the content browser into the spatial audio demo map.
Position it beside the existing building.
 An instance of the Blueprint Class Added to the World
- Remote connect Wwise, and play in editor.
- Click the mouse to play the outside sound.
- In the Game Object Profiler layout in Wwise, confirm that the geometry of the new Blueprint class is correctly registered, and that rays reflect correctly from this geometry.
Confirm that rays pass through the portals correctly in the new Blueprint structure.
 Spatial Audio Paths Correctly Interacting with the New Blueprint Class Instance
To test the late reverb component, you must add a sound and position it within the large room in our SpatialAudioBP instance. Right-click on the existing Play_Outside AkAmbientSound actor in the world and duplicate it.
 Duplicate the Existing Play_Outside Sound
- Rename the duplicate to 'Play_LargeRoom_BP'. (You could also detach Play_LargeRoom_BP from Button_Outside in the World Outliner hierarchy, by dragging Play_LargeRoom_BP on top of Button_Outside.)
Move Play_LargeRoom_BP inside the large room of our SpatilAudioBP instance.
 Position the Sound Within the Large Room
Open the Level Blueprint and add logic to play the Play_LargeRoom_BP sound when the B key is pressed (see Unreal Project Preparation step 3).
 Logic in the Level Blueprint to Play the New Sound Using the B Key
- Compile and save the Level Blueprint.
- Play in editor.
- Press B to play the new sound.
- Walk into the large room in the SpatialAudioBP building.
- You should hear the reverb applied.
Combining Simple and Complex Collision
| Note: This section is based on the 'SpatialAudioTutorialMap' and the assets found in the ComplexRoomDemo directory in the WwiseDemoGame project, which is available from the Audiokinetic Launcher. The pre-made mesh assets and a custom Blueprint class are used to combine simple collision and complex collision. |
This section shows how simple collision and complex collision can be combined for the same mesh, such that Spatial Audio containment tests are performed using the simple collision, and Unreal queries make use of the complex collision.
For complex meshes, such as those with doorways and openings, it is sometimes necessary to 'use complex collision as simple' in the collision settings for the mesh (refer to Simple Vs Complex Collision). For example, this setting might be required to allow a character to enter a room through a doorway but still collide with the walls. When this setting is used, the containment tests for AkLateReverbComponent and AkRoomComponent will fail, as the simple collision will be ignored, and the mesh's full trimesh will be used. The simple collision tests used by AkLateReverbComponent and AkRoomComponent do not support trimeshes.
One solution to this is to create two duplicates of the same mesh asset, using simple collision for one, and complex collision for the other. In the SpatialAudioTutorialMap, there is a complex room structure for which this technique has been used.
To begin, test out the complex room structure by playing in editor and walking around the building:
- Open the SpatialAudioTutorialMap in Unreal.
- Activate the 'Play in Editor' option.
- Press 'C' to trigger the sound in the non-box-shaped building.
 The Non-Box-Shaped Room in the SpatialAudioTutorialMap
- You can walk around the outside of the building and the sound will be occluded.
Follow along with the remainder of this tutorial to see how the building structure is set up to handle both simple collision, for Wwise Spatial Audio containment tests, and complex collision, for Unreal physics containment tests.
In the context browser, browse to WwiseAssets/SpatialAudioDemo/ComplexRoomDemo.
 The ComplexRoomDemo Assets in the SpatialAudioTutorialMap
This folder contains two Static Mesh assets - 'Building_Complex' and 'Building_Simple'.
- Open each of these assets and scroll to the collision settings in the Details Panel.
You will notice that they have different values assigned to the Collision Complexity property.
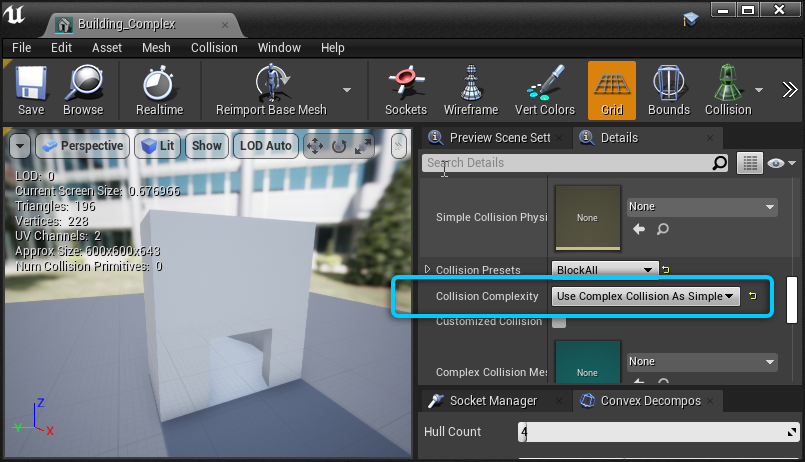

Building_Complex has Collision Complexity set to 'Use Complex Collision As Simple' which means Unreal will not generate any simplified geometry for this mesh, and will instead use the entire trimesh. This is what allows the character to walk through the doorway opening. Building_Simple has Collision Complexity set to 'Use Simple Collision As Complex' which means Unreal will generate simplified geometry and ignore the trimesh. This is what allows Spatial Audio to perform containment tests for room containment.
| Note: It is possible to set Collision Complexity to 'Simple And Complex'. However, this causes Unreal to use the simplified geometry for collision queries, which means the character cannot enter through the doorway opening. Instead, two identical meshes can be used - one with complex geometry and one with simple geometry. |
The next step is to combine both meshes inside a custom Blueprint class.
- Open the BuildingBP Blueprint.
This Blueprint uses two Static Mesh Components that are positioned right on top of one another.


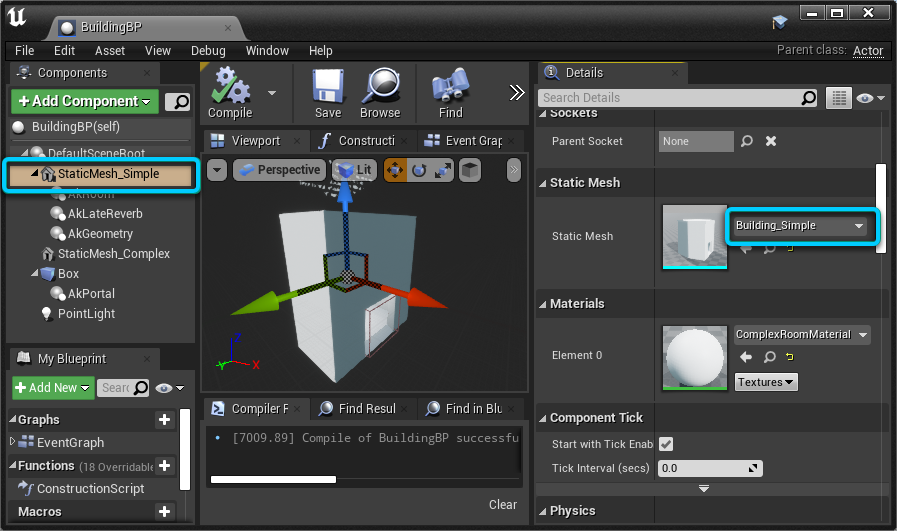

For the StaticMesh_Simple component, 'Visible' is disabled and 'Hidden in Game' is enabled in the Rendering section. This is because this mesh is only used for its simplified geometry, so that containment tests can be made for Spatial Audio.
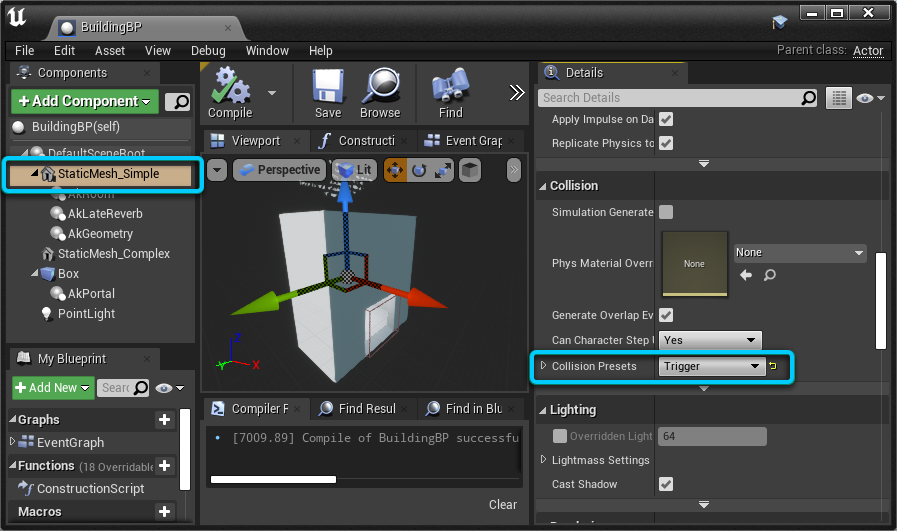
Also for the StaticMesh_Simple component, the Collision Presets property is set to 'Trigger'. The simplified geometry creates a barrier at the doorway opening. Using the 'Trigger' collision preset ensures the character and other game objects can freely move through the simplified geometry.
The StaticMesh_Simple Component has an AkRoom component and an AkLateReverb Component attached. This way, the simple collision of the Building_Simple mesh is used for room containment tests.
To allow for sounds to reflect and diffract on the BuildingBP's mesh, an AkGeometry Component needs to be added to one of the Static Mesh Components. In this solution, since we are also using Reverb Parameter Estimation, it is best to add it to the StaticMesh_Simple component. The AkLateReverb Component uses the Acoustic Textures of its sibling AkGeometry Component to calculate HF Damping. Setting the AkGeometry Component to Static Mesh sends the full complex geometry to Wwise Spatial Audio instead of its simple collision mesh.
Finally, a Box Collision Component with an AkPortal Component attached is used to add an acoustic portal to the doorway.

A Point Light is also added to make the interior of the building visible.
| Note: When sending geometry to Wwise, there is a limitation that each edge can have no more than two triangles connected. This should be taken into account when designing meshes to be used with Spatial Audio. |
| Note: When using the Game Object Profiler in Wwise, Room Extents will always be visualized as green cuboids, regardless of the geometry assigned to the room. |
| Note: Adding simple collision to meshes in Unreal will only work correctly when the mesh is convex. For more complex mesh structures, it is best to try to approximate the mesh using simple collision geometry. Simple collision primitives can be added to the mesh from the Collision menu in the Static Mesh editor. 
Adding Collision Primitives to a Mesh Asset |
Was this page helpful?
Need Support?
Questions? Problems? Need more info? Contact us, and we can help!
Visit our Support pageTell us about your project. We're here to help.
Register your project and we'll help you get started with no strings attached!
Get started with Wwise