-
-
-
-
-
-
-
-
-
-
-
-
-
-
-
-
Glossary
-
-
-
-
-
-
The Schematic View displays a graphical representation of the structure of your Wwise project. You can use the Schematic View to get an overview of a project, locate project objects, or analyze project structure one object at a time. The Schematic View includes icons representing each project object, the object names, and lines and nodes representing their relationships. You can customize how the Schematic View displays project object details as well.
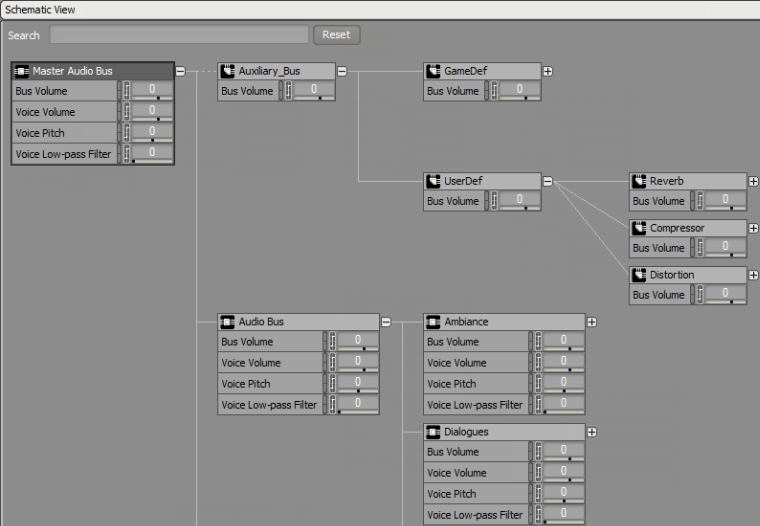 |
The Schematic View is made up of icons representing project objects and connectors representing their relationship to one another. The following table describes the connectors between project objects. For information on the icons representing project objects, refer to Understanding the visual elements in Wwise.
|
Icon |
Name |
Description | ||||
|---|---|---|---|---|---|---|
|
|
Solid line |
These lines connect parent and child objects. | ||||
|
|
Dashed line |
These lines connect busses to child objects to demonstrate routing. | ||||
|
|
Plus sign (white) |
Click to expand the schema and show all children of the object. | ||||
|
|
Plus sign (yellow) |
Click to show all children of the object, when not all children are currently displayed.
| ||||
|
|
Minus sign |
Click to collapse all children of the object. |
You can customize the information shown about each project object in the schema by using the Schematic View Settings.
To specify the information to be displayed in the Schematic View:
Click the options icon in the upper right corner of the Schematic View.
The Schematic View Settings dialog opens.
Select one or more of the following information types:
Icon Strip to display the row of icons representing object properties. If the object property has been changed, the icon is displayed in white and you can mouse over it for more information. If the property still has its default value, it is grayed out.
Mute/Solo to display the mute and solo buttons for each object.
Bus to display the bus through which the object is routed.
Conversion Settings to display the Conversion Settings ShareSet that is being used by the object.
Effect to display any effects that have been applied to the object.
Positioning Type to display the type of positioning (No Positioning, 3D Emitter, 3D Emitter with Automation, 3D Listener with Automation) applied to the object.
Game Parameters to display the Game Parameters affecting the object (through RTPCs).
State Group to display the State Group to which the object subscribes.
Advanced Settings to display any changes made to the Advanced Settings of an object (such as playback limit or volume threshold).
Volume to display the volume assigned to the object.
Pitch to display the pitch assigned to the object.
![[Note]](/images/2023.1.3_8471/?source=Help&id=note.png)
Note Pitch is not displayed for music objects, because it is not available for them.
Low Pass to display the Low-Pass Filter assigned to the object.
Click OK.
The Schematic View displays the information you selected for each project object.
You can find a project object quickly in the Schematic View by using the Search function.
To search for a project object in the Schematic View:
In the Search field, type the name of the project object you want to find.
Wwise highlights project objects matching the name you have entered and unrelated objects are hidden.
Click Reset to erase the Search field and reset the Schematic View.
| Note |
|---|---|
The search is not case-sensitive, and will find objects as you type in your search term. The search engine looks at the beginning of words, so typing “gun” will find “gun”, “big_gun”, and “gunner”, but not “shotgun”. |
You can simplify the project schema presented in the Schematic View by specifying one project object to be highlighted.
To highlight a project object in the Schematic View:
In the Schematic View, right-click a project object.
The shortcut menu is displayed.
From the shortcut menu, select Show in Schematic View.
The bus routing for the selected object is displayed. The object is highlighted, and unrelated objects are hidden.
To reset the Schematic View, click Clear.
![[Tip]](/images/2023.1.3_8471/?source=Help&id=tip.png) | Tip |
|---|---|
You can also drag an object from the Project Explorer to show it in the Schematic View. You can also right-click in the Property or Contents editors and select Show in Schematic View. |
You can use the controls displayed under each project object in the Schematic View to edit the object. These controls work identically to those in the Property Editor. For more information on using these controls, refer to Wwise interface basics.
 |
Use the Schematic View Settings to display these controls. For more information on these settings, refer to Setting the Schematic View display options.
If you prefer to edit object properties directly, you can quickly open the Property Editor for a project object from the Schematic View.
To open the Property Editor for a project object:
In the Schematic View, right-click a project object.
The shortcut menu is displayed.
From the shortcut menu, select Edit.
The Property Editor for that project object opens.
| Note |
|---|---|
You can leave the Schematic View open while you work in this Property Editor. The changes you make to a project object in the Property Editor are reflected immediately in the Schematic View. |
Was this page helpful?
Need Support?
Questions? Problems? Need more info? Contact us, and we can help!
Visit our Support pageTell us about your project. We're here to help.
Register your project and we'll help you get started with no strings attached!
Get started with Wwise