-
-
-
-
-
-
-
-
-
-
-
-
-
-
-
-
Glossary
-
-
-
-
-
-
A game is often released for multiple platforms. Consequently, it is essential to be able to specify the target platforms for a project. In Wwise, this is done via the Platform Manager.
In the Wwise menu bar, select Project > Platform Manager… to prompt the Platform Manager. Default Shortcut: Shift+Alt+P.
The Platform Manager, seen below, allows you to define the platforms for your game. A platform consists of a platform name and a base SDK. You can specify as many platforms as desired for any listed SDK.
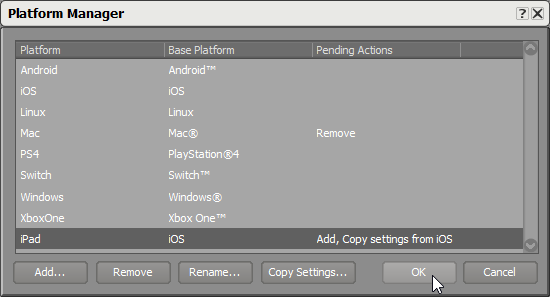 |
Wwise includes a list of base platforms which cover the primary SDKs used with Wwise, and you are free to create your platforms according to all the base platforms pertinent to your project. But, additionally, you may wish to add multiple platforms with the same base platform in order to accommodate differences.
For example, you may have both iPhone and iPad platforms to develop in your project. They are not exactly the same even though they are fundamentally iOS platforms. To facilitate your management of these distinct project types, you could create two iOS-based platforms: one specific to iPad and another specific to iPhone.
In the Platform Manager, click Add.
The Add Platform dialog is displayed.
![[Note]](/images/2023.1.3_8471/?source=Help&id=note.png)
Note If a platform is highlighted in the Platform Manager when clicking Add, then all three fields are populated with that platform's default information. Otherwise, the fields are populated with information from the alphabetically first listed platform.
Select a Base Platform from the list of SDKs.
The name field updates accordingly.
If needed, select Override Default Name. This activates the name field, where you can specify the new platform's name. It must be alphanumeric (no spaces, but underscores are accepted) and unique among all defined platform names.
![[Tip]](/images/2023.1.3_8471/?source=Help&id=tip.png)
Tip If possible, avoid overriding the default name because third-party Wwise plug-ins may reference it.
Optionally, select an existing platform to Copy settings from.
Click OK to confirm the new platform information and close the Add Platform dialog.
The new platform name, base platform, and pending actions ("Add" and possibly "Copy settings from") appear in their respective columns of the new bottom row of the Add Platform dialog.
Note If desired, you can click Remove to instantly delete a selected new entry.
Click OK to commit the newly added platforms.
A warning appears explaining that these platform changes cannot be undone.
Click Yes to proceed with the pending actions.
Another warning appears to remind you to verify the platform changes, especially in path names, after the project reloads.
Click OK to reload the project.
The project closes and reloads with the new platform settings. Depending on the size of your project, this may take a few seconds.
In the Platform Manager, select the listed platform you want to remove.
Click Remove.
The Pending Actions column of the selected platform is marked Remove.
Note To cancel the Remove action, you can close the Platform Manager or click Cancel.
Click OK to activate the removal of the selected platforms.
A warning appears explaining that these platform changes cannot be undone.
Click Yes to proceed with the pending actions.
Another warning appears to remind you to verify the platform changes, especially in path names, after the project reloads.
Click OK to reload the project.
The project closes and reloads with the new platform settings. Depending on the size of your project, this may take a few seconds.
You may select to copy the platform-specific settings from a previously defined platform over to another platform.
This could save you a lot of time if many of the platforms' settings should be the same.
In the Platform Manager, click Copy settings….
This prompts the Copy Platform Settings dialog.
Select the source platform in the From list.
Select the destination platform in the To list.
Click OK to commit the newly added platforms.
A warning appears explaining that these platform changes cannot be undone.
Click Yes to proceed with the pending actions.
Another warning appears to remind you to verify the platform changes, especially in path names, after the project reloads.
Click OK to reload the project.
The project closes and reloads with the new Platform-specific settings that are copied over from the source to the target platform:. Depending on the size of your project, this may take a few seconds.
![[Caution]](/images/2023.1.3_8471/?source=Help&id=caution.png) | Caution |
|---|---|
Be sure to have an up-to-date backup of your project in case you decide to revert these changes later. |
![[Warning]](/images/2023.1.3_8471/?source=Help&id=warning.png) | Warning |
|---|---|
This operation cannot be undone, and it will clear the Wwise-related contents on your clipboard and your Undo history. |
Related Topics
Was this page helpful?
Need Support?
Questions? Problems? Need more info? Contact us, and we can help!
Visit our Support pageTell us about your project. We're here to help.
Register your project and we'll help you get started with no strings attached!
Get started with Wwise