-
-
-
-
-
-
-
-
-
-
-
-
-
-
-
-
Glossary
-
-
-
-
-
-
Why is this sound so loud? Why can't I hear this sound? These are questions sound designers often ask. Through the hierarchy of sounds, Attenuations, Events, RTPCs, and busses, it can be difficult to find the cause of unexpected volume output levels in Wwise. The Voice Inspector allows users to quickly track down the volume drivers of any voice.
Upon selection of a sound in either the Voice Explorer or Voice Monitor, the dry path is automatically selected in the Voice Graph of the Voice Inspector, which displays the full hierarchy of the selected dry path in the Contribution List. All changes made to the Volume/LPF/HPF are displayed in the Contribution List including RTPCs, States, Distance and Cone Attenuations, and Event Actions. These are updated in real time and synced with the Performance Monitor/Voice Monitor time cursor, which allows users to compare values over time by moving the time cursor.
The Voice Explorer view contains all Game Objects that have at least one sound playing, whether physical or virtual, at a given time (specified by the time cursor of the Performance Monitor/Voice Monitor). One or multiple active sounds can be displayed under their corresponding Game Objects. When multiple instances of the same sound are currently playing on the same Game Object, the sound name appears multiple times under the Game Object. However, each instance has a different ID and its own Volume/LPF/HPF profiled independently.
Select a sound in the Voice Explorer to update the Voice Graph and Contribution List of the Voice Inspector. The dry path is selected by default. Only one sound can be displayed at a time.
Double-click on sounds to open the Property Editor. Right-click on a sound to display the standard shortcut menu.

The Voice Inspector view includes the Voice Graph on the left side and the Contribution List on the right side. The content displayed in this view pertains to the sound selected in either the Voice Explorer or Voice Monitor view.
The Voice Graph displays all the signal paths of the voice from the source to the output(s). Since the Volume/LPF/HPF properties can have different values across the signal paths, only one path is active at a time. The active path is represented by the highlighted connectors between the graph nodes. The property contributions along the selected path are reported in the Contribution List. The properties that are not part of the selected path are not displayed.

To display the property values of different paths, click on the graph node or on the wires belonging to the path you want. You can multiselect nodes (Ctrl+click) if you want to inspect a path that goes through multiple sends (common in Spatial Audio scenarios).
Standard Voice Graph operations, such as double-clicking and right-clicking, are available.

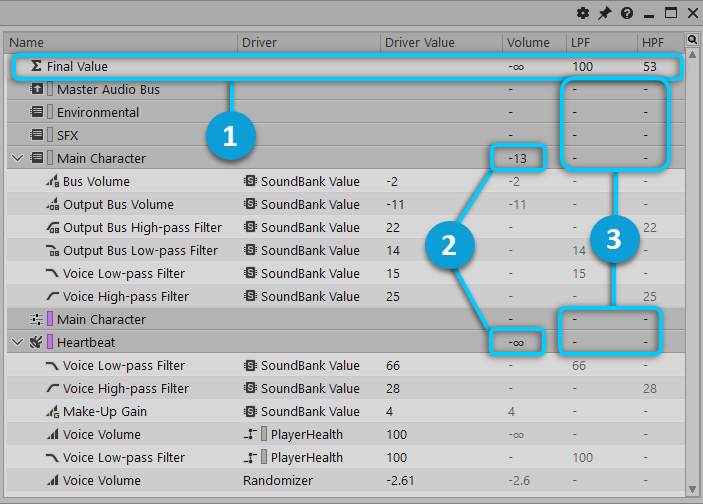
Select an object in the Voice Graph, such as the Master Audio Bus shown in the following image, to highlight the object and the associated path in the Voice Graph. This also highlights the object and its child objects in the Contribution List.

The Contribution List contains, for the selected voice path of the selected sound, all the parent objects from the Master-Mixer, Actor-Mixer, and Interactive Music hierarchies that modify the Volume/LPF/HPF, including all audio and Auxiliary Busses involved in mixing the selected sound.
The Contribution List displays the actual value for Volume/LPF/HPF under each object of the hierarchy. The Driver and Driver Value columns provide details about what caused the property change. You can go to the property page where the property is changed by double-clicking on the property name.
In the Contribution List, the accumulation of all modifications is reported at the top in the Final Value row. In the Volume column, a partial sum is provided for each of the applicable object rows. This indicates the volume modifications made directly on that node for the selected path. Note these partial sums are not provided in the LPF and HPF columns because the way in which they are accumulated varies depending on where the modification is applied in the voice pipeline; sometimes it's by addition, other times by taking the highest or lowest of the values.
 |
The accumulation of all modifications is indicated in the Final Value row. |
 |
Partial sums are indicated in the Volume column for each applicable object. |
 |
Partial sums are not indicated in the LPF and HPF columns. |
![[Note]](/images/2023.1.3_8471/?source=Help&id=note.png) | Note |
|---|---|
Values that were never modified are not reported at all. However, values that were once modified in the past, but have since come back to a neutral value (0 db), will continue to be displayed indefinitely. |
You can use the Voice Inspector either connected to a game or in Wwise authoring directly.
Setting up the Voice Inspector:
Go to the Voice Profiler layout (F11) or directly open the Voice Inspector view.
In the Voice Inspector, click the settings icon in the upper right corner or press Alt+G to open the Profiler Settings view.
Enable Voices Data and Voice Inspector Data.
Capturing data:
In the Project Explorer, add a Sound SFX with a source file. Set it to infinite looping.
In the Property Editor's RTPC tab, add one or more RTPC curves attached to at least one value (of Volume, LPF, or HPF).
Optionally, in the Property Editor's Positioning tab, add an Attenuation ShareSet, and in the Attenuation Editor, enable Cone Use.
In the Wwise toolbar, click Start Capture. (Alt+C)
In the Transport Control, play the sound. (spacebar)
Adjust different settings, such as:
In the Attenuation Editor, move the Distance and Cone Attenuations.
In the General Settings tab of the Master Audio Bus or the sound, change the base value of Volume, Pitch, Low-pass Filter, or High-pass Filter.
Stop the capture. (Alt+C)
At this point, the Voice Inspector has recorded all modifications to Volume/LPF/HPF on this voice. To see the modifications, observe the Voice Inspector while moving the time cursor in the Voice Monitor.
Observing the captured data:
Ensure you have the Voice Explorer, the Voice Inspector, and Voice Monitor views open. (By default, the Voice Profiler layout includes them all.)
Move the time cursor back in the Voice Monitor until you see your looping sound in the Voice Explorer. Select the sound in the Voice Explorer list.
Once a sound is selected in the Voice Explorer, its full signal flow voice is displayed in the left panel, the Voice Graph, of the Voice Inspector view. Selecting a node in the graph displays a specific voice path, which will update the right panel, the Contribution List, accordingly.
Move the time cursor back and forth in the Voice Monitor to see the modifications to Volume/LPF/HPF during the capture.
![[Tip]](/images/2023.1.3_8471/?source=Help&id=tip.png)
Tip Movement of the time cursor in either the Performance Monitor or Voice Monitor is synchronized with the other view.
To fully understand the values reported in the Voice Inspector, take note of the following.
In general, if the same Driver is affecting Volume, LPF, and/or HPF, it will use only one line.
Project Value/SoundBank Value: Ordinary values modified by sliders (such as the main volume slider of any sound) are normally written in a SoundBank and loaded by the game. Those values are reported as "SoundBank Value" when the profiler is connected to a game. When the profiler is used without a game connection (just starting a capture), the base sound properties will be reported as "Project Value". When connected to a game, any adjustment to those values done after the capture is started counts as a "Live Edit".
Live Edit: Changing a property value while connected to a game will be reported as a Live Edit entry in the Contribution List corresponding to the offset applied. Therefore, if the original volume was -10 dB and the slider was moved to -4, the Live Edit will show +6 and the SoundBank Value will remain unchanged. However, the sum of both will reflect the real volume of -4 dB. This is also true of values changed while not connected to the game. When connecting, Wwise pushes the new changes to the game and they will also show up as Live Edit. This is useful to identify stale SoundBanks that should be regenerated.
Note The Voice Inspector reports Live Edits differently depending on when you connect to a remote platform, when SoundBanks load, and whether you reconnect or recapture.
Values which are edited before connecting to a remote platform, where the edits are not included in generated SoundBanks, will be marked as Live Edit if they are loaded before their corresponding SoundBank loads. The SoundBank Value will be marked as 0—effectively ignoring it.
Live Edit values from the last capture may be marked as SoundBank Value when restarting the capture or reconnecting to the remote platform.
Event Actions: When multiple Actions are concurrently active, Set/Reset Volume/LPF/HPF only displays the effective value. For example, imagine you have a Play Event of an explosion with a first Set Volume Action setting it to an Absolute 30 dB, then a second Set Volume Action with a delay of 10 seconds that has a Relative -20 dB. Some 10 seconds after the Event is triggered, under the explosion voice object node would be a Voice Vol entry of 10. Further investigation of Set Volume Actions can be done via the Capture Log.
Attenuation: The Volume, LPF, and HPF values of an Attenuation correspond to its emitter-listener pair (also known as a "ray") values. When there are multiple listeners or multiple positions, the Attenuation values represent the maximum Volume and the minimum filter values among all of the Attenuation's emitter-listener pairs. Expand the Attenuation object node and then its respective rays to view details on any applicable Distance Attenuation, Cone Attenuation, Obstruction, and/or Occlusion values, which combine to constitute a ray's values.
Source: Fade Ins and Fade Outs from the Source Editor are not reported because they are baked in the audio file at conversion time.
Fades: Fades from Events (Play, Stop, Mute, Unmute, Pause, and Resume) appear only while they are actively changing the volume. Once the fade is complete the line reporting the fade will disappear from the Contribution List. Each source of a fade is reported separately.
RTPC: Changes due to RTPCs are shown with the Game Parameter as the Driver and the value of the parameter at the current time will be listed in the Driver Value column. The corresponding change, once the RTPC curve transforms the value, appears in the Volume, LPF or HPF column.
States: Changes due to States will list the State Group in Driver column and the current State in the Driver Value column. The corresponding change to properties appears in the Volume, LPF or HPF column.
HDR Window: The attenuation applied to sounds due to the HDR window will be reported as a Voice Volume (HDR) item, with the HDR bus as the Driver and the HDR Window volume as the Driver Value. The actual volume change in dB will be reported in the Volume column.
Room Bus Normalization: Auxiliary buses used in Spatial Audio to represent a room will normalize their output across the number of outgoing connections from that bus. A Room bus with two outgoing connections, for example, will often report -6 dB in the Voice Graph when you select either of those outgoing connections. This normalization is not otherwise reported in the Contribution List.
Cette page a-t-elle été utile ?
Besoin d'aide ?
Des questions ? Des problèmes ? Besoin de plus d'informations ? Contactez-nous, nous pouvons vous aider !
Visitez notre page d'AideDécrivez-nous de votre projet. Nous sommes là pour vous aider.
Enregistrez votre projet et nous vous aiderons à démarrer sans aucune obligation !
Partir du bon pied avec Wwise