-
-
-
-
-
-
-
-
-
-
-
-
-
-
-
-
Glossary
-
-
-
-
-
-
The Project Explorer is where you manage all the elements in your Wwise project. In each of its tabs, you can create, rename, cut, copy, paste, and delete the distinctive elements that are displayed in the tab's hierarchical structure. Each tab also includes a toolbar that allows you to quickly add parent and child objects to your project hierarchy. In this one central place, you can organize and manage the various elements of your Wwise project, including audio, music, and motion assets, Busses, Events, SoundBanks, Game Syncs, and so on.
The Project Explorer is also where you can divide up your project elements into Work Units so that each member of your team can work on different parts of the project at the same time. For more information on creating Work Units, refer to Dividing your project into Work Units.
The Project Explorer contains the following tabs:
Audio - Contains all the sound, music, motion, and Bus structures in your project.
Events - Contains all the events, both action and dialogue, in your project.
SoundBanks - Contains all the SoundBanks in your project.
Game Syncs - Contains all the States, Switches, Triggers, and Game Parameters in your project.
ShareSets - Contains all the Effect and Attenuation ShareSets in your project.
Sessions - Contains all the Soundcaster sessions in your project.
Queries - Contains all the queries in your project.
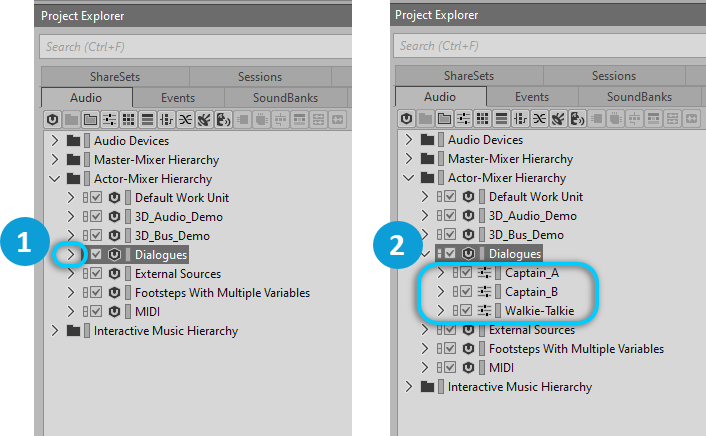
To navigate through the different levels in the Project Explorer, you can expand and collapse the groups by clicking the plus (+) and minus (-) signs beside each object. Hold Ctrl while clicking to expand/collapse all child nodes.
![[Tip]](/images/2023.1.3_8471/?source=Help&id=tip.png) | Expand and collapse group shortcuts |
|---|---|
Press the right and left cursor keys or the plus (+) and minus (-) keys in the number pad to expand or collapse a selected group one node level. You can also expand and collapse all child nodes within the groups by pressing slash (/) and asterisk (*) in the number pad. |
 |
Expand the Work Unit. |
 |
The contents of the Work Unit. |
Wwise uses a different icon to represent each object and element in your project to make it easy for you to identify the different object and element types within the Project Explorer and elsewhere in the interface. For a complete list and description of all icons, refer to Understanding the visual elements in Wwise.
Other visual elements, such as color, are used in the Project Explorer to help identify the status of certain objects. For example, the color of an object can specify whether it has an associated source, or whether it has been converted for a particular platform. The following table contains a list of the visual elements used in the Project Explorer.
|
Visual Element |
Example |
Usage |
Tab | |
|---|---|---|---|---|
|
Asterisk |
|
Changes have been made to one or more project elements inside the Work Unit. When you save your project, the asterisk will disappear. |
All | |
| Link icon |
|
The Link icon in gray indicates the settings for the object in question are applicable across platforms. Wwise allows you to simultaneously author on several platforms by linking and unlinking most of the property values associated with an object. By default, all property values across active platforms are linked and, therefore, set to the same value. Unlinking a property value allows you to customize it for a particular platform. For more information on linking and unlinking, refer to Customizing object properties per platform. |
Audio and ShareSets (for Effects and Audio Devices) | |
|
Check mark |
|
When a check mark is displayed beside the object name, the object is included in the current platform. When no check mark is displayed, the object is not included in the current platform. |
Audio and ShareSets (for Effects and Audio Devices) | |
|
Object name in red |
|
A Sound SFX or Music Track has been created but is not associated with a source. |
Audio | |
|
Object name in blue |
|
A Sound SFX or Music Track associated with a source that has not been converted for the current platform. |
Audio | |
|
Object name in white |
|
A sound or Music Track is associated with a source that has been converted for the current platform. |
Audio |
If you are using a source control plug-in, special overlay icons will be displayed over the Work Units in the Project Explorer to help you identify the status of your project files. For example, different icons are used for files that are marked for add, checked out, and checked in. For more information about the overlay icons, refer to Managing project files with a source control plug-in.
In the Project Explorer you can perform the standard Windows Explorer (or Mac Finder) commands such as renaming, cutting, copying, and pasting using the shortcut menu. You can also drag and drop project elements within the tabs as well as to other views within the Wwise interface. Keep in mind that whenever you move an object, you affect the parent child relationships. For information about building and managing these elements and their relationships, refer to the following sections:
In addition to the standard commands, the Project Explorer shortcut menu includes commands such as inclusion and exclusion, and tab-specific commands such as importing and converting audio files in the Audio tab and importing SoundBank definitions in the SoundBanks tab.
![[Note]](/images/2023.1.3_8471/?source=Help&id=note.png) | Note |
|---|---|
You can have multiple instances of the Project Explorer open at the same time within the same layout. |
Cette page a-t-elle été utile ?
Besoin d'aide ?
Des questions ? Des problèmes ? Besoin de plus d'informations ? Contactez-nous, nous pouvons vous aider !
Visitez notre page d'AideDécrivez-nous de votre projet. Nous sommes là pour vous aider.
Enregistrez votre projet et nous vous aiderons à démarrer sans aucune obligation !
Partir du bon pied avec Wwise