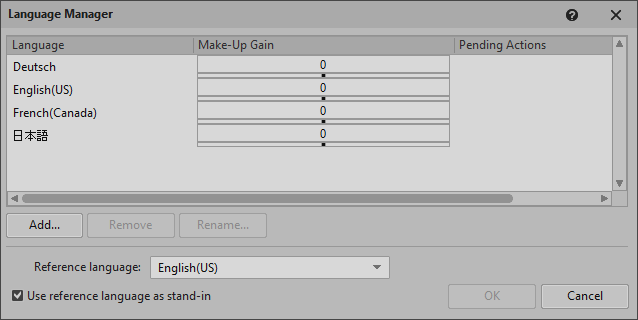
With the 「Language Manager」, you can define the languages used for 「Localizing your project」 and set a Make-Up Gain (volume offset) for each. You can also set the stand-in reference language.
All languages defined in a project are listed in the Language Selector in the toolbar and in the Contents Editor for Sound Voice objects. See 「Switching to a different project language」 and 「Contents Editor: Voice」.
To open the Language Manager, from the Wwise menu bar, click Project > Language Manager (Shift+J).
![[注意]](/images/2023.1.3_8471/?source=Help&id=caution.png) | 注意 |
|---|---|
These actions cannot be undone. We recommend you back up your project before proceeding. |
Addをクリックする。
In the Add Language dialog, enter a language name using any OS-supported characters.

OK をクリックします。
The Pending Actions column is updated. To remove or rename the new language, select it and click the respective button. To cancel the action, click Cancel.
Click OK to execute any pending actions. A message appears warning you that the changes cannot be undone.
Click Yes to proceed.
The Process Log might open with messages for the executed actions.
Select a language and click Remove.
The Pending Actions column is updated. To cancel the change, click Cancel.
Click OK to execute any pending actions. A message appears warning you that the changes cannot be undone.
Click Yes to proceed. Depending on your project setup, a message might appear warning that corresponding audio files and plug-ins will be deleted.
Click Yes to proceed.
The Process Log might open with messages for the executed actions.
Select a language and click Rename.
In the Rename Language dialog, enter the new language name using any OS-supported characters.

OK をクリックします。
The Pending Actions column is updated. To cancel the change, click Cancel.
Click OK to execute any pending actions. A message appears warning you that the changes cannot be undone.
Click Yes to proceed.
The Process Log might open with messages for the executed actions.
Because some language files might not be available when you add a language, you can set a reference language as a substitute for languages that are not yet ready. The conversion settings associated with the reference language can also be used as default conversion settings for other imported language files.
Reference languageリストでレファレンスランゲージを選択する。
Use reference language as stand-in is enabled by default. これを選択すると、オーディオファイルのローカライズしたバージョンがない場合は、そのランゲージのSoundBankに、レファレンスランゲージのオーディオファイルが代わりに入れられる。
Click OK to execute any pending actions. A message appears warning you that the changes cannot be undone.
Click Yes to proceed.
The Process Log opens with messages for the executed actions.
If your localized assets contain dialogue from different studios with different actors and recording conditions, you can balance them and match the levels for each language.
The Make-Up Gain is the volume gain in decibels applied to the voice after all other volume adjustments. メイクアップゲインは、Actor-Mixer Hierarchy全体を通して、加算される。See Understanding the voice pipeline and Using Loudness Normalization or Make-up gain to Adjust Volume.
ランゲージを選択する。
In the Make-up Gain column, use the slider to set a value from -24 to 24, or type it in.
Click OK to save the setting. If the volume offset of some files differs from that of their language, a message box appears offering to conserve or overwrite the file offset.
Click Conserve or Overwrite to continue.