
Continuous Workflow Improvement
Do you always strive to get the optimal workflow for your tasks? Identifying tedious and repetitive tasks should be part of your mandate, and you should take time or request help to improve your workflow on a continuous basis. You will save time over time. You already know all that, no? Do you put that in practice?
As part of your job, you use different tools every day. Some of these tools are customizable. Customization is one way of improving your workflow. This is the focus of this article.
That being said, there are a lot of ways to customize Wwise. Some are easy, some involve tweaking files, some involve a bit of programming. Today, we take a look at a few different techniques that you could use to make Wwise your own.
Introducing Command Add-ons
In Wwise, commands are executable fragments that can run on request of the user. Commands can be triggered using different mechanisms:
-
Keyboard Shortcuts (Refer to menu Project > Keyboard Shortcuts)
-
Context Menus & Main Menus
-
Control Surface
-
Wwise Authoring API (WAAPI) using ak.wwise.ui.commands.execute
As of Wwise 2018.1, there are over 200 built-in commands available for you to use. Commands can be seen in the Keyboard Shortcuts dialog, and most of them are listed here.
With Wwise 2018.1.2, we are introducing the Command Add-ons. Command add-ons allow you to create and add your own commands to Wwise. In summary, you can now execute an external program from Wwise. Command Add-ons are defined by the following attributes:
-
id: Defines a human readable unique ID for the command.
-
displayName: Defines the name displayed in the user interface.
-
program: Defines the program or script to run when the command is executed.
-
args: Defines the arguments for launching the program.
-
cwd: Defines the current working directory to execute the program.
-
defaultShortcut: Defines the shortcut to use by default for this command.
-
startMode: Specifies how to expand variables in the arguments field in case of multiple selection in the Wwise user interface.
-
contextMenu: Defines a context menu.
-
mainMenu: Defines a main menu.
The good news is that we defined a set of built-in variables that you can use in the args attribute. For example, you can retrieve the id, name, path or original wav file path of the selected objects, and pass it to the program you execute as arguments.This is actually the most important part: it gives you the ability to stay “in context” when executing your own code in Wwise. More on that later...
Adding WAV External Editor - New way
You probably already know the External Editor functionality in Wwise (Project > User Preferences > External Editors), which allows you to chose your favorite WAV file editors on your computer, and launch them directly from Wwise. This is one way of customizing Wwise, and it is very handy to quickly modify your WAV files without losing context.
Context is everything in an optimal workflow. Switching context adds a lot of overhead. Imagine you don’t use the External Editor. What steps are required to edit a WAV file?
-
Find your favorite WAV editor in Windows Start Menu
-
Use the Open File function in the WAV editor
-
Browse for the WAV file in the Wwise Project folder (can be quite tedious)
-
Edit the file
-
Save
By using the External Editor functionality, not only do you get rid of the first 3 steps, you actually eliminate the strongest workflow breakers: Find and Browse. These are mental operations that require considerable efforts; a context switch for your brain. Being able to only focus on your main task, editing the file, is a total life saver.
Now, we can push it a little further with the Command Add-ons I described in the previous section. Command add-ons can be used as a replacement for external editors, and it offers greater flexibility. However, it requires a little setup. Here are the step-by-step instructions to get you started:
The first step is to create the directory structure:
-
Windows: Go to %appdata%\Audiokinetic\Wwise
Mac: Go to ~/Library/Application Support/Wwise2018/Bottles/wwise/drive_c/users/crossover/Application Data/Audiokinetic/Wwise -
Create “Add-ons” directory
-
Create “Commands” directory
For the next step, you can use any modern text editor. I am personally using Visual Studio Code, which has good support for JSON editing. Create a new file under the Commands directory. Name it mycommands.json, and copy paste this content:
{
|
Now, fix the path to the exe. In this example, I am using Wavosaur, which is free and has a portable version. Keep in mind that you need to escape the backslash characters in JSON files. That means that you need to double each of the backslashes. On Mac, use single slashes.Also, I bound the “W” keyboard shortcut for this command. Feel free to change it. You can use a combination of keys, such as “Ctrl+Alt+W”. Please note that if the key is already in use within the Wwise keyboard shortcuts, the key you define will be ignored.Now you need to understand what “args”:“${sound:originalWavFilePath}” does. Wwise will automatically replace this variable with the actual WAV file path associated with the selected items in Wwise. If multiple objects are selected, Wwise will automatically expand the variable to space-separated paths. You can change this behavior by setting the startMode. Please refer to documentation for more information on the modes available.Ok, now restart Wwise, and try it. You should see a new entry in the context menu when you right click.
Trigger WAAPI in your Command
Now that you are able to launch any program from Wwise, why not trying to write your own program? I will try to guide you step-by-step. For this exercise, we will use Python with WAAPI.
Learn more about WAAPI here
Learn more about the WAAPI Python client.
The whole project can be found on github.
The Python code is located in offset_property.py. The first part of the script handles the arguments. When executed, the script is actually being passed a list of Wwise object ids, which are GUIDs. The object ids are determined by the selection in Wwise.
Next, the script connects to Wwise using WAAPI. This is done automatically when creating the WaapiClient object:
# Connect (default URL)
client = WaapiClient()
Then, the first operation is to retrieve the current volumes for the Wwise objects being passed as arguments. For that, we are using a WAAPI query, where we ask to return the volume and the object id for each of the specified object:
# Retrieve the volume and id for the selected objects
query = { 'from': { 'id': args.id }}
options = { 'return': ['id', '@Volume']}
result = client.call("ak.wwise.core.object.get", query, options=options)
Learn more about the WAAPI queries.
The last operation is to call setProperty on each object, with the new volume calculated.
# Set new volumes
|
See the complete script here.
Ok, now we need to call that script from Wwise, using the Command Add-ons. Make sure you use Wwise 2018.1.2 or later versions:
1. Make sure you have Python 3 installed on your computer
2. Clone or download the project on github.
3. Copy the file offset_property_commands.json to:
a. Windows: %appdata%\Audiokinetic\Wwise\Add-ons\Commands
b. Mac: ~/Library/Application Support/Wwise2018/Bottles/wwise/drive_c/users/crossover/Application Data/Audiokinetic/Wwise/Add-ons/Commands
4. Edit the file, and fix the path to offset_property.py, to where you did place the github project on your computer
5. Restart Wwise
6. Select objects, and use the keys - or = to increase or decrease volume.
Setup a Control Surface to execute script
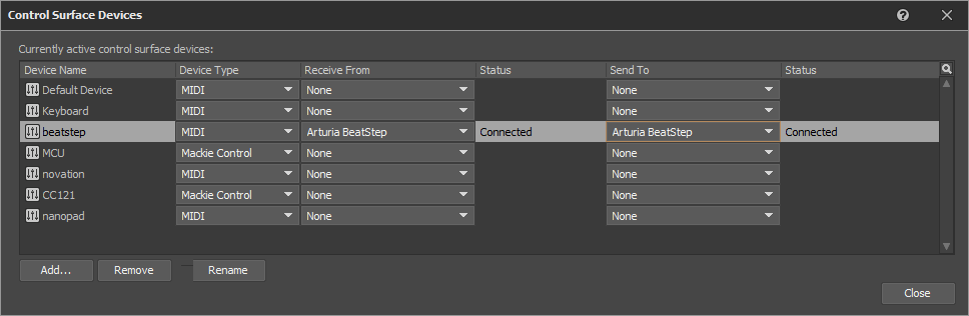
Now, we will push this a little further. We will be using that old midi controller sitting on our desk to trigger the new commands we created. Using buttons to change the volume is actually interesting because it allows for fine incremental changes to properties.
1. Add and connect your device to the Control Surface device list (Project > Control Surfaces):
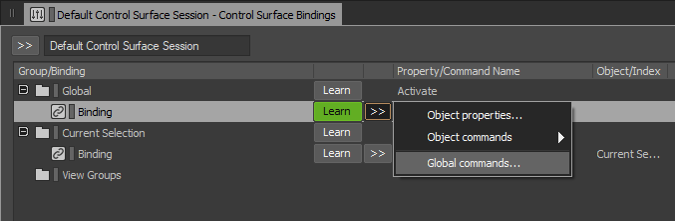
2. Then, open the Control Surface Bindings view and edit the Default Control Surface Session.
3. Add a global binding of type Global command:
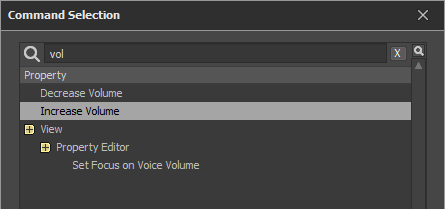
4. Search for the “volume” in the list of commands (Ctrl+F3 to search), and select Increase Volume. Click OK.
5. Hit the a button on your control surface:
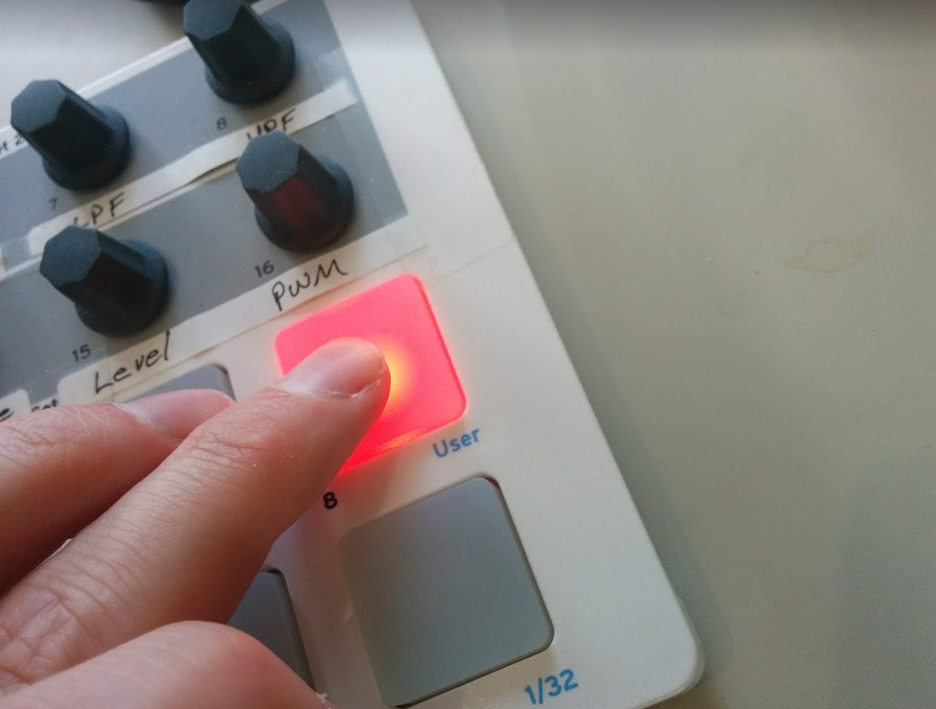
6. Repeat these steps for the Decrease Volume command
You should end up with something like this:

Now you can use your control surface anywhere in Wwise, any object selected will react to command triggered by the control surface.
Conclusion
This walkthrough was covering just a few examples of what could be done with the command add-ons. The possibilities are actually endless. Here are some other ideas:
-
Edit the work unit file in your favorite text editor
-
Trigger your game engine from an Event
-
Trigger text to speech synthesis for a Sound
-
Execute a mastering effect chain on a WAV file
-
Search JIRA with the name of the selected object
-
Copy to clipboard the object’s notes
-
Automate the creation of complex Wwise structures
-
Copy the generated SoundBank file to game directory
-
Trigger git commands on work units

댓글
Nikola Lukić
October 13, 2018 at 05:16 am
Hey Bernard, thanks for this great feature and extremely detailed tutorial on how to utilize this. I managed to create my custom command for Windows, but I have a small problem on MAC. How do I set program path for OSX? Here is my command: { "commands":[ { "id":"ak.edit_in_audacity", "displayName":"Edit in Audacity", "defaultShortcut":"Alt+A", "program":"/Applications/Audacity.app", "args":"${sound:originalWavFilePath}", "cwd":"", "contextMenu":{ "visibleFor":"Sound,MusicTrack" }, "mainMenu":{ "basePath":"Edit/Audacity" } } ] } The command is visible in Wwise, but when I run it I get either nothing or Wine Explorer. Thanks.
Bernard Rodrigue
October 15, 2018 at 07:46 am
Nikola, thank you reporting the issue. We will address it in the upcoming point release.
Bernard Rodrigue
October 31, 2018 at 12:00 pm
With Wwise 2018.1.3, Command add-ons are now supported on macOS.
Nikola Lukić
November 06, 2018 at 02:43 am
Thanks for the fix. Too bad I saw your comments just now. You should send email notifications to let us know when our comments have been replied.