The Schematic View displays a graphical representation of the structure of your Wwise project. You can use the Schematic View to get an overview of a project, locate project objects, or analyze project structure one object at a time. The Schematic View includes icons representing each project object, the object names, and lines and nodes representing their relationships. You can customize how the Schematic View displays project object details as well.
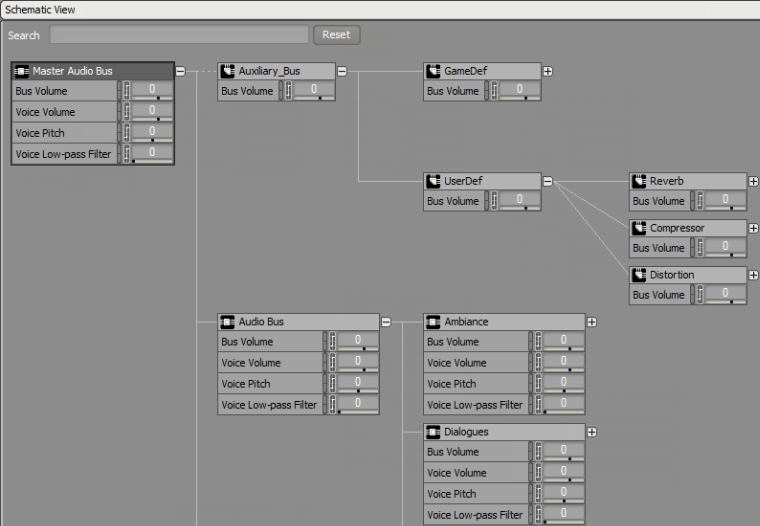 |
The Schematic View is made up of icons representing project objects and connectors representing their relationship to one another. 다음 표는 프로젝트 오브젝트 사이의 커넥터를 설명합니다. 프로젝트의 오브젝트를 표시하는 아이콘에 대한 정보는 “Understanding the visual elements in Wwise”을(를) 참조하세요.
|
아이콘 |
Name |
설명 | ||||
|---|---|---|---|---|---|---|
|
|
굵은 선 |
이 선은 상위 오브젝트와 하위 오브젝트를 연결합니다. | ||||
|
|
점선 |
이 선은 버스를 하위 오브젝트에 연결하여 라우팅 관계를 보여줍니다. | ||||
|
|
더하기 부호 (흰색) |
이 부호를 클릭하면 개요가 펼쳐져 오브젝트의 모든 하위 오브젝트를 보여줍니다. | ||||
|
|
더하기 부호 (노란색) |
이 부호를 클릭하면 현재 하위 오브젝트 중 일부만 보일 경우에 모든 하위 오브젝트를 보여줍니다.
| ||||
|
|
빼기 부호 |
이 부호를 클릭하면 모든 하위 오브젝트를 접습니다. |
Schematic View Settings를 사용하면 각 프로젝트 오브젝트의 개요에 표시할 정보를 맞춤화할 수 있습니다.
To specify the information to be displayed in the Schematic View:
Click the options icon in the upper right corner of the Schematic View.
The Schematic View Settings dialog opens.
다음 정보 유형 중 한 개 이상을 선택합니다.
Icon Strip을 선택하면 오브젝트 속성을 표시하는 아이콘 줄을 표시합니다. 오브젝트의 속성이 변경되면 이 아이콘이 흰색으로 표시되며 마우스를 가져다 놓아 추가 정보를 확인할 수 있습니다. 속성이 기본값을 유지하고 있을 경우 회색으로 표시됩니다.
Mute/Solo: 각 오브젝트의 뮤트와 솔로 버튼을 표시합니다.
Bus: 오브젝트가 라우팅되는 버스를 표시합니다.
Conversion Settings : 오브젝트가 사용하는 Conversion Settings ShareSet를 표시합니다.
Effect: 오브젝트에 적용된 모든 효과를 표시합니다.
Positioning Type은 오브젝트에 적용된 위치 지정 유형 (No Positioning, 3D Emitter, 3D Emitter with Automation, 3D Listener with Automation)을 표시합니다.
Game Parameters: (RTPC를 통해) 오브젝트에 작용하는 Game Parameter를 표시합니다.
State Group: 오브젝트가 구독(subscribe)하는 State Group을 표시합니다.
Advanced Settings: 재생 제한(playback limit)이나 볼륨 한계점(volume threshold)와 같은 오브젝트 Advanced Settings의 변화를 표시합니다
Volume: 오브젝트에 지정된 볼륨을 표시합니다.
Pitch: 오브젝트에 지정된 피치를 표시합니다.
![[참고]](/images/2023.1.3_8471/?source=Help&id=note.png)
참고 음악 오브젝트에는 피치 속성을 사용할 수 없기 때문에 표시되지 않습니다.
Low Pass: 오브젝트에 부여된 Low-Pass Filter를 표시합니다.
OK를 클릭합니다.
Schematic View가 지금 선택한 정보를 각 프로젝트 오브젝트에 표시합니다.
You can find a project object quickly in the Schematic View by using the Search function.
To search for a project object in the Schematic View:
Search 입력란에 찾고자 하는 프로젝트 오브젝트의 이름을 입력합니다.
Wwise가 입력된 이름과 일치하는 프로젝트 오브젝트를 강조 표시하며 관련없는 오브젝트는 숨깁니다.
Click Reset to erase the Search field and reset the Schematic View.
| 참고 |
|---|---|
검색 기능은 대소문자를 구별하지 않으며 검색어를 입력하는 대로 오브젝트를 검색합니다. 검색 엔진은 글자의 시작 부분을 확인하기 때문에 'gun'을 입력하면 'gun', 'big_gun', 'gunner'이 결과로 나오지만 'shotgun'은 찾을 수 없습니다. |
You can simplify the project schema presented in the Schematic View by specifying one project object to be highlighted.
To highlight a project object in the Schematic View:
In the Schematic View, right-click a project object.
바로가기 메뉴가 나타납니다.
바로가기 메뉴에서 Show in Schematic View를 선택합니다.
선택한 오브젝트의 버스 라우팅이 표시됩니다. 오브젝트가 강조 표시되며 관련 없는 오브젝트는 숨겨집니다.
To reset the Schematic View, click Clear.
![[작은 정보]](/images/2023.1.3_8471/?source=Help&id=tip.png) | 작은 정보 |
|---|---|
You can also drag an object from the Project Explorer to show it in the Schematic View. 그리고 Property/Contents Editor에서 우클릭하여 Show in Schematic View를 선택하는 것도 가능합니다. |
You can use the controls displayed under each project object in the Schematic View to edit the object. 이 컨트롤은 Property Editor에서 제공하는 컨트롤과 동일합니다. 이러한 컨트롤 사용에 대한 더 많은 정보는 Wwise interface basics을(를) 참조하세요.
 |
Schematic View Settings에서 이 컨트롤을 표시하도록 체크합니다. 이 설정 사용하기에 대한 더 많은 정보는 “Setting the Schematic View display options”을(를) 참조하세요.
If you prefer to edit object properties directly, you can quickly open the Property Editor for a project object from the Schematic View.
오브젝트의 Property Editor를 여는 방법:
In the Schematic View, right-click a project object.
바로가기 메뉴가 나타납니다.
바로가기 메뉴에서 Edit을 선택합니다.
해당 프로젝트 오브젝트의 Property Editor가 열립니다.
| 참고 |
|---|---|
You can leave the Schematic View open while you work in this Property Editor. The changes you make to a project object in the Property Editor are reflected immediately in the Schematic View. |
이 페이지가 도움이 되었나요?
작업하는 프로젝트에 대해 알려주세요. 언제든지 도와드릴 준비가 되어 있습니다.
프로젝트를 등록하세요. 아무런 조건이나 의무 사항 없이 빠른 시작을 도와드리겠습니다.
Wwise를 시작해 보세요