|
Wwise Unreal Integration Documentation
|
This tutorial presents the Spatial Audio features introduced in the Unreal Wwise integration. It explains the workflow to integrate spatial audio in a game and provides technical information about initializing spatial audio features (such as 3D busses, 3D-spatialized Sound SFX, or the Reflect Effect plug-in) in the Wwise authoring tool.
This tutorial is separated into multiple sections. Section A will help you prepare a project and each following one will talk about a different Spatial Audio feature. They can be followed independently.
 |
Note: Generating soundbanks in sections using the Reflect plug-in require the appropriate license. |
- A - Preparation for the Spatial Audio Tutorials
- B - Reflect
- C - Rooms and Portals
- D - Diffraction
- E - Transmission
A - Preparation for the Spatial Audio Tutorials
|
Note: A map with the parameters for all tutorials is available as part of the Unreal Demo Game available from the Wwise Launcher. You can skip this section if you want to follow along with that map. It is called SpatialAudioTutorialMap. |
A.1. Create a new project
Follow the steps below (based on the use of Wwise 2019.2 and Unreal 4.24), in order to build your working environment.
- Launch Unreal from the Epic launcher.
- Create a new Unreal Project C++ Blank project (without starter content).
- Close Unreal.
- Start the Wwise Launcher.
- Install Wwise.
- Select the Unreal Engine tab.
- Click the Integrate Wwise into Project... button.
- Launch Wwise using the Open in Wwise button.
- Launch Unreal using the Open in Unreal button.
A.2. Wwise Project Preparation
For the tutorial, you will need a Sound SFX and an Event to play it.
- In the Wwise project, create a new Sound SFX in the Default Work Unit of the Actor-Mixer Hierarchy and import a sound.
- Make sure to enable Use game-defined auxiliary sends in the General Settings tab.
 Create Sound SFX
 - In the Positioning tab, enable Listener Relative Routing, set 3D Spatialization to Position + Orientation and add an Attenuation with a Max distance of 5000.
 Set 3D Spatialization to Position + Orientation
- Make sure to enable Use game-defined auxiliary sends in the General Settings tab.
- Right-click on the Sound SFX within the Actor-Mixer Hierarchy, then select New Event > Play.
 Create sound Event
 - Save the project.
A.3. Unreal Project Preparation
- Create a floor, a building with two rooms and an obstacle outside using your preferred method. In the SpatialAudioTutorialMap, we used a custom mesh for the building and a basic cube static mesh component for the obstacle outside.
- Place emitters in the scene:
- Drag the Event created in the previous subsection from the Waapi Picker to the Content Browser.
 Drag from Wwise Picker to the Content Browser
- Double-click the Event in the Content Browser and create a new SoundBank directly from the SoundBank list.
 Create SoundBank
 Select SoundBank
- Double-click the Event in the Content Browser and create a new SoundBank directly from the SoundBank list.
- Drag the Event into the scene to create new
AkAmbientSoundactors.- Place one of them outside and one in each room.
 SpatialAudioTutorialMap
- Place one of them outside and one in each room.
- Drag the Event created in the previous subsection from the Waapi Picker to the Content Browser.
- Open the Level Blueprint from the Blueprints menu and remove "Event BeginPlay" and "Event Tick".
- Trigger events with user input.
- Drag a newly created AkAmbientSound from the World Outliner into the blueprint.
- Find the "Post Associated Ak Event" function from the AkAmbientSound node.
- Right-click the blueprint background and search for "Left Mouse Button".
- Connect the Pressed outlet to the "Post Associated Ak Event" Exec.
- Repeat the same steps for all the AkAmbientSound items.
 Add user input to trigger ambient sound
 - Save and close the Level Blueprint.
- Trigger events with user input.
A.4. Verify your Setup
- In the upper menu, select Build > Generate SoundBanks.... to generate the SoundBanks for Windows.
- Make sure the banks are successfully generated in the Output Log.
 Generate SoundBanks from build menu
- Make sure the banks are successfully generated in the Output Log.
- Start the scene. When pressing the respective buttons, you should now hear the sounds play, spatialized in 3D.
- Connect to Wwise Authoring and open the Profiler layout (shortcut F6).
- When playing a sound in the scene, you should see a graph similar to the following one.
 Outside button Voices Graph
- When playing a sound in the scene, you should see a graph similar to the following one.
B - Reflect
In this section, we will use Spatial Audio Geometry to send reflective surfaces to the Reflect plug-in. It will simulate the early reflection implied by the propagation of sound in an acoustic environment.
B.1. Wwise Project
- To have access to factory Acoustic Textures as well as a preset for the early reflection Auxiliary Bus, you need to import the Reflect Factory Assets.
- Navigate to Project > Import Factory Assets...
- Choose Reflect and press OK.
- Create an early reflection Auxiliary Bus using the factory preset:
- In the Master-Mixer Hierarchy, right-click on the Master Audio Bus
- Navigate to New Child > Presets and select Early Reflection Auxiliary Bus
- In the Effects tab, double-click on the effect and
- set the Max Distance to at least 5,000, which is the maximum distance attenuation of the sound we set in A.2. Wwise Project Preparation
- set the Speed of Sound to 34,500
 Set Reflect Speed of Sound and Max Distance
- In the Effects tab, double-click on the effect and
- Navigate to the Sound SFX Sound Property Editor of the sound created in A.2. Wwise Project Preparation.
- In the General Settings tab, add the new Auxiliary Bus with the Reflect Effect under Early Reflections
 Enable Reflect on a Sound in Wwise
- In the General Settings tab, add the new Auxiliary Bus with the Reflect Effect under Early Reflections
- Save the project.
B.2. Unreal Project
In the project, we want our building, the floor and the obstacle to reflect sounds. There are two ways to do that, with an AkSpatialAudioVolume or with the AkGeometryComponent.
The AkGeometryComponent can be added to static mesh actors. It will automatically send the static mesh geometry to spatial audio. It can also be configured to send the simple collision mesh. It is best to use this component for simple shapes. You don't want to send too many triangles to spatial audio, it can quickly become computationally expensive.
The AkSpatialAudioVolume is a brush volume. It has to be added and transformed manually around objects. If your static mesh is complex, you can use this volume to create a simple shape around it.
- In the SpatialAudioTutorialMap, the obstacle is a basic static mesh. We can easily add an AkGeometryComponent to it.
- Click on the actor and click on Add Component. Choose Ak Geometry.
- In the Geometry section, choose Simple Collision
 AkGeometryComponent
- In the Geometry section, choose Simple Collision
- Click on the actor and click on Add Component. Choose Ak Geometry.
- Repeat the same steps for the floor.
- In the SpatialAudioTutorialMap, the building is made out of a custom mesh. The shape is still basic enough to use an AkGeometryComponent, but for the sake of this tutorial, we will use AkSpatialAudioVolume. The only drawback of using AkSpatialAudioVolumes is that it is tedious to create openings at the position of the doors of the building.
- Drag and drop three
AkSpatialAudioVolumesinto the scene- Set one around the building for the exterior walls.
- Set the two others around each room for the interior walls.
- Make sure that "Enable Surface Reflectors" is enabled for all three
AkSpatialAudioVolumes.- Leave "Enable Room" and "Enable Late Reverb" unchecked, we will talk about them in C - Rooms and Portals.
 Spatial Audio Volume with Enable Surface Reflectors enabled
- Leave "Enable Room" and "Enable Late Reverb" unchecked, we will talk about them in C - Rooms and Portals.
- Drag and drop three
B.3. Verify your Setup
- Generate SoundBanks.
- Start the scene and connect to Wwise Authoring.
- In the Advanced Profiler's Voices Graph view, you should see a new auxiliary send with the Reflect Effect.
- At the initial position of the player, play the sound placed outside.
 Outside button Voices Graph with Reflect
Note:
If you play either of the sounds from the rooms while the player is outside, you will neither hear the sound nor see any reflect sends. That's because we created closed AkSpatialAudioVolumes around the building and each room. You can create openings in them by modifying the brush object, or use Spatial Audio Portals (seen in C - Rooms and Portals). - Before going to the next step, open the Profiler Settings view and make sure Spatial Audio is enabled.
- At the initial position of the player, play the sound placed outside.
- Navigate to the Game Object Profiler layout (shortcut F12).
- Make sure you watch the player camera and the three emitters.
- In the Game Object 3D Viewer, you should see the different reflective surfaces.
- When playing a sound, early reflection rays will be drawn to show where the sound will be coming from.
 Game Object 3D Viewer with early reflections
 - If you can't see rays, make sure Reflection Paths is enabled in the Game Object 3D Viewer Settings.
 Game Object 3D Viewer with early reflections
- In the Advanced Profiler's Voices Graph view, you should see a new auxiliary send with the Reflect Effect.
|
Note: If you can't see any geometry in the Game Object 3D viewer, you may need to increase the Monitor Queue Pool Size. The setting is located in the Initialization settings. |
C - Rooms and Portals
In a realistic acoustic environment, sounds coming from an enclosed space will come out from openings such as doors and windows. Spatial Audio Rooms and Portals will simulate this effect by emitting sounds that are played in a room only from a portal.
C.1. Wwise Project
- In the Wwise project, create new Auxiliary Busses for each of the rooms.
- Right-click where you want to add a child Auxiliary Bus
- Navigate to New Child > Presets and select Room Auxiliary Bus
- In the Effects tab, you can tweak the RoomVerb Effect.
 Add a reverb effect to the Auxiliary Bus
- In the Effects tab, you can tweak the RoomVerb Effect.
- Navigate to the Sound SFX from A.2. Wwise Project Preparation.
- In the Positioning tab, make sure the "Enable Diffraction" checkbox is ticked.
 Enable diffraction on the sound in Wwise
- In the Positioning tab, make sure the "Enable Diffraction" checkbox is ticked.
- Save the project.
C.2. Unreal Project
- In Unreal, drag and drop the new Auxiliary Busses from the Waapi Picker to the Content Browser.
- Double-click them and assign them to the bank.
- Select the AkSpatialAudioVolumes placed on each of the rooms created in B.2. Unreal Project.
- Make sure the "Enable Late Reverb" and "Enable Room" are both enabled.
- In the Late Reverb Section, drag and drop the new imported Auxiliary Bus from the Content Browser to the Aux Bus parameters.
- Add two
AkAcousticPortals.- Place them around the openings of the building.
- Select the portals and set their initial state to Open in the "Ak Acoustic Portal" section.
 Drag acoustic portals into the scene
|
Note: An AkAcousticPortal must be oriented in a way that the rooms it will link between are positioned on its local Y axis. When selecting a portal, a yellow ribbon appears around the portal to help visualize it. The yellow line represents the separation between the front and back areas. The highest priority room will be chosen in case of overlapping rooms. |
C.3. Verify your Setup
- Generate the SoundBanks for Windows.
- Start the scene and stay at the start location. You should now hear the sounds of both rooms when triggering them.
- Connect to Wwise Authoring and navigate to the Game Object Profiler layout (shortcut F12). In the Game Object 3D Viewer:
- You should see the new portals.
- Under each emitter, you should see the room in which they are placed.
- When moving the listener through rooms, its room will change too.
 Game Object 3D Viewer using Rooms and Portals
 - When playing a sound in a different room than the listener (with no direct line of sight):
- You will hear sound because portals cut through reflective surfaces.
- You will see early reflection paths going through the portal.
- You will see a sound propagation path diffracting on the edge of the portal.
 Spatial Audio paths in the Game Object 3D Viewer
|
Note: If the world contains one or more spatial audio rooms, then the behavior of the occlusion/obstruction algorithm changes to use the additional information that spatial audio rooms provide. If the line-of-sight test between the emitter and listener fails, one of the following happens.
|
In Wwise, you can fine-tune the filter response of the portal shadow region under the Obstruction/Occlusion tab in Project Settings.


C.4. Portals and Reverb
Sound emitting through Portals can reverberate into the room the listener is currently in. These steps show how it was configured in the Spatial Audio Tutorial map.
- In the Wwise project,
- Find the Auxiliary Bus used for the Room Reverb. The room where sound is emitted from that we want to feed to other room reverbs.
- In the General Settings of the Auxiliary Bus Property Editor, make sure use game-defined auxiliary sends is enabled.
 Enable 'Use game-defined auxiliary sends' of a room Auxiliary Bus.
- In the General Settings of the Auxiliary Bus Property Editor, make sure use game-defined auxiliary sends is enabled.
- Find the Auxiliary Bus used for the Room Reverb. The room where sound is emitted from that we want to feed to other room reverbs.
- Generate Soundbanks, start the scene and connect to the Wwise Authoring.
- Play the sound in the room with enabled auxiliary sends and navigate to a communicating room.
- You should see that the wet part of the emitting sound will also feed the reverb of the room the listener is in.
 SmallRoom reverb feeds into LargeRoom reverb.
- You should see that the wet part of the emitting sound will also feed the reverb of the room the listener is in.
C.5. Room Tones
Sometimes, rooms have a specific ambient sound like the buzzing sound of air conditionning. To recreate this, you can post an event on the Spatial Audio Room game object. When the listener will be in the room, the sound will be positionned at its location. When in a different room, the listener will hear the room tone from the portals connecting the room to the position of the listener.
- In the Wwise project,
- Create new Sound SFX for the room tone.
- Enable 'Use game-defined aux sends' if you want the sound to send to reverb
- Add an attenuation, if desired, for distance attenuation curves.
- Create a play event with the room tone by right-clicking on the Sound SFX, then selecting New Event > Play.
- Create new Sound SFX for the room tone.
- In Unreal,
- Drag the Event created in the previous subsection from the Waapi Picker to the Content Browser.
- Add this event to the Ak Audio Event parameter, under the Ak Event section, of one of your rooms.
- Adjust the Aux Send Level to feed some of the sound to the reverb of the room.
- You can choose to check the Auto Post box to post the room tone event on BeginPlay, or you can call the same blueprint functions usually used to post events on game objects.
 The AkEvent section of a Spatial Audio Volume with Room enabled.
- In the Spatial Audio Tutorial map, we used blueprint functions in the Level Blueprint to activate and deactivate the room tone.
- While having the AkSpatialAudioVolume with a room tone selected in the World Outliner, right-click in the Level Blueprint to create a reference.
- Drag a connection from the reference and search for "Post Associated Ak Event".
- In the same way, search for the Stop function.
- Add a key press as an input node.
 Play and stop a room tone from the Level Blueprint
- Generate SoundBanks.
- Start the scene and connect to Wwise Authoring.
- Navigate to the room with a room tone and press the key to start the room tone. Verify that you can hear it.
- In the Advanced Profiler view, you should see the event being played.
 Advanced Profiler view when playing a room tone
 - In the 3D Game Object Viewer, you can watch the room game object as you move the listener around.
- If the listener is in the room, the room will emit at the position of the listener. You will see the room game object follow the listener game object.
- If the listener is in a different room, the room game object will be placed at the portal and a path will be drawn between it and the listener game object.
 Watch the room game object in the Game Object 3D Viewer
- In the Advanced Profiler view, you should see the event being played.
D - Diffraction
When the line of sight between the emitter and the listener is obstructed by an object, Spatial Audio can create diffraction paths that will go around the object and simulate a realistic behavior. Depending on the angle of the path around an edge, the sound will be attenuated with obstruction.
|
Note: When using Spatial Audio diffraction, disable unreal engine side obstruction/occlusion. Set the Occlusion Refresh Interval of your emitters (AkComponent) to 0. |
In the SpatialAudioTutorialMap, we can add Spatial Audio diffraction around the obstacle outside and the exterior walls of the building.
- In the Wwise project, make sure that diffraction is enabled on the Sound SFXs that are emitted by the emitters we want to use diffraction for.
- Enable Diffraction in the Positioning tab of the Sound Property Editor.
- In Unreal,
- Click on each AkAmbientSound actors that will be emitting diffraction enabled sounds.
- Set Occlusion Refresh Interval to 0.
- Click on the AkSpatialAudioVolume for the exterior walls of the building.
- In the Acoustic Surface Properties section, enable Diffraction by checking the checkbox.
- Click the obstacle static mesh outside.
- In the Geometry section, under Diffraction, enable Diffraction by checking the checkbox.
- Click on each AkAmbientSound actors that will be emitting diffraction enabled sounds.
- Generate SoundBanks.
- Play and connect to Wwise.
- You should be able to see diffraction edges on the diffraction-enabled geometries and diffraction paths when a diffraction-enabled sound is played while it is obstructed from the listener.
 Diffraction paths in the Game Object 3D Viewer
- You should be able to see diffraction edges on the diffraction-enabled geometries and diffraction paths when a diffraction-enabled sound is played while it is obstructed from the listener.
E - Transmission
When an object appears between the emitter and the listener, the sound can also pass through the object. Spatial Audio models this phenomena by applying occlusion filtering on the direct path of the sound. Occlusion values ranging from 0 to 1 can be applied on an AkSpatialAudioVolume or AkGeometry components. The occlusion value is then sent to Wwise where the associated filter is applied according to the occlusion curves of the project. Typically, a value of 1.0 represents full occlusion, and a value of 0.0 indicates that sound can be transmitted through the geometry.
- Enable transmission in the spatial audio init settings
 Spatial Audio Init Settings
 - The transmission value of a sound is the maximum occlusion value of spatial audio geometries or rooms that the sound encounters in a direct path from the emitter to the listener.
- On AkSpatialAudioVolume components,
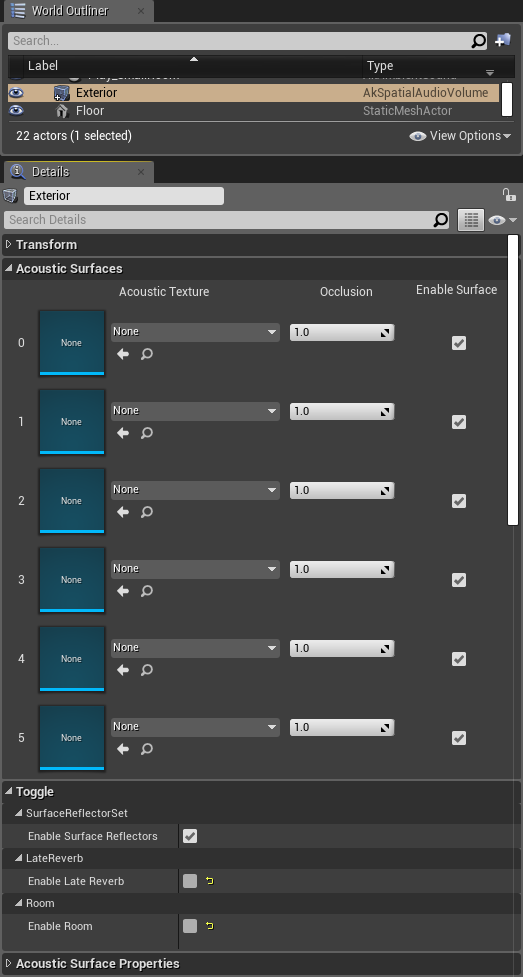
- an occlusion value can be associated with each acoustic surface, if the component enables surface reflectors
 Occlusion Values for each acoustic surface
 - an occlusion value can be associated to the walls of the room in Wall Occlusion, if the component enables room.
 Wall Occlusion of the Room
- an occlusion value can be associated with each acoustic surface, if the component enables surface reflectors
- On AkGeometry components,
- the occlusion value can be overriden in the Acoustic Properties Override parameter
- for the collision mesh
 Override the occlusion value of the simple collision mesh in the AkGeometry component
 - or for each material of the static mesh
 Override the occlusion value of the static mesh in the AkGeometry component
- for the collision mesh
- the occlusion value can also be set per Physical Materials in the AkGeometry Surface Properties Map of the Integration Settings
 Associate occlusion values to Physical Materials
- the occlusion value can be overriden in the Acoustic Properties Override parameter
- On AkSpatialAudioVolume components,
- Adjust the occlusion curves in Wwise Authoring in the Obstruction/Occlusion tab of the Project Settings.
 Occlusion volume curve
 Occlusion LPF curve
Was this page helpful?
Need Support?
Questions? Problems? Need more info? Contact us, and we can help!
Visit our Support pageTell us about your project. We're here to help.
Register your project and we'll help you get started with no strings attached!
Get started with Wwise