While exploring the SoundSeed Grain granular synthesis, please keep the following tips in mind.
In Wwise, live monitoring needs to be explicitly enabled. Do so by clicking the Start Capture button in the top bar, below the menu bar. Also make sure that Follow Capture Time, the button on its right, is enabled, unless you want to see values back in time. With capture enabled, the Grain Visualizer, Slider Feedback and VU Meter all come to life and make designing with the synthesizer much easier.
 |
SoundSeed Grain does not feature a preview mode of the file loaded in it without granulation. One way to audition your file is to right-click in the wavefrom view and select Edit in External Editor, using the editor of your choice.
A neat way to have the Position scan your file sequentially for implementing time scaling effects (independent time stretching and pitch shifting) is to assign a Saw up+ modulator to the Position property.
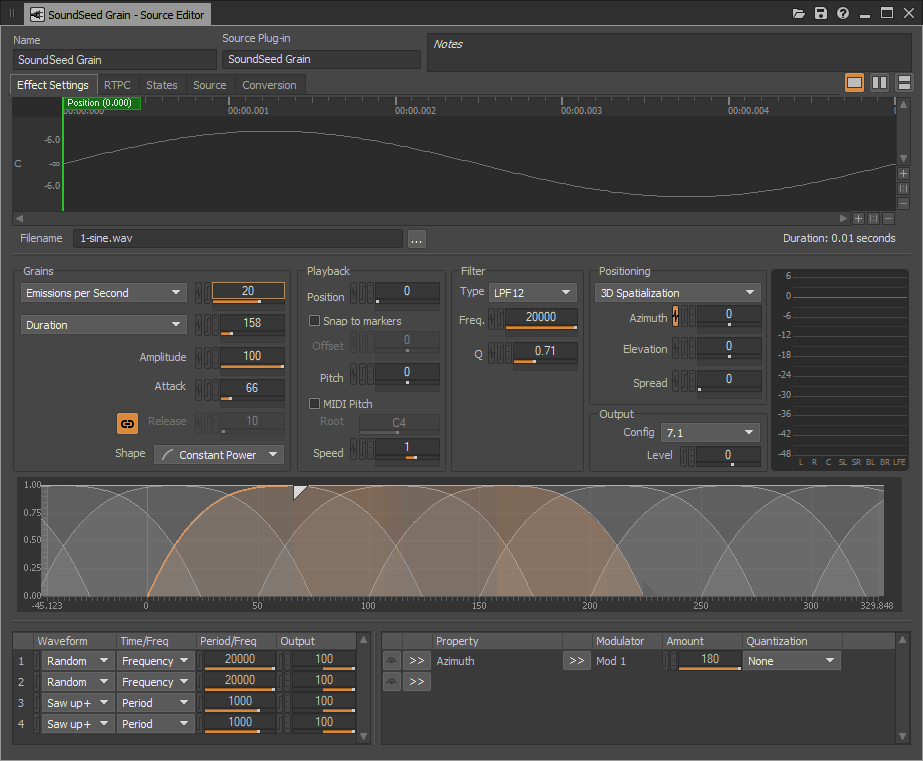
Load a file in SoundSeed Grain.
Select a modulator for this purpose. Let's use Mod 3 since its Waveform is Saw up+ by default.
In the Modulator view, set the chosen modulator's Waveform type to Saw up+, Time/Freq mode to Period, and Period to the duration of the file, as you can see in the lower left corner of the Waveform view. The duration is indicated in seconds, while modulator period uses milliseconds, so you need to multiply this value by 1,000. For example, with a file duration of 2.00 seconds, use 2,000 as the modulator period.
In the Modulator Assignment view, create an entry with Property set to Position, Modulator set to the chosen modulator (Mod 3 in this example), and Amount to 100.
 |
If you make the modulator's Period smaller, SoundSeed Grain will scan the file faster. If you like, you can use an RTPC on the modulator's Period. You can also use different waveforms. For example, a triangle LFO will produce ping-pong-like scanning of the file.
For 3D ambiences, you should design your SoundSeed Grain patch in such a way that it represents the sound field in its most immersive, surrounding form, like you will want it to play back with 100% spread. Then, Wwise takes care of contracting it in a point source whenever the sound's Spread is smaller than 100.
Inspect the sound that hosts your synthesizer.
In the Positioning tab of the Property Editor, set the 3D Spatialization mode to Position or to Position + Orientation. Use an Attenuation ShareSet with a Spread curve.
 |
![[Note]](/images/2019.2.15_7667/?source=Help&id=note.png) |
Note |
|---|---|
Alternatively to using an Attenuation ShareSet, you may use the sound as a Spatial Audio Room, and let Wwise Spatial Audio modulate the spread according to the listener's proximity to Portals to that Room. Refer to the Wwise Spatial Audio SDK documentation for more details on Rooms and Room ambiences. |
For creating an enveloping ambient sound in SoundSeed Grain, you will typically use a mono or multichannel file, and generate 3D spatialized grains all around you.
Make sure that the output configuration is multichannel. For best results it should be the same as that of the output bus. Although it is also very relevant to output, say, first order ambisonics, and mix it into a third order ambisonics bus.
Set the Positioning mode to 3D Spatialization.
Use random modulation with Azimuth and/or Elevation.
You may use Spread to your liking (to fill the space for example). Make sure Spread is greater than 0 if your material is multichannel, otherwise each grain is treated as a point source that gets folded down to mono.
 |
The Amplitude property has the same effect as the Level property, only it is expressed in % instead of in decibels, which is usually less intuitive. Its main interest is for producing grains of various amplitude. For example, set Amplitude to 0 and assign Amplitude to a Random+ modulator with Amount 100 to produce grains with random amplitude between 0 and 100%. Alternatively you could set Amplitude to 50 and use a bipolar Random modulator with Amount 50 to obtain the same effect.
Filters are similar. There are as many filters as there are grains playing concurrently; therefore, it is better to use an EQ as an insert effect if the desired filtering is constant over time, for performance reasons (although the cost of each filter is not very significant). However, if you want to produce grains with different filtering, then use the filter with grain modulation.
 |
For implementing engine sounds, you may have imported a recording where each region corresponds to a different RPM or engine regime. Then, your goal is to have the synthesizer pick grains randomly in a region of the file corresponding to the desired regime. This region can be viewed as a macro window in which grains should be taken. One way to implement this macro window is using grain modulation on top of RTPC.
Assign the Position property to an RTPC, which you will bind to an appropriate game parameter, say, RPM. This RTPC defines the left boundary of the macro window.
Assign the Position property to a Random+ modulator with some Amount. The chosen Amount defines the width of the macro window, in percentage of the file's duration.
If the width of the window should change with the RPM, bind it to RPM using an RTPC.
|
Note |
|---|---|
|
Alternatively, you could have used a bipolar Random modulator waveform. In this case the Position RTPC defines the center of the window instead of its left boundary. |
|
Note |
|---|---|
|
For engine sounds, it may be desirable to place markers at each explosion and use the "Snap to markers" option. |
 |
Was this page helpful?
Need Support?
Questions? Problems? Need more info? Contact us, and we can help!
Visit our Support pageTell us about your project. We're here to help.
Register your project and we'll help you get started with no strings attached!
Get started with Wwise