|
Wwise Unreal Integration Documentation
|
Posting an Event and Setting a State from a Blueprint - BeginPlay | PostEvent | Self
In this example, again we’ll play something when starting the game, but this time from a Blueprint. A good use case for this is playing Music, which could potentially continue forever.
In Wwise, in a Music Playlist Container, a Music Segment is looped indefinitely when called from a Play_Music Event.

In the Unreal Editor, we'll add sounds to the ThirdPersonExampleMap level. This level already contains various Actors, such as Lights, Meshes, and even a character you can control. As we'll only be working with this level for now and the Actors stay in the scene indefinitely, we can simply pick an Actor from the World Outliner and add the necessary audio integrations to it.
 |
Note: If you have multiple scenes, consider creating a Persistent level so the music survives loading a different map. |
We’ll use the Blueprint of the playable character, which has already been created and added to the ThirdPersonCharacter.
-
Go to the World Outliner > ThirdPersonCharacter Actor and select Edit ThirdPersonCharacter.

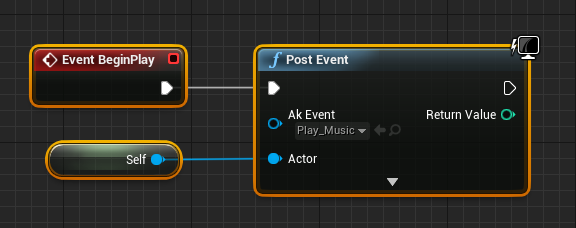
This opens the Blueprint of the ThirdPersonCharacter, where we'll call the Wwise Event. You might notice a lot of other premade systems, like Gamepad Input, Jump, or Movement Input. This is how your character is controlled, which we won't need for now. Leave it as is, and find an empty place. To play (also referred to as 'post') any Wwise Event, we'll need to have the Unreal Event (1) called when you begin to play, connect it to the function (2) that plays the Wwise Event, and specify at which Actor (3) it should be playing.
-
Right-click on an empty place in the Event Graph, type “BeginPlay” and select the corresponding Unreal Event.

-
From the BeginPlay arrow, drag out a connector, type “postevent”, and select the Post Event function.

Before this can actually work, the Post Event function requires a reference to an Actor so that it knows where to place the Wwise Event.
-
From the Actor Object Reference, drag out a connector, type “self” and select Get a reference to self.

That's it for the system itself. You can now pick a Wwise Event in the AkEvent property and it will be posted when you play the game. In this example, we’ll pick the Play_Music Event, as follows.
-
In the Post Event function, select a Wwise Event.
This is how Blueprints are used to control calls to Wwise. Note, this is a very basic example. Most real life scenarios are much more complicated.
Using an AkComponent
While the Blueprint environment is great for controlling how Actors behave, it's not very convenient when managing and positioning Actors in your level. Instead, we want to handle as much as possible from the Level Editor by exposing some of the controls from the Blueprint in the Details panel. This can be achieved by adding an AkComponent to the Actor, which will also allow us to offset the position of the sound, if needed, directly from the Level Editor.
-
Select Add Component, search for 'Ak' and select Ak.

-
In the Event Graph, delete the Post Event function along with the reference to Self.

Next, we will reference the AkComponent as the object on which to be posted, meaning this will be the position and orientation of the posted sound.
-
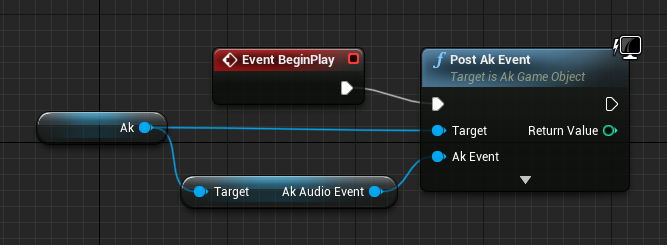
Drag the AkComponent into the Blueprint, and from the Object Reference, find the Post Ak Event.

-
Connect the BeginPlay to the Post Ak Event.

Now we can retrieve the Wwise Event selected in the AkComponent.
-
From the AkEvent Object Reference, find a Get Ak Audio Event and connect it to the AkComponent reference.
-
Compile, select Ak in the Details panel, and choose an Event.

You no longer have to visit the Blueprint to change the Event, and you can offset the position of the sound relative to the Actor to which it's attached.
Ignoring Occlusion
In the Going From Silence to Sound exercise we added an AkAmbientSound to the Level and made it play an ambience. In that case, we added it next to the ThirdPersonCharacter which worked well, but by taking a stroll behind some boxes in the level you might notice that the sound disappears. Let's diagnose this potential issue.
-
Locate your AkAmbientSound Actor.

Notice how the sound plays at full volume when you start the game, but as you walk to the opposite side of any object where the camera (i.e., listener) cannot see that Actor's location, the sound will fade out. This is because Occlusion is enabled by default. For sounds like ambience or music, this effect may not be desired. You can disable it by setting the Occlusion Refresh Interval to 0.

-
In the Details view, set the AkComponent > Occlusion > Occlusion Refresh Interval to 0.

Alternatively, if you are posting a Wwise Event using the Post Event function, you can use the SetOcclusionRefreshInterval function to set this property before you post the Wwise Event.

Controlling Music with States
In most cases, you want interactive music in your game so that it adapts to the conditions of gameplay and provides variety. The following example demonstrates a common approach, which is to use States to control the music. Before starting, you must create a new music system in Wwise. As shown in the following figure, create a Music Switch Container that is able to switch between the "Repeat Calm" and "Repeat Intense" Music Playlists, based on a “Music” State.

Notice there are three States: Calm, Intense, and None. With this setup you can change the music during runtime by setting the States from the game, but before you start to do so, you might want to choose what State is set when starting the game. For this, we'll continue from the steps performed in Using an AkComponent with the Occlusion Refresh Interval set to 0, like in Ignoring Occlusion.
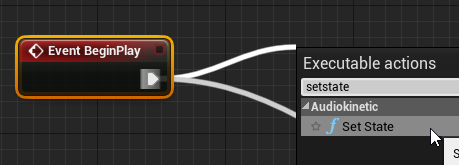
To control what the initial State will be, start by setting a State before the music is posted.
-
From BeginPlay, drag out a SetState function.
-
Set the Initial State to Music-Calm.

Setup of the initial state is complete.
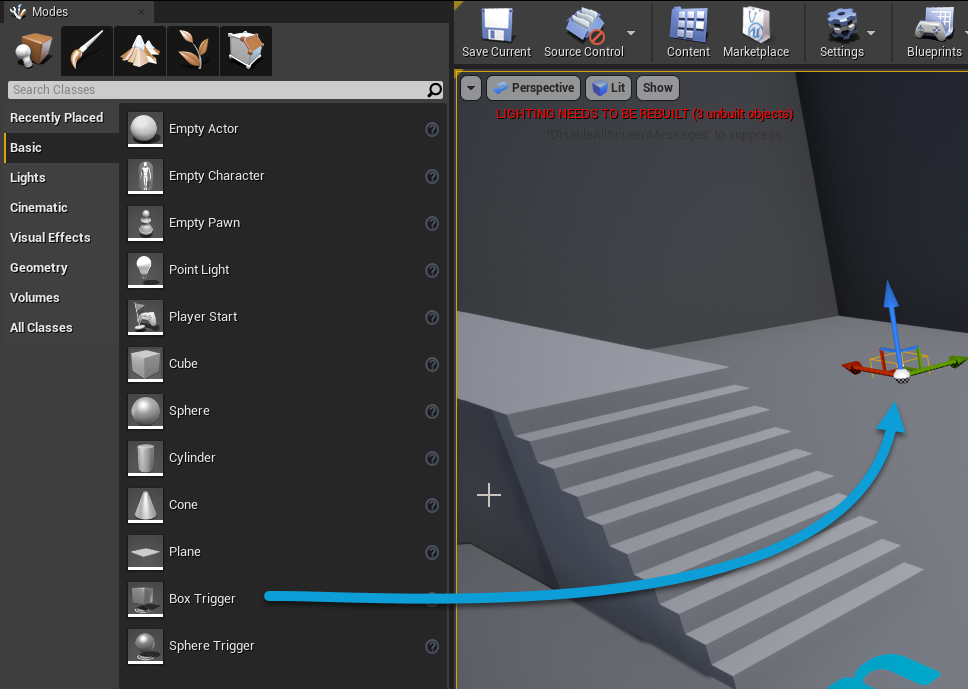
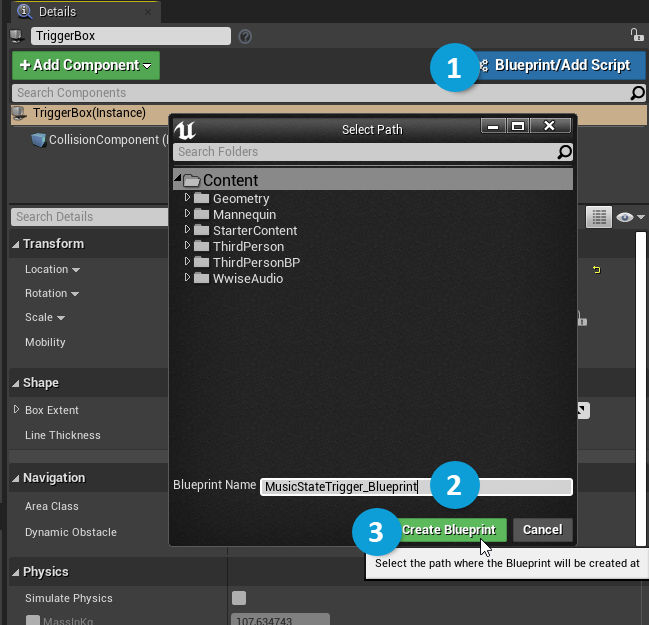
For runtime state changes, a common approach to controlling music states is to set the States as the player enters a certain area, defined by a Trigger. As such, we'll create a Box Trigger (1-2), with a Blueprint system that sets the State upon entering the triggers boundaries (3-4). Then we will expose the State in the Details view (5-6) so you won't have to revisit the Blueprint afterwards.
-
Drag a Box Trigger into the Level.
-
Increase the size of the Box Trigger.

-
Select Blueprint/Add Script (1), give it a proper name (2) and select Create Blueprint (3).
Next, we will design the Blueprint system. Upon creating a new Blueprint, you'll automatically get an ActorBeginOverlap Event, which is good for detecting when something enters the Box Trigger. We’ll use that Event to detect if it's the player Actor, and if yes, set the State.
-
From the ActorBeginOverlap, cast it to ThirdPersonCharacter and connect the Exec to a Set State function.

You could now select the State in the Set State function, but that would not allow you to reuse this Box Trigger for another State, and you would have to revisit the Blueprint to change it in the future. To avoid this, we'll create a Variable that will be accessible outside the Blueprint.
-
From the State Value, drag out and select Promote to variable.

You now have a variable under My Blueprint > Variables on the left, but it's not yet visible outside the Blueprint.
-
Rename the variable “MusicState” and select the eye icon to make it public.

- Select Compile, and close the Blueprint.
-
With the Trigger selected, pick a State in Details > Default > Music State.

-
Using the ThirdPersonCharacter, walk into the new Trigger and wait for the music to change.

You can now duplicate the trigger, reuse it somewhere else and set a different state without affecting the first trigger.
|
Note: If your Music Switch Container's Transition is set to Exit Cue, you might have to wait a while to hear the change in the music. |
Was this page helpful?
Need Support?
Questions? Problems? Need more info? Contact us, and we can help!
Visit our Support pageTell us about your project. We're here to help.
Register your project and we'll help you get started with no strings attached!
Get started with Wwise