-
-
-
-
-
-
-
-
-
-
-
-
-
-
-
-
Reflect
-
-
-
-
-
-
-
-
-
-
-
-
|
Wwise Unreal Integration Documentation
|
In a realistic acoustic environment, sounds coming from an enclosed space will transmit through the walls, and will also come out from openings, such as doors and windows. Spatial Audio will simulate this effect with a high-level geometry abstraction called Rooms and Portals.
 |
Note: The Preparation for the Spatial Audio Tutorials must be completed prior to starting this tutorial. |
|
Note: When using Spatial Audio diffraction, disable Unreal engine's obstruction/occlusion. Set the Occlusion Refresh Interval of your emitters (AkComponent) to 0. |
Wwise Project
- In the Wwise project, create new Auxiliary Busses for each of the rooms.
- Right-click where you want to add a child Auxiliary Bus
-
Navigate to New Child > Presets and select Room Auxiliary Bus
- In the Effects tab, you can tweak the RoomVerb Effect.
 Add a reverb effect to the Auxiliary Bus
-
Navigate to the Sound SFX from Wwise Project Preparation.
- In the Positioning tab, make sure the Diffraction and Transmission checkbox is selected.
 Enable diffraction on the sound in Wwise
 - Save the project.
Unreal Project
- In Unreal, drag and drop the new Auxiliary Busses from the Waapi Picker to the Content Browser.
- Double-click them and assign them to the bank.
- If not done already in another tutorial, drag and drop two AkSpatialAudioVolume objects for each room of the building. We will use Fit To Geometry to place the two rooms.
- Enable Fit To Geometry in the Details panel of each AkSpatialAudioVolume.
- If the initial shape that is found is not satisfactory, translate the AkSpatialAudioVolume to a new location using the transform gizmo. Notice that a yellow preview outline appears when translating the AkSpatialAudioVolume. When a satifactory shape is found, release the mouse button and the AkSpatialAudioVolume will snap into place.
- For more information on placing AkSpatialAudioVolumes using Fit To Geometry, refer to Fit to Geometry.
- Make sure that Enable Room and Enable Late Reverb are enabled for the two AkSpatialAudioVolume objects.
- If you didn't do the Reflect tutorial, leave Enable Surface Reflectors unchecked.
- In the Late Reverb Section, drag and drop the newly imported Auxiliary Bus from the Content Browser to the Aux Bus parameters.
- Make sure that Enable Room and Enable Late Reverb are enabled for the two AkSpatialAudioVolume objects.
-
Add two AkAcousticPortal objects
- Place them around the openings of the building.
- To facilitate placement of an AkAcousticPortal, enable the Fit To Geometry check box in the Details panel.
- When Fit To Geometry is enabled, the integration will attempt to find a logical placement for the portal using the surrounding geometry. A yellow preview outline will appear when dragging the AkAcousticPortal near an appropriate opening using the transform gizmo. When a satisfactory placement is found, release the mouse button and the AkAcousticPortal will snap to place.
- For more information on placing AkAcousticPortals using Fit To Geometry, refer to Fit to Geometry.
- After an AkAcousticPortal is placed inside each doorway, adjust the depth of each portal using the scale gizmo to achieve the desired crossfade distance. A deeper portal (along its local X-axis) will result in a longer crossfade distance when an AkComponent transitions through the portal. This is true for both reverb sends and spread transition.
- Select the portals and set their initial state to Open in the Ak Portal Component section.
 AkPortalComponent Properties
 - Place them around the openings of the building.
|
Note: 
Ensure that realtime is enabled in the viewport when working with portals and rooms in the level editor
|
Verify your Setup
- Generate the SoundBanks for Windows.
- Start the scene and stay at the start location. When playing the events on the emitters inside the rooms, you should be able to hear them.
- Connect to Wwise Authoring and navigate to the Game Object Profiler layout (shortcut F12). In the Game Object 3D Viewer you will see:
- a visualization of the rooms in grey (if the AkSpatialAudioVolume doesn't have Surface Reflectors enabled).
- a visualization of the portals in green.
- Play a sound in a different room than the listener. In the Game Object 3D Viewer you will see:
- the rooms in which each game object is placed.
- sound propagation paths diffracting on the edge of the portal(s) with an associated diffraction value at each edge depending on the bending angle.
- sound propagation paths going through the walls of the room with an associated transmission loss value.
Note:
This transmission loss value can be set by changing the transmission loss parameter of the room in the AkRoomComponent component. - spread cones for the diffracted and transmitted paths of the sound if it has a spread curve.
 Game Object 3D Viewer using Rooms and Portals
|
Note: 
Obstruction Volume Curve
|
Portals and Reverb
Sound emitting through Portals can reverberate into the room the listener is currently in. These steps show how it was configured in the Spatial Audio Tutorial map.
- In the Wwise project,
-
Find the Auxiliary Bus used for the Room Reverb. The room where sound is emitted from that we want to feed to other room reverbs.
- In the General Settings of the Auxiliary Bus Property Editor, make sure use game-defined auxiliary sends is enabled.
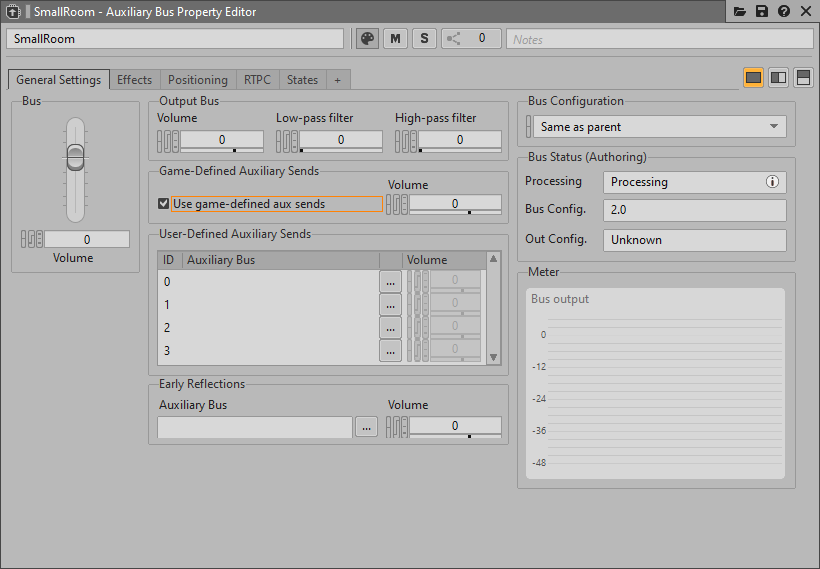 Enable 'Use game-defined auxiliary sends' of a room Auxiliary Bus.
-
- Generate Soundbanks, start the scene and connect to the Wwise Authoring.
-
Play the sound in the room with enabled auxiliary sends and navigate to a communicating room.
- You should see that the wet part of the emitting sound will also feed the reverb of the room the listener is in.
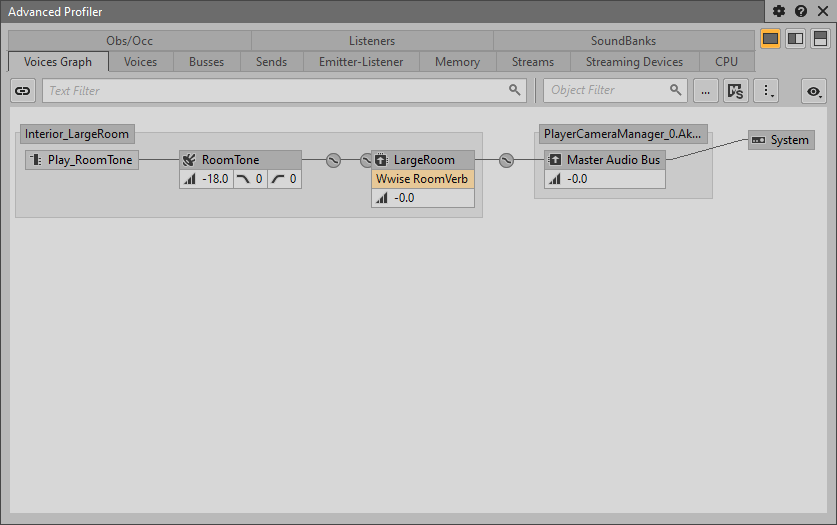
 SmallRoom reverb feeds into LargeRoom reverb.
Room Tones
Sometimes, rooms have a specific ambient sound like the buzzing sound of air conditionning. To recreate this, you can post an event on the Spatial Audio Room game object. When the listener will be in the room, the sound will be positionned at its location. When in a different room, the listener will hear the room tone from the portals connecting the room to the position of the listener.
- In the Wwise project,
- Create new Sound SFX for the room tone.
- Enable 'Use game-defined aux sends' if you want the sound to send to reverb
- Add an attenuation, if desired, for distance attenuation curves.
- Create a play event with the room tone by right-clicking on the Sound SFX, then selecting New Event > Play.
- Create new Sound SFX for the room tone.
-
In Unreal,
- Drag the Event created in the previous section from the Waapi Picker to the Content Browser.
- Add this event to the Ak Audio Event parameter, under the Ak Event section, of one of your rooms.
- Adjust the Aux Send Level to feed some of the sound to the reverb of the room.
- You can choose to check the Auto Post box to post the room tone event on BeginPlay, or you can call the same blueprint functions usually used to post events on game objects.
 The AkEvent section of a Spatial Audio Volume with Room enabled.
-
In the Spatial Audio Tutorial map, we used blueprint functions in the Level Blueprint to activate and deactivate the room tone.
- While having the AkSpatialAudioVolume with a room tone selected in the World Outliner, right-click in the Level Blueprint to create a reference.
- Drag a connection from the reference and search for "Post Associated Ak Event".
- In the same way, search for the Stop function.
- Add a key press as an input node.
 Play and stop a room tone from the Level Blueprint
- Generate SoundBanks.
- Start the scene and connect to Wwise Authoring.
-
Navigate to the room with a room tone and press the key to start the room tone. Verify that you can hear it.
- In the Advanced Profiler view, you should see the event being played.
 Advanced Profiler view when playing a room tone
-
In the 3D Game Object Viewer, you can watch the room game object as you move the listener around.
- If the listener is in the room, the room will emit at the position of the listener. You will see the room game object follow the listener game object.
- If the listener is in a different room,
- a room game object will be placed at the portal indicating the position of the diffracted sound and a path will be drawn between it and the listener game object.
- a room game object will be placed at the limit of the room on the direct path indicating the position of the transmitted sound.
- spread cones will be drawn for both of these positions.
 Room Tone in the Game Object 3D Viewer
Was this page helpful?
Need Support?
Questions? Problems? Need more info? Contact us, and we can help!
Visit our Support pageTell us about your project. We're here to help.
Register your project and we'll help you get started with no strings attached!
Get started with Wwise