-
-
-
-
-
-
-
-
-
-
-
-
-
-
-
-
Reflect
-
-
-
-
-
-
-
-
-
-
-
-
|
Wwise Unreal Integration Documentation
|
When using an AkLateReverbComponent that is attached to a UPrimitiveComponent, you can tell the Wwise Unreal Integration to automatically assign the reverb Aux Bus based on the size and shape of the UPrimitiveComponent.
Similarly, the Wwise Unreal Integration can also use the UPrimitiveComponent to estimate specific reverb parameters and adjust them via the Global Reverb RTPCs. This tutorial explains how to set up automatic Aux Bus assignment and reverb effect parameter estimation using the Global Reverb RTPCs.
 |
Note:UPrimitiveComponent is a generic Unreal Component that has size and shape. There are many Component types that are based on UPrimitiveComponent, including collision Components, brush Components and mesh Components. See the Unreal Engine documentation for more information. |
|
Note: Although Reverb Parameter Estimation is a feature of the AkLateReverbComponent, the AkSpatialAudioVolume contains an AkLateReverbComponent, so it can also make use of the feature. |
|
Note: The Preparation for the Spatial Audio Tutorials must be completed prior to starting this tutorial. |
Automatic Aux Bus Assignment
Automatic Aux Bus Assignment works by estimating the time taken in seconds for the reverb of a sound to decay by a certain amount. We refer to this simply as the Decay. You can use the Aux Bus Assignment Map in the Integration Settings to determine which Decay values map to which Aux Buses.

|
Note: To access the Integration Settings, click Edit > Project Settings..., which will open the Unreal Project Settings. Then, in the left panel of the Unreal Project Settings, scroll down to the Wwise section and click on Integration Settings. |
Before setting up the Decay keys in the map, we can observe the estimated Decay values for the existing reverbs in our level.
- Open the SpatialAudioTutorialMap if it is not already open.
- In the World Outliner, click on the Interior_SmallRoom
AkSpatialAudioVolume. - In the Details panel for Interior_SmallRoom, enable Auto Assign Aux Bus.
- Repeat steps 2 and 3 for the Interior_LargeRoom
AkSpatialAudioVolume.

|
Note: Enabling Auto Assign Aux Bus will cause Aux Bus to be set to None. This is because we have not yet set up the Aux Bus Assignment Map. |
With Auto Assign Aux Bus enabled, some text information is displayed above each AkSpatialAudioVolume in the viewport when they are selected. The Interior_SmallRoom has a Decay estimate of 0.37 seconds. The Interior_LargeRoom has a Decay estimate of 0.45 seconds. This information is also available in the Details panel under Reverb Parameter Estimation. We can use these values to set up the Aux Bus Assignment Map.


- Open the Integration Settings.
- Expand the Reverb Assignment Map section if it is not already expanded.
Aux Bus Assignment Map in the Integration Settings
- Click the Insert Decay Key button.
- Set the value to 0.4 and click Insert.
 Insert a Decay Key Value of 0.4
 - Click the Insert Decay Key button.
- Set the value to 0.5 and click Insert.
- Next to the Decay key of 0.4, select the SmallRoom Aux Bus.
- Next to the Decay key of 0.5, select the LargeRoom Aux Bus.

With the Aux Bus Assignment Map set up like this, any Decay value between 0.0 and 0.4 will produce the SmallRoom Aux Bus. Any Decay value between 0.4 and 0.5 will produce the LargeRoom Aux Bus. Decay values above 0.5 will produce the Default Reverb Aux Bus.
Going back to our level, we can see that the appropriate Aux Bus values have been assigned for Interior_SmallRoom and Interior_LargeRoom.

Global Reverb RTPCs
As well as automatically assigning the Aux Bus, it is possible to automatically set certain parameters of a reverb effect in Wwise via the Global Reverb RTPCs. Three parameters can be set in this way: Decay, Predelay, and HFDamping. You can set which RTPCs control these parameters in the Integration Settings.

Setting Up RTPCs
In order to use the Global Reverb RTPCs we need to add three RTPCs in our Wwise project.
- Open the Wwise project.
- Open the Designer Layout by clicking Layouts > Designer, or by pressing the F5 key.
- In the Project Explorer, click the Game Syncs tab.
 Open the Game Syncs Tab
 - Add three new Game Parameters called Decay, Predelay and HFDamping.
- Set the Min, Max and Default values of the three new Game Parameters as follows:
- Decay - Min: 0, Max: 10, Default: 0
- Predelay - Min: 0, Max: 1, Default: 0
-
HFDamping - Min: -1, Max: 1, Default: 0
 Add Three New RTPCs in the Wwise Project
- In the Project Explorer, click the Audio tab.
- Under the Master-Mixer Hierarchy, double-click on SmallRoom.
- This will open the SmallRoom Aux Bus in the Property Editor
- Click the Effects tab in the Property Editor.
 Open the Effects Tab for the SmallRoom Aux Bus
 - Click the Edit button to open the WwiseRoomVerb Effect.
- In the Effect Editor, click the RTPC tab.
- Add entries for Decay Time, Predelay and HF Damping in the RTPCs list.
- Map each of these parameters as follows:
- Decay Time: Decay
- Pre delay: Predelay
- HF Damping: HFDamping
- Select the Decay mapping and add a point on the curve.
- Set both the X and Y values of the point to 0.2.
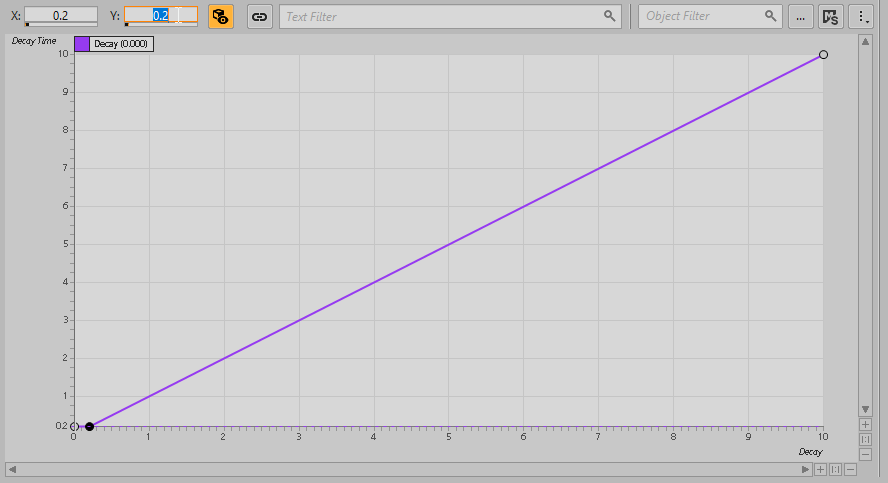 The Decay RTPC Mapping
 - Select the HFDamping mapping and add a point on the curve.
- Set the X value to 0.0 and the Y value to 1.0.
 The HFDamping Mapping
 All Three RTPC Mappings
 - Select all of the mappings in the list.
- Right-click one of the mappings and select Copy.
- Open the LargeRoom Aux Bus in the Property Editor.
 Open the Effect Editor for the LargeRoom Wwise RoomVerb Effect
 - Click on the Effects tab.
- Click on the Edit button to open the WwiseRoomVerb effect.
- In the Effect Editor, click the RTPC tab.
- Right-click in the empty RTPCs list and select Paste.
We have now set up three RTPCs to control reverb parameters in our Wwise project. Back in the Unreal project, we can use these RTPCs as the Global Reverb RTPCs.
- Open the Integration Settings.
- Expand the Reverb Assignment Map section if it is not already expanded.
- Expand the RTPCs subsection if it is not already expanded.
The Global Reverb RTPCs in the Integration Settings
- Assign each new RTPC to the corresponding Global Reverb RTPC

You can now remote connect to Wwise and Play In Editor. If you observe the RTPC curves in Wwise while triggering the sounds in the small room and the large room, you can see how the reverb parameters are changed.

Using One Reverb Aux Bus for Different Room Types
Using the Global Reverb RTPCs, it is possible to use one reverb effect for the whole level, and drive the parameters dynamically for the different rooms in the level.
- In the Wwise project, create a new Aux Bus called DynamicReverb.
- Add a Wwise RoomVerb effect to this Aux Bus, using the Default effect preset.
 Add a New Aux Bus Called DynamicReverb with a Wwise RoomVerb Effect
 - Copy and paste the RTPC mappings from the SmallRoom Aux Bus reverb effect to the DynamicReverb Aux Bus reverb effect.
- In the Unreal project, clear all entries in the Aux Bus Assignment Map
- You can do this by clicking the small delete icon next to Environment Decay Aux Bus Map.
- Set the Default Reverb Aux Bus to the new DynamicReverb Aux Bus.
Now, if you remote connect and Play In Editor, both the Interior_SmallRoom and Interior_LargeRoom will use the DynamicReverb Aux Bus, but the parameters will be automatically tweaked for each room, via the Global Reverb RTPCs.
Using Reverb Estimation with a Custom Blueprint Class
To further demonstrate the single Aux Bus workflow, we can create a custom Blueprint Class representing a single room. For demo purposes, this will be a simple cube room with walls that we can walk through. The first thing we need to do is create a double-sided material so that we can see the inside of our room.
- In the Content Browser, browse to the WwiseAssets/SpatialAudioDemo folder.
- Right-click the SpatialAudioDemoMeshMaterial and select Duplicate.
 Duplicate the SpatialAudioDemoMeshMaterial
 - Call the new Material Instance "SpatialAudioDoubleSidedMaterial".
 Rename the New Material Instance to SpatialAudioDoubleSidedMaterial
 - Open the new Material Instance.
- Under the Material Property Overrides, enable Two Sided.
- Save the Material Instance.
With our demo material ready, we can now create our Blueprint Class.
- In the Content Browser, browse to the Blueprints folder.
- Right-click in the folder and select Blueprint Class.
 Create a New Blueprint Class
 - Choose Actor as the Parent Class.
- Call the new Blueprint "BPRoom".
- Open the new BPRoom Blueprint Class.
- On the Components panel, click the Add Component button.
 Use The Add Component Button in the Blueprint Editor to Add Components
 - Type cube in the search bar and select the Cube Component.
- This creates a Static Mesh Component with a cube mesh selected as the Static Mesh.
- In the Details panel, under Materials, set Element 0 to the SpatialAudioDoubleSidedMaterial.
 Set the Cube Material to SpatialAudioDoubleSidedMaterial
 - In the Components panel, select the Cube Component.
- Click the Add Component button and add a Box Collision Component.
- Select the Box Component.
- Click the Add Component button and add an Ak Room Component.
- Select the Box Component.
- Click the Add Component button and add an Ak Late Reverb Component.
- Select the Box Component.
- Click the Add Component button and add an Ak Geometry Component.
The Component hierarchy in your Blueprint Class should now look as follows:
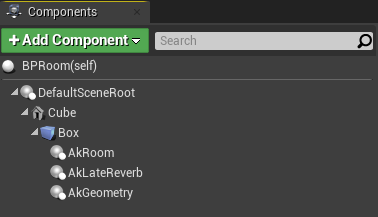
- Select the AkGeometry Component.
- In the Details panel, under Geometry, set the Mesh Type to Simple Collision.
- Expand the Acoustic Properties Override subsection and set the Acoustic Texture to Concrete.
 Set Up the AkGeometry Parameters
 - In the Components panel, Select the Cube Component.
- Click the Add Component button and add a Point Light Component.
- This will allow us to see when we walk inside the room.
 Add a Point Light to the Cube Component
- This will allow us to see when we walk inside the room.
- Select the Cube Component.
- Under Collision, set the Collision Preset to No Collision.
- Select the Box Component.
- Under Collision, set the Collision Preset to No Collision.
- This will allow us to walk through the walls.
- Compile and Save the Blueprint.
- In the Level Editor, drag in multiple instances of the BPRoom from the Content Browser.
- Give these rooms different sizes.
Before testing our new room Blueprint, we need to add a sound to play as we change between the rooms.
- Open the MyCharacter Blueprint from the Blueprints folder in the Content Browser.
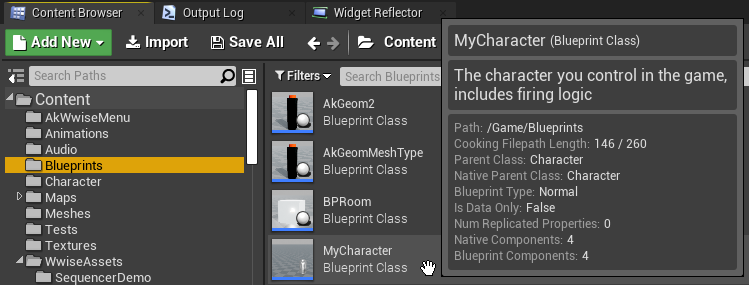 MyCharacter Blueprint in the Content Browser
 - In the Components panel, select the Capsule Component.
- Click the Add Component button and add an Ak Component.
- This will show up simply as "Ak".
- Change the name of the Ak Component to SpatialSound.
- Select the SpatialSound Component.
- In the Details panel, set the Ak Audio Event to Play_SpatialSound.
 Add an Ak Component to the MyCharacter Blueprint
 - Open the Event Graph for the MyCharacter Blueprint.
- Locate the Event BeginPlay node at the lower-right side of the Event Graph.
- Drag off the last Set Switch node and start typing "post associated".
 Connect the Set Switch Node to a PostAssociatedAkEvent Node
 - Choose Post Associated Ak Event (SpatialSound).

We can now place some rooms in our level.
- Drag multiple instances of the BPRoom Blueprint into the level.
- Size the rooms differently.
- Change the Acoustic Texture on the AkGeometry Component in each of the rooms.
- Select a room in the level.
- In the Details panel, select the AkGeometry Component.
- Change the Acoustic Texture.
- Do this for all BPRoom instances in the level.
 Change the Acoustic Textures for Different Instances of BPRoom Actors
You can now remote connect to Wwise and Play In Editor. The spatial sound will be triggered immediately. As you walk into the different rooms, the appropriate reverb parameters will be applied to the sound.
HFDamping Calculation and Acoustic Textures
When estimating the HFDamping value, the AkLateReverbComponent uses the AkGeometryComponent in order to query which Acoustic Textures it has. In the previous subsection, we had an AkLateReverbComponent and an AkGeometryComponent attached to the same UPrimitiveComponent parent. The UPrimitiveComponent parent was the Box Component. With this setup, when the AkLateReverbComponent has a sibling AkGeometryComponent, it automatically uses that sibling AkGeometryComponent to calculate the HFDamping. However, if the AkGeometryComponent has a different parent, we need to explicitly associate the AkGeometryComponent with the AkLateReverbComponent using the AssociateAkTextureSetComponent function. This final section demonstrates this setup.
- Open the BPRoom Blueprint.
- In the Components panel, drag the AkGeometry Component on top of the Cube Component and release the mouse button.
- This will attach the AkGeometry Component to the Cube Component instead of the Box Component.
- Select the AkGeometry Component.
- In the Details panel, under Geometry, set the Mesh Type to Static Mesh.
- Add an entry to the Acoustic Properties Override using the plus button.
 Add a Material in the Acoustic Properties Overrides List
 - Set the Material to SpatialAudioDoubleSidedMaterial.
- Click the drop-down arrow next to the Material and set the Acoustic Texture to Concrete.
 Set up the AkGeometry Parameters
 - Open the Event Graph for the Blueprint.
- Click and drag from the execution pin of the Even BeginPlay node.
- Type "associate" in the search bar.
- Choose Associate Ak Texture Set Component (AkLateReverb).
- Drag the AkGeometry Component from the Components panel on top of the Texture Set Component pin and release the mouse button.

You can now remote connect to Wwise and Play In Editor in order to test that the HFDamping value is updated correctly. With this setup, you can have a Static Mesh with multiple materials, and an AkGeometryComponent attached that maps those materials to Acoustic Textures. You can then associate this AkGeometryComponent with an AkLateReverbComponent in order to have the textures drive the HFDamping value.
Was this page helpful?
Need Support?
Questions? Problems? Need more info? Contact us, and we can help!
Visit our Support pageTell us about your project. We're here to help.
Register your project and we'll help you get started with no strings attached!
Get started with Wwise