Ensure you are logged in if you are a licensed user for specific platforms.
|
Wwise Unreal Integration Documentation
|
Table of Contents
Description
The AkAudioMixer module provides a platform-agnostic Unreal Audio Mixer, which you can use to run the Unreal and Wwise audio mixers concurrently.
The Unreal Audio Mixer is platform independent: it works on Windows, Mac, Android, and consoles. A Mixer Platform that handles the interaction between the platform’s hardware and the platform-independent code. Both the Unreal Audio Mixer and the Wwise SDK automatically initialize and handle a platform’s audio. However, most platforms cannot receive audio from multiple sources simultaneously, especially consoles that initialize one unique audio system. Some consoles crash if they are initialized twice, and some allow both systems to interact with the same objects blindly.
One solution to this problem is to disable Unreal’s Audio Mixer when a project uses Wwise. To do so, ensure that the Enable Wwise SoundEngine only audio routing option is selected (see Selecting Audio Routing Options for more information).
The AkAudioMixer module provides a concurrent, platform-agnostic solution, in which Unreal's Audio Mixer uses Wwise instead of the default platform (XAudio2, SDL Audio, AudioOut, and so on). Wwise can therefore properly initialize the Platform Sound Engine, and Unreal processes audio.
This module provides two different input components, both processed through a basic AkAudioInputComponent. Refer to Providing Audio Input to Wwise for more information.
Main Mix (FAkMixerPlatform)
The Wwise Sound Engine uses FAkMixerPlatform to substitute the platform-specific part of the Unreal Audio Mixer. Through a stereo feed, it is then possible to retrieve the result of the Unreal mixdown as a Wwise Audio Input. When you use FAkMixerPlatform, the Unreal audio subsystem remains fully functional alongside the Wwise audio system.
When you use FAkMixerPlatform, Unreal audio is provided as stereo. This Unreal mixdown is muted in Wwise but is available as a temporary solution because using two different, concurrent spatialization methods can cause audio problems. After you set up the FAkMixerPlatform properly, projects use Unreal submixes only when actual inputs for objects are necessary.
Component Submix (UAkSubmixInputComponent)
You can use UAkSubmixInputComponent to connect any Unreal audio submix to a Wwise Audio Input component. You can then retrieve part of a mix, such as movie audio, and send it to Wwise individually. You can provide the submix in any channel configuration, as required by Wwise. Due to limitations and performance considerations, we recommend that you configure the entire flow in Wwise whenever possible.
Use UAkSubmixInputComponent to retrieve Unreal audio from individual actors. Through the Wwise Unreal Integration, you can link the Audio Input Component with its actor position and then use Wwise integrated spatialization (or the object-based pipeline in 2021.1 or later) to achieve the project’s desired audio properties and quality.
You can use this component independently. It does not require the FAkMixerPlatform. However, be aware that initializing both Unreal’s platform-specific audio and Wwise’s platform-specific sink simultaneously can cause some platforms to crash because they do not support usage of two concurrent audio pipelines.
Initialization
Use Wwise "Play" Events to initialize both FAkMixerPlatform and UAkSubmixInputComponent. The Wwise Sound Engine can then poll the Unreal components.
The Event starts the polling process, and the process must never be virtualized: it is either started or stopped, and the FAkMixerPlatform input component must always be playing. Otherwise, the Unreal audio pipeline does not work properly.
Polling Order

After the initialization is complete, the audio pipeline is executed every few milliseconds to provide the next audio chunk to the hardware.
At the beginning of the pipeline tree, the platform hardware requests an audio buffer from the Wwise Sink. Next, the Wwise Sound Engine polls any playing Audio Input Components for their audio.
At this point, FAkMixerPlatform is polled, and requests the next buffer from the Unreal Master Submix. This, in turn, empties Unreal’s circular audio buffers so that the entire pipeline can continue to work.
Audio Buffering

Two sequential, concurrent systems add some latency to the end mix. Unreal assumes that the A/V component plays at its own speed, and uses a circular buffer to provide audio at the same speed at which the Audio Mixer requests it.
The Unreal Master Submix also has a circular buffer in the Audio Mixer’s FOutputBuffer to ensure audio is provided at a valid speed.
Because the individual submixes are pushed by the Master Submix, and Wwise requests its buffers at the same time, both Unreal and Wwise push requests.
Finally, the Wwise Sink also has buffering, which you can customize through code.
FAkMixerPlatform Setup
With the Wwise Audio Input source plug-in, you can use any input from external sources inside Wwise.


In order to capture the Unreal Mix, you must create one Wwise Audio Input as well as an Event that starts the data acquisition process.
We recommend that you create a bus in the Master-Mixer Hierarchy and a Sound SFX object that uses a Wwise Audio Input source plug-in. The connection to the Master Audio Bus is important, even if you plan to discard the audio as provided by this component eventually. If you mute the final result, you must not virtualize the voice, because virtualization effectively removes the audio polling that the Unreal Audio pipeline requires.
Setting up the Wwise Project
This section describes how to create the Unreal input source in your Wwise Project. As part of the process, you must create an Event to play the associated Sound SFX. Unreal also requires the Event to determine which Audio Input to use for the FAkMixerPlatform.
To create an input source:
- In Wwise, create an empty Unreal_Input SFX object.
- In the Contents Editor, click Add Source > Wwise Audio Input and add the desired source.

- Configure a volume offset at the source level or directly on the Sound SFX object.

- Route the sound to the appropriate Output Bus, which is the “Unreal Input Bus” in this example.

- In the Actor-Mixer Hierarchy, right-click the Sound SFX and click New Event > Play. The event is automatically named Play_[SoundName] but you can rename it if desired.

 | Warning: The FAkMixerPlatform must be “Playing” at all times to ensure that Unreal’s Audio Mixers process audio for its components. If the FAkMixerPlatform is not playing, Unreal’s circular buffers fill up, which can potentially add latency to your audio. To mute the channel, ensure that it is playing and never virtualized or stopped due to lack of audio. |
Setting up the Unreal Project
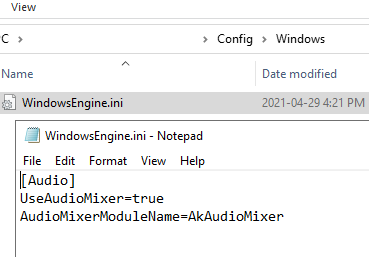
You must configure Unreal to use the Wwise Audio Mixer instead of the platform’s own Audio Mixer. For each platform, add the following lines to <Project>/Config/<Platform>/<Platform>.ini or <UE_ROOT>/Engine/Config/<Platform>/<Platform>Engine.ini. Note that the project settings override the engine settings. If the file does not yet exist, you must create it.
After the desired Wwise Integration is activated, you must use the previously created Play Event in your Project Settings’s Audio Input Event. This binds the FAkMixerPlatform component in your Unreal project to the Wwise Sound Engine.
After you generate SoundBanks, the Event is available in the Unreal Editor through the Wwise Browser. If WAAPI is enabled, it appears in the Wwise Browser.

Generate the SoundBanks in Wwise (or in the Unreal Wwise Browser) and restart the Unreal Editor. A restart is required each time you change the Audio Input Event because it is only initialized once. If you start the Profiler on the Unreal Player in Wwise Authoring, you can see the meters of your Audio Busses moving.
FAkMixerPlatform Limitations
Unreal determines how to encode audio through the ITargetPlatform interface. On each platform, the GetWaveFormat and GetAllWaveFormats methods are called by the Derived Data system in order to determine which audio format is supported. The AkAudioMixer system does not override this selection. Ensure that the function provides a supported, generic format: you can override the necessary files yourself, or ensure that you meet the conditions required to use generic encoding, and not any platform-specific encoding.
Otherwise, you can modify the Unreal source code to change the target platform’s audio formats in the following file pattern: Engine/Platforms/<PlatformName>/Source/Developer/<PlatformName>TargetPlatform/Private/<TargetName>TargetPlatform.cpp
Ensure that the platform’s audio format is equivalent to the one provided in the FMixerPlatformWwise CreateCompressedAudioInfo method as found in this file:
Plugins/Wwise/Source/AkAudioMixer/Private/AudioMixerPlatformWwise.cpp
UAkSubmixInputComponent Setup
Setting up the Wwise Project
The Wwise project preparation for any UAkSubmixInputComponent is similar to the one for FAkMixerPlatform: in your project, you must create a new Wwise Audio Input Source, and add an Event to play. This Event will be bound to your Unreal project later in a Blueprint that you must create yourself.
| Warning: As with the FAkMixerPlatform input, you must ensure that the Wwise object is never virtualized or stopped on its own. Unreal must play or stop the Event. Otherwise, buffers continue to fill on the Unreal side, which causes lags and memory usage spikes. |
Setting up the Unreal Project’s Audio
To prepare your Unreal project for a UAkSubmixInputComponent, you must do three things:
- Create the Master Submix.
- Create capture submixes.
- Assign the custom submixes to the Master Submix.
Creating the Master Submix
First, you must set up your Unreal project to override the default Master Submix and customize the Audio Submix flow. If you only create the Master Submix but do not customize it, it does not sound any different than the Default Master Submix. Note that an Unreal project can only use one Master Submix, which is shared by all worlds.
To create a Master Submix:
- Create a Sound Submix, as described in Overview of submixes in Unreal Engine. In this example, the name is "MasterSubmix".
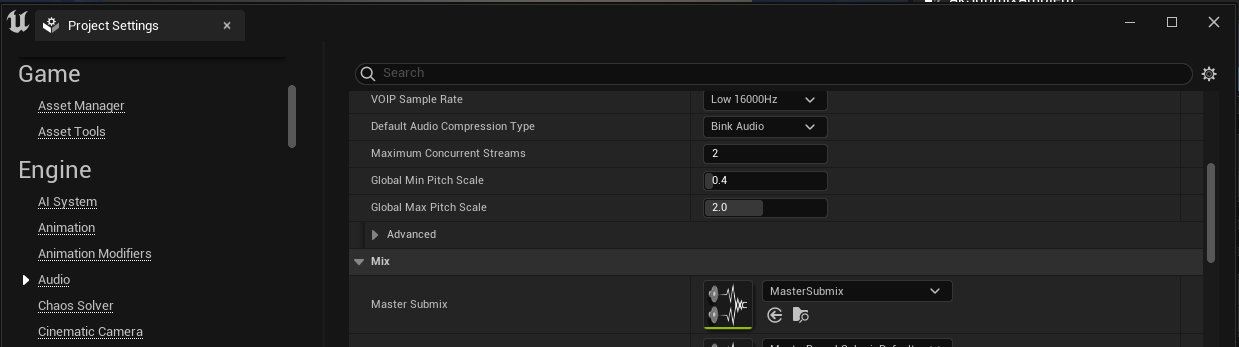
- In the Project Settings, scroll to the Engine section and click Audio, then open the Mix section.
- Set the Master Submix to the newly created Sound Submix. For example:
At this point, you have an empty custom Master Submix without any special routing, and that sounds the same as a copy of the project that uses the Default Master Submix.
Creating Capture Submixes
To efficiently capture the audio of a group of actors in Unreal, you must create two new submixes for each submix category. Because of the way Unreal handles submixes, there must be a hierarchy of two distinct submixes to ensure that the submix audio is not pre-mixed with anything except its own audio.
In the following section, the example uses the submix name, and the second submix has a “Passthrough” suffix (AmbianceSubmix and AmbianceSubmixPassthrough, respectively).
Assigning the Custom Submixes to the Master Submix
Open the custom Master Submix, as defined in the Creating the Master Submix section. Add a graph where the different Passthroughs are set between the real submix and the Master Submix. You can use more submixes and can define any order for the submixes, as long as you arrange them in the following order:
Submix -> Passthrough -> Next in Tree
For example, the following graph demonstrates two different submixes:

At this point, the submixes are unused and unassigned, and your project sounds the same as it did before because all audio from all objects is still routed to the Master Submix. However, when actors start to send their audio to their own custom submix, such as the DiscussionSubmix and AmbianceSubmix as defined here, audio is sent to both the Discussion UAkSubmixInputComponent and the Master Submix, which causes audio duplication.
To prevent this duplication, set the Output Volume of the multiple Passthrough mixes to -96db (0 in Unreal 4.27). This measure ensures that no audio is sent to the Master Submix during mixdown, and the entire audio of the Discussion and Ambiance submixes are delivered to a custom Wwise Audio Input component.

Assigning Unreal Asset Submixes
After the submixes are created and assigned to the Master Submix, add audio to the submixes. In the Effects section of the audio asset details dialog, expand the Submix tab and set the Base Submix to the submix you want to use.
| Warning: If you want to use multiple assets for one submix, it might be desirable to execute the Play Event at level start and the Stop Event at level end. This approach affects performance because the audio channel is open permanently in that level. If you have more than a few assets, they all push audio to Wwise, which must to be mixed. Another approach is to have one master component that determines the life cycle of the audio data transmission, and more than one sub-component to provide audio whenever necessary. |
In the following example, a WAV file was imported into the Unreal Content Browser, and the submix was changed to define the final destination.

At this point, this asset does not produce any audio because the Passthrough volume is -96db (0 in Unreal 4.27), so the audible track does not go to the Master Submix. The Events to Play and Stop the required audio component are not set up either. The asset is also not yet used in the Unreal world.
Setting up Unreal Blueprints
This section shows an example of how to set up the UAkSubmixInputComponent to bind submixes to the Wwise Audio Input Component. You can configure things differently, depending on your project’s specific requirements.
In the example in this section, an AmbientSound actor provides audio, but you can use any other Audio Component, or even Audio-Video components, to send audio to submixes.
Creating an AmbientSound Blueprint Class
First, you must create a new Blueprint class, with the Unreal AmbientSound as the parent class. An AkAmbientSound actor is also accessible. It is used to create Wwise-specific Ambient Sounds, so it is not relevant for this example.
 | Note: For performance purposes, we strongly recommend that you use AkAmbientSound whenever possible, but it is unnecessary in the case of the AkAudioMixer because the audio is already played and rendered in Wwise. |
In this example, the AmbientSound actor component is called “AkSubmixAmbient”.

Link the previously created SoundWave to the AmbientSound object in the Sound section (as seen in the bottom right of the following image). This is a generic component, so it is used as a default value.

Applying UAkSubmixInputComponent
To apply UAkSubmixInputComponent, an Unreal component is required to control the Play and Stop Events, and bind the submix to a Wwise Audio Input Component. Use the AkSubmixInput Audio Component.
In your AkSubmixAmbient Blueprint, under the root component, add the AkSubmixInput component.

In the Event Graph, post the Ak Submix Input component’s event on BeginPlay, and stop the component on EndPlay.

This configuration ensures that audio data transmission is active when BeginPlay starts, and stops it as soon as End Play is reached. To optimize this configuration beyond the default values, follow your own actor’s life cycle: start and stop the Audio Input processing only when necessary.
You can now compile and save the Blueprint.
Creating the Actor, Binding the Event and the Submix
Drag and drop your new Blueprint into the level to instantiate it.
In the Details panel, set the SoundWave of your choice in the Sound property. This is the real value, not the default one.

Select the AkSubmixInput component.
Define the Ak Audio Event to start playing the Wwise Audio Input Component, and the Submix to Record on this Component. Select the proper Submix to Record in the Submix Input section, and select the Ak Event to Play the Audio Input.

At this point, the submix plays the Ambient sound, the submix is muted (the output volume is set to 0 in the Submix tree), and the Audio Input is used in Wwise to play back the audio for that object.
Was this page helpful?
Need Support?
Questions? Problems? Need more info? Contact us, and we can help!
Visit our Support pageTell us about your project. We're here to help.
Register your project and we'll help you get started with no strings attached!
Get started with Wwise