Table of Contents
In each filename, the L designation indicates the file’s musical length in measures. You may have noticed that clips on the timeline are generally a few measures longer. Extra space at the beginning of a file is usually left to accommodate a pickup note leading into the first beat of the musical segment. This could be anything from a string line quickly climbing a musical scale to slide into the first note of the melody, to the crescendo of a timpani roll reaching its apex on the downbeat. Extra space at the end is usually left to include the natural decay of the instrument, like the diminishing volume of a cymbal crash or the reverb tail following a brass section’s sforzando played in a large room.
For the Explore-Arpeggio Music Segment, the main musical part is 16 bars long; but, there is an extra measure at the beginning, known as a pre-entry, and two extra measures at the end referred to as a post-exit.
-
Select the Explore-Arpeggio Music Segment and listen to understand why the pre-entry and post-exit were included.
In the beginning you hear a synth swell and at the end you hear the decay of the echoes. While it’s possible to edit out this pre-entry and post-exit material to make the section exactly 16 bars long, this isn’t desirable. It’s important to leave this information, which is why it was included in the delivered asset. In fact, if you look at the structure of the Cube Music DAW project, you’ll see that the various sections of music that would normally be played end-to-end have intentional measures of rest in between. This is so that the sections can be re-assembled within Wwise, but in a way that can be changed each time the parts are played.
If the pre-entry or post-exit material is not included, the transitions between segments would sound very unnatural. However, Wwise lets you keep this important extra material and let’s you define the transitions so the musical end of one segment will align with the musical beginning of the next played segment. All of the pre-entry and post-exit material is allowed to overlap and play simultaneously making extremely smooth natural sounding transitions as if the music had been recorded that way. This is the beauty of the Interactive Music Hierarchy.
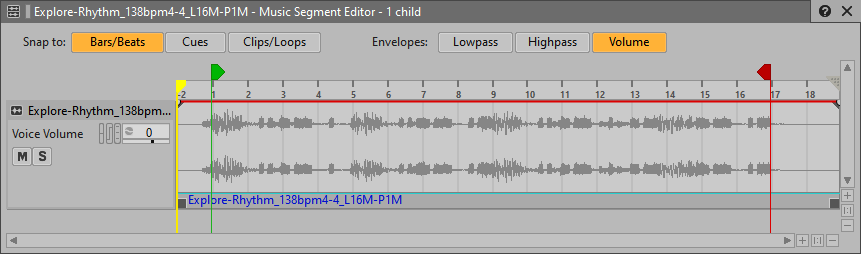
In order for this to work, you must define where the musical beginning and end of each Music Segment should occur by defining what is called an Entry Cue and Exit Cue. The Entry Cue is defined by a green icon and the Exit Cue is represented by a red icon, which are both positioned above the timeline in the Music Segment Editor. Knowing where to put these cues would be difficult without proper documentation from the composer. This is why the filenames in the audio assets also include a suffix to help communicate where to position these cues.
For the Explore-Arpeggio Music Segment the extension says L16M-P1M. L stands for length, P stands for pre-entry, and M stands for measure. This means that there is 1 measure of pre-entry to account for the synth swell, followed by a 16-measure-long piece of music. Anything left in the audio file after that is post-exit, which in this case is to provide time for the echoes to ring out. Having this information directly in the name of the audio file is an immense help as it eliminates any confusion about how to set these cues at the time of integration.
Cues can be freely moved to any position, but oftentimes they need to occur directly on bars or beats. To make it easier to accurately align the cue, you can enable snapping to bars and beats.
-
Click the Bars/Beats button in the upper-left corner of the Music Segment Editor.

You’ll first move the Entry Cue. If you were to drag the Entry Cue by default, you wouldn’t be moving the cue in relation to the waveform, but instead you’d end up creating more blank space at the beginning of the track. Instead, hold the Ctrl key while dragging the Entry Cue to the right. An alignment guide will appear to help you set the proper position.
-
Hold Ctrl and drag the Entry Cue to the right until the alignment guide reaches the apex of the waveform.

You see that the apex of the waveform now represents the first beat of the first measure and a negative measure number is used to represent the pre-entry portion of the clip.
Now you need to move the Exit Cue to the proper position.
![[Tip]](/images/wwise201/?source=wwise201&id=tip.png)
The Exit Cue may not be visible anymore because of the extra measure added to the timeline. You can drag the scroll bar at the bottom of the Music Segment Editor to bring it into view, or use the zoom buttons in the lower-right corner of the view to resize the timeline.
The filename indicates that the segment is 16 bars long, so the Exit Cue should be positioned at the beginning of bar 17. There’s no need to hold the Ctrl key when moving the Exit Cue.
-
Drag the Exit Cue to where the alignment guide is positioned, at the beginning of measure 17.

Now that you understand how to place Cues, you need to do the same for the remaining Music Segments. Be careful to note that the length and pre-entry values differ. If a pre-entry value indicates P0, this means that there is no pre-entry and the Entry Cue can be left exactly at the beginning of measure 1.
-
Position the Entry and Exit Cues for the remaining Music Segments and compare your results to the following images.