-
-
-
-
-
-
-
-
-
-
-
-
-
-
-
-
Glossary
-
-
-
-
-
-
The Wwise interface is divided into several different views. Each view has a specific purpose and gives you access to a series of tools or options that help you manage and define the content for your game. Views are grouped together to create layouts, which facilitate the work involved for a particular task or job. There are different layouts available in Wwise. Refer to Working with layouts for more information.
At the top of each layout is the menu bar and toolbar. The menu bar gives you access to all basic information, such as the project name, and commands, such as: saving projects, changing layouts, opening views, and opening help entries for properties. The toolbar provides quick access to certain tools, such as the Platform or Language Selectors, the Capture tools, the Remote Platform Connector, and the Search tool.

The following figure provides a detailed view of the menu bar:

The following figure provides a detailed view of the left side of the toolbar:

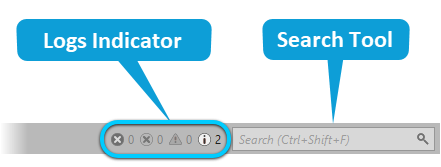
The following figure provides a detailed view of the right side of the toolbar:
When you first start Wwise, the Designer layout is displayed.

It consists of the following views:
Project Explorer: The main area where you manage and organize the various elements of your Wwise project. The Project Explorer contains the following tabs:
Audio: A hierarchical tree view, much like Windows Explorer and Mac Finder, where you can organize the assets in your project. The Audio tab has four main hierarchies: Audio Devices, the Master-Mixer Hierarchy, the Actor-Mixer Hierarchy, and the Interactive Music Hierarchy.
Events: Displays the Events, both Action and Dialogue Events, in your project.
SoundBanks: Displays all the SoundBanks in your project.
Game Syncs: Displays all the Switches, States, Game Parameters, and Triggers in your project.
ShareSets: Displays all the Effect and Attenuation ShareSets in your project.
Sessions: Displays all the Soundcaster sessions in your project.
Queries: Displays all the Queries in your project.
Event Viewer: Displays the different Events that have been created for the current project. The Event Viewer has three different tabs: Filtered, Current Selection, and Orphans, each of which filters the Events in a different way.
Object Tab Group: Contains zero or many Object Tabs depending on your selections. Any object in Wwise can be displayed in an Object Tab, which automatically adapts to the characteristics of the object. Each Object Tab provides easy access to all of the editors that are most relevant to the object, providing a central location where you can define the characteristics and behaviors of the objects within your sound, music, or bus structures.
Transport Control: Plays back your objects. The Transport Control contains the traditional controls associated with the playback of audio, such as play, stop, and pause.
Meter view: Displays color-coded values per channel of three different kinds of levels, namely Peak, True Peak, and RMS. For ambisonic busses, the Meter view can also display the 3D Meter, which shows directional data.
Most of the views in Wwise contain text boxes in which you can type property values or specific information about an object. The name of the text box identifies the type of information the field represents. Depending on the view, the name of the text box could be beside, above, or below it.

 |
Text box name. |
 | Property value. |
You can copy text from a text box by right-clicking the text and selecting Copy. When text is displayed in a text box but can't be edited, it is unavailable.
If you want to return a property value to its default setting, Ctrl+click in the text box.
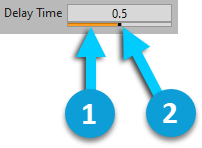
Most of the text boxes that contain property values also have a horizontal slider underneath them. You can drag the slider to set the value in the text box from a continuous range of possible values.
Horizontal sliders contain a slider head and a slider bar. The slider head is a small point that represents the current property value. The slider bar represents how much or how little the current value represents within the range of possible values.
|
|
Slider bar. |
|
|
Slider head. |
The slider head appears in different locations along the slider depending on where the default value falls within the range of possible values for each property. The slider bar also starts in different locations and moves in different directions depending on where the default value falls within the range of possible values for each property.
![[Note]](/images/2023.1.3_8471/?source=Help&id=note.png) | Note |
|---|---|
Some sliders have a default slider range that is only a subset of the full range of the property. To access a greater range of values for a particular property, enter a value in the text box outside the default slider range. To view the "default slider range" and full "range" for each property, refer to the Contextual Help for that property or the reference topic for the related view. |
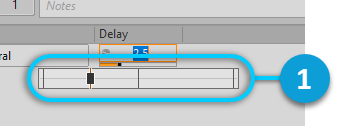
When you click and hold anywhere in the text box, the super slider appears, which makes it easier for you to fine-tune the property value. When you release the mouse button, the larger slider disappears. If you need to define the value more precisely, you can Shift+drag the slider to increase or decrease the value in smaller increments.
|
|
Click and hold anywhere in the text box to display the super slider and then drag to change the property value. |
There are two types of lists in Wwise: a drop-down list and a shortcut list (sometimes called a contextual or context list). The drop-down list, referred to simply as a "list" in this help documentation, is a field that contains a series of pre-defined options. To display the list, click the arrow to the right of the field.

|
|
Click the arrow to display the list of options. |
The selector button (>>) displays a series of options or actions. The shortcut menu may or may not have a field associated with it to display the option selected. Click the button to display the menu options.

|
|
Click the selector button to display the list of options. |
Some properties, such as Volume, use vertical sliders or faders instead of horizontal sliders to change their values. The controls for Volume use vertical sliders to better simulate faders that are found on both hardware and software mixers. You can drag the fader up or down to increase or decrease these property values. If you need to define the value more precisely, you can Shift+click above or below the fader to increase or decrease the value in smaller increments.

|
|
Drag the faders up or down to change the property values. Ctrl+click anywhere on the slider or within a text box to restore the property's default value. |
|
|
Text box: You can type values here. |
A table is an arrangement of data using a series of rows and columns. The information in the first column relates specifically to the information found in the other columns. In Wwise, tables display information on things such as Events and Presets.
 |
You can navigate through the items in the table by using the up and down arrow keys. In most cases, you can resize columns, sort information by each of the different column headings, and edit the property values directly within the table.
To resize columns in a table:
Position the mouse pointer over a column divider.
The pointer changes to a double arrow.
Do one of the following:
Drag the divider to the right to increase the size of the column.
Drag the divider to the left to decrease the size of the column.
To configure columns in a table:
Position the mouse over the column header band.
Right-click the header band.
The shortcut menu appears displaying its sole option: Configure Columns.
Select Configure Columns.
The Configure Columns dialog appears, where you can specify which columns to display and their order.
To sort information in a table:
Click a column title in the table.
The information in the table is sorted in ascending order according to the information in that column.
Click the column title again to sort the information in descending order.
Note Where the order of items within a table plays an important role, you will not be able to sort by column title. Instead, you will be able to reorder the items manually by dragging them from one position to another.
To filter elements in a table:
Click the Search icon in the upper-right corner. Default Shortcut: Ctrl+F3.
A standard alphanumeric search field appears.

Enter any series of characters in the field, including numbers, letters, underscores, or spaces.
Wwise filters from view all elements without a matching pattern of characters in any of their columns. With fewer elements listed, it's easier to find the one you need.
Note Exceptionally, in the File Manager Wwise searches only the filenames of the File column.
Additionally, Wwise excludes objects hidden in a collapsed node in the List View, Query Editor, MIDI Keymap Editor, and Reference View from the search, thereby filtering them out by default unless a visible ancestor is kept.
To close the search field and reset the filter, click the Close icon to the left of the Search icon or press Esc.
| Add links to table texts |
|---|---|
Text in table fields can be linked to other locations by adding an appropriate protocol
handler at the beginning. The handler will apply to all the text in the field, so your entry
must be accurate and complete. Adding, for example, http:\\www.audiokinetic.com to the
Notes field will display an underlined, clickable text
when viewing it from a table view like the Batch Rename View. In this case, the protocol
handler and URL will clearly open a browser to Audiokinetic's website. However, you are
welcome to use any protocol handler defined in
|
You can undo most actions that you perform in Wwise, such as changing a property value, moving an object, or creating an Event. If you undo an action by mistake, you can redo the last action to return to the previous value or state.
To undo an action, click Edit > Undo ><Action Name> or press Ctrl+Z. You can undo up to the last 200 actions.
To redo an action, click Edit > Redo ><Action Name> or press Ctrl+Y. You can invoke one redo command for each undo action.
Was this page helpful?
Need Support?
Questions? Problems? Need more info? Contact us, and we can help!
Visit our Support pageTell us about your project. We're here to help.
Register your project and we'll help you get started with no strings attached!
Get started with Wwise