-
-
-
-
-
-
-
-
-
-
-
-
-
-
-
-
Reflect
-
-
-
-
-
-
-
-
-
-
-
-
-
-
-
-
-
-
|
Wwise Unreal Integration Documentation
|
In this tutorial, we will use Spatial Audio Geometry to send reflective surfaces to the Reflect plug-in. It will simulate the early reflection implied by the propagation of sound in an acoustic environment.
 | Note: You need a license for Reflect to generate SoundBanks in this tutorial. |
| Note: The Preparation for the Spatial Audio Tutorials must be completed prior to starting this tutorial. |
Wwise Project
- To have access to factory Acoustic Textures as well as a preset for the early reflection Auxiliary Bus, you need to import the Factory Acoustic Textures and the Reflect Factory Assets.
- Navigate to Project > Import Factory Assets...
- Choose both Reflect and Acoustic Textures and press Import.
- Create an early reflection Auxiliary Bus using the factory preset:
- In the Master-Mixer Hierarchy, right-click on the Master Audio Bus
Navigate to New Child > Presets and select Simplified Early Reflection Auxiliary Bus
- In the Effects tab, double-click on the effect and set the Speed of Sound to 34,500

Navigate to the Sound SFX Sound Property Editor of the sound created in Wwise Project Preparation.
- In the General Settings tab, add the new Auxiliary Bus with the Reflect Effect under Early Reflections

- Save the project and generate Soundbanks.
Unreal Project
In the project, we want our building, the floor and the obstacle to reflect sounds. There are two ways to do that, with an AkSpatialAudioVolume or with the AkGeometryComponent.
The AkGeometryComponent can be added to static mesh actors. It will automatically send the static mesh geometry to spatial audio. It can also be configured to send the simple collision mesh. A sufficiently complex static mesh with an AkGeometryComponent attached can sometimes result in geometry that is too complex. This is both in terms of computation time and because ray-based acoustic simulation techniques, such as those used in Wwise Spatial Audio, generally assume that geometric features (surfaces and edges) are significantly larger than the wavelength of the sound source. For reference, a 1000Hz sound in air has a wavelength of 34cm. Instead of using the static mesh directly, an AkSpatialAudioVolume can be used to create a simple shape around the mesh (when it serves as an obstacle to reflect and obstruct sound), or within the mesh (when it serves as interior walls).
- In the tutorial map, the obstacle is a basic static mesh. We can easily add an
AkGeometryComponentto it.Click on the actor and click on Add Component. Choose Ak Geometry.
- In the Geometry section, choose Simple Collision

- Repeat the same steps for the floor.
In the SpatialAudioTutorialMap, the building is made out of a custom mesh. The shape is still basic enough to use an AkGeometryComponent, but for the sake of this tutorial, we will use an
AkSpatialAudioVolume.- Drag and drop three
AkSpatialAudioVolumesinto the scene- Set one around the building for the exterior walls. Since this volume is placed around the outside of the mesh, it must be transformed manually.
- Set the two others inside each room for the interior walls. We will use Fit To Geometry to place the two rooms.
- Enable Fit To Geometry in the Details panel of each AkSpatialAudioVolume.
- If the initial shape that is found is not satisfactory, translate the AkSpatialAudioVolume to a new location using the transform gizmo. Notice that a yellow preview outline appears when translating the
AkSpatialAudioVolume. When a satifactory shape is found, release the mouse button and the AkSpatialAudioVolume will snap into place. - For more information on placing AkSpatialAudioVolumes using Fit To Geometry, refer to Fit to Geometry.
- Make sure that Enable Surface Reflectors is enabled for all three
AkSpatialAudioVolumes.- Leave Enable Room and Enable Late Reverb unchecked. They will be discussed in Rooms and Portals.

- Drag and drop three
Verify your Setup
- Start the scene and connect to Wwise Authoring.
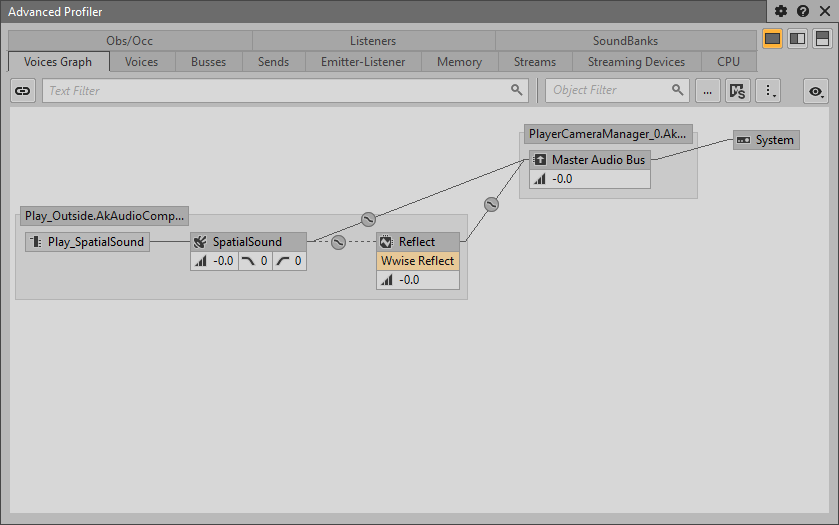
- In the Advanced Profiler's Voices Graph view, you should see a new auxiliary send with the Reflect Effect.
- At the initial position of the player, play the sound placed outside.
Note:
If you play either of the sounds from the rooms while the player is outside, you do not see any Reflect sends. Also, the sound is attenuated by transmission. That's because we created closed AkSpatialAudioVolumes around the building and each room. You can create openings in them by modifying the brush object, or by using Spatial Audio Portals, which are covered in Rooms and Portals. - Before going to the next step, open the Profiler Settings view and make sure Spatial Audio is enabled.
- At the initial position of the player, play the sound placed outside.
Navigate to the Game Object Profiler layout (shortcut F12).
- In the Game Object 3D Viewer, you should see the different reflective surfaces.
- When playing a sound, early reflection rays will be drawn to show where the sound is be coming from.
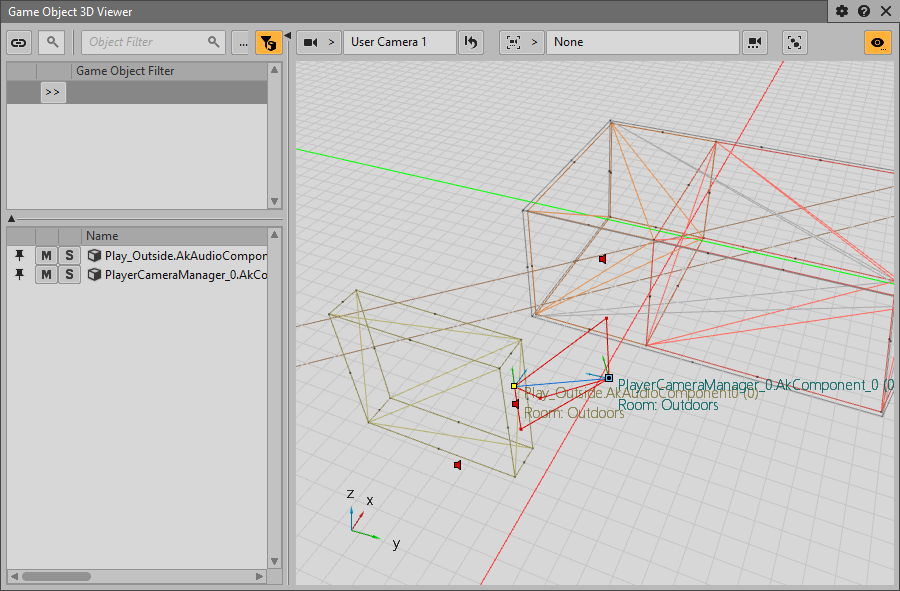
- If you can't see rays, make sure to enable Show Reflection Paths in the Game Object 3D Viewer Settings.

- In the Advanced Profiler's Voices Graph view, you should see a new auxiliary send with the Reflect Effect.
| Note: If you can't see any geometry in the Game Object 3D viewer, you may need to increase the Monitor Queue Pool Size. The setting is located in the Platform Initialization Settings. |
Was this page helpful?
Need Support?
Questions? Problems? Need more info? Contact us, and we can help!
Visit our Support pageTell us about your project. We're here to help.
Register your project and we'll help you get started with no strings attached!
Get started with Wwise