-
-
-
-
-
-
-
-
-
-
-
-
-
-
-
-
Glossary
-
-
-
-
-
-
To create the structure for your audio routing, you can add Audio Busses to the Master Audio Bus. You can also create other master busses to mix for other outputs. When using Motion, you should also create a master bus for motion devices, and route all sounds (motion is only low-frequency audio) to a bus in that hierarchy. After you have created a child bus under the master bus, you can create any number of parent and child busses to build your routing structure.
To add a child bus in the Master-Mixer Hierarchy:
In the Audio tab of the Project Explorer, right-click the bus for which you want to create a new child.
From the menu, select one of the following:
New Child > Audio Bus.
New Child > Auxiliary Bus.
The new child bus is added to the Master-Mixer Hierarchy.
To create a parent bus in the Master-Mixer Hierarchy:
In the Audio tab of the Project Explorer, right-click the bus for which you want to create a new parent.
From the menu, select one of the following:
New Parent > Audio Bus.
New Parent > Auxiliary Bus.
The new parent bus is added to the Master-Mixer Hierarchy.
![[Note]](/images/2023.1.3_8471/?source=Help&id=note.png)
Note An Auxiliary Bus cannot be at the top level of the hierarchy. Therefore, the New Parent > Auxiliary Bus option will be disabled in such cases.
A Master Bus can be added to any Work Unit or Virtual Folder in the Master-Mixer Hierarchy, as long as there's no master audio bus above that location in the hierarchy.
To add a new Master Bus in the Master-Mixer Hierarchy:
In the Audio tab in the Project Explorer, right-click on a Work Unit or virtual folder in the Master-Mixer Hierarchy.
From the menu, select one of the following:
New Child > Audio Bus.
The new Master Bus is added to the Master-Mixer Hierarchy.
Another way of adding busses is to copy existing ones and paste them in the desired location.
To copy and paste an audio bus in the Master-Mixer Hierarchy:
In the Audio tab in the Project Explorer, right-click the desired bus in the Master-Mixer Hierarchy.
From the menu, select Copy or press Ctrl+C.
Select another bus in the Master-Mixer Hierarchy under which you'd like to paste the copied bus.
From the menu, select Paste or press Ctrl+V.
A new bus, with all the same settings as the one copied, is added with a "_##" appended to the end of the name to ensure its uniqueness.
After you have added your busses, you may want to change the location of a bus to create different relationships between the busses.
To move a bus to another location in the Master-Mixer Hierarchy:
Drag the bus to the desired location.
The bus and any of its children are moved to the new location. By changing the location, the moved bus will now be affected by its new parent's properties.
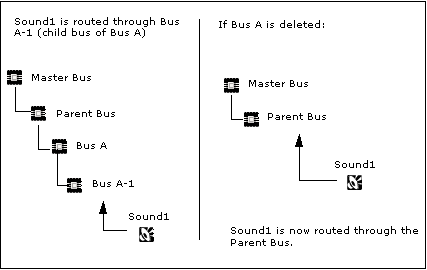
If you have created a bus by mistake or no longer need a particular bus, you can delete it. When you delete a bus, you are also deleting all of its child busses. The objects that were routed through that bus are now reassigned to the next parent object in the hierarchy. The property overrides for the rerouted objects remain intact.
The following illustration demonstrates what happens to a sound object being routed through a bus that is deleted.
 |
To delete a bus in the Master-Mixer Hierarchy:
On the Audio tab of the Project Explorer, select the bus that you want to delete, and do one of the following:
Press the Delete key.
In the shortcut menu for the bus, select Delete Selection.
The bus and its children are deleted, and the objects routed through the deleted busses are now routed through the parent bus.
Was this page helpful?
Need Support?
Questions? Problems? Need more info? Contact us, and we can help!
Visit our Support pageTell us about your project. We're here to help.
Register your project and we'll help you get started with no strings attached!
Get started with Wwise