-
-
-
-
-
-
-
-
-
-
-
-
-
-
-
-
Glossary
-
-
-
-
-
-
An Object Tab Group is included in the center of the Designer layout. It can contain zero or many Object Tabs depending on your selections. Any object in Wwise can be displayed in an Object Tab, which automatically adapts to the characteristics of each object. The Object Tab centralizes and provides easy access to all of the editors that are most relevant to an object.
 |
An Object Tab Group. |
 |
Three sample Object Tabs. |
There are two types of Object Tab: Recycle and Keep Open. Generally, the first tab opened in an Object Tab Group is a Recycle tab. This means that each time an object is selected in the Project Explorer, it replaces the previously selected object in the same Object Tab. A recycling icon indicates the tab type.
To keep an object open in a tab, double-click the tab (or right-click the tab and select Keep Open). This converts the tab from a Recycle tab to a Keep Open tab. The recycling icon is removed. After a tab has been converted to a Keep Open tab, it cannot be reverted to a Recycle tab. Upon subsequent selection of an object in the Project Explorer, a new Recycle tab automatically opens to display the selected object. This newly opened tab is always displayed to the right of the currently selected Object Tab.
![[Note]](/images/2023.1.3_8471/?source=Help&id=note.png) | Note |
|---|---|
There can only be one Recycle tab open within an Object Tab Group at any time. |
To view an object in a Recycle tab:
Select any object in the Project Explorer.
To view an object in a Keep Open tab, do any of the following:
Drag any object in Wwise onto the title bar of an Object Tab Group. You can choose where to place the tab amongst the existing Object Tabs.
Double-click any object in Wwise. The new Object Tab opens to the right of the currently selected Object Tab.
Right-click any object in Wwise and click Open in New Tab. The new Object Tab opens to the right of the currently selected Object Tab.
To close an Object Tab, do any of the following:
Click the x at the top-right corner of the tab.
Right-click the tab and select Close (Ctrl+F4 or Ctrl+W).
Center-click the tab.
To rearrange Object Tabs within an Object Tab Group:
Drag a tab to the left or right.
Both Object Tabs and Object Tab Groups can be docked and undocked. Refer to Docking/undocking views and Object Tabs for details.
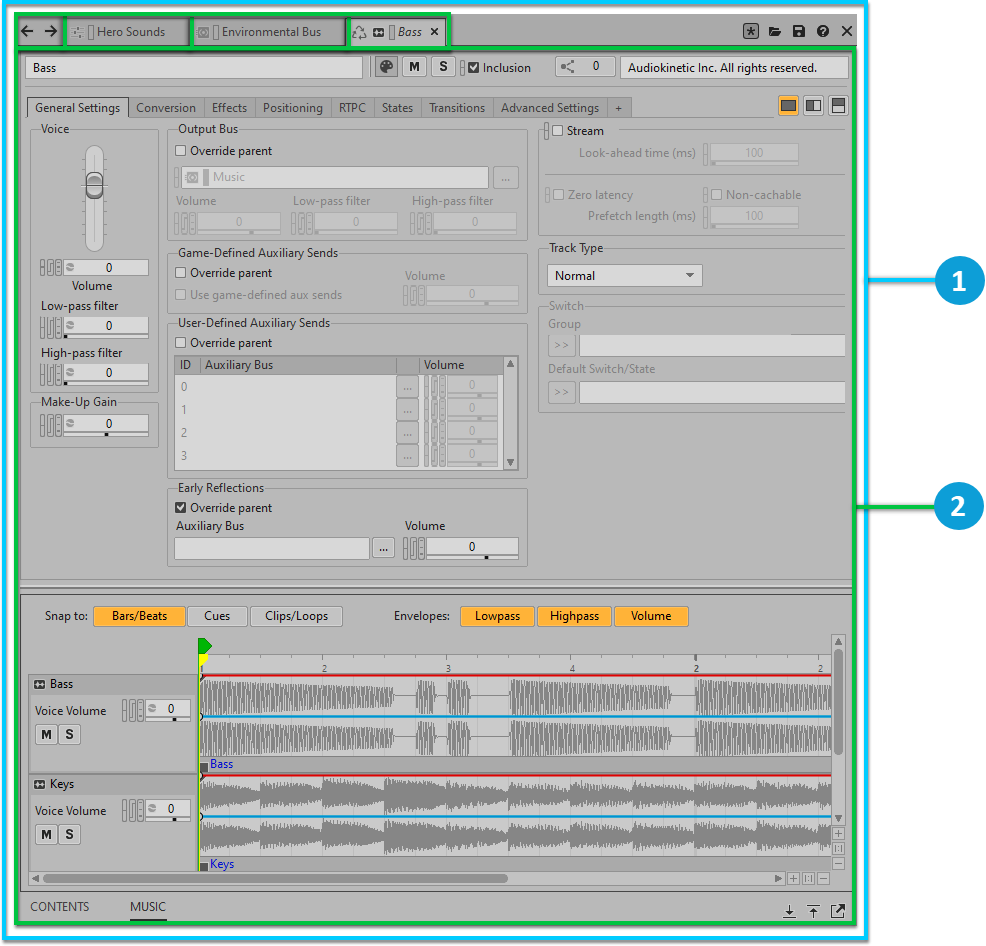
Each Object Tab consists of a Primary Editor in the upper pane and, for most object types, a Secondary Editor in the lower pane.

The Primary Editor typically presents either the Property Editor, Event Editor, or Audio Device Editor depending on the type of object selected. The Secondary Editor includes a tab for each of the other editors that are most relevant to the currently selected object. Click the tab name at the bottom of the pane to switch between these editors.

The following table lists some examples of tabs that could be included in the Secondary Editor and the conditions that would lead to their inclusion.
|
Tab Name |
Conditions for Inclusion |
|---|---|
|
<Effect Name> |
Effects have been inserted on the object. A tab appears for each Effect inserted on the object, displayed from left to right corresponding to Effects 0 through 3. |
|
Attenuation |
An attenuation instance (ShareSet or custom) has been defined in the Positioning tab of the object. |
|
Content |
Included by default for most objects. |
|
Music |
The object is part of the Interactive Music Hierarchy. |
|
Source |
The object is a sound object and is associated with a source file or has a Source plug-in. |
The buttons in the lower-right corner of the Secondary Editor provide the following functionality:
 |
Minimizes the Secondary Editor within the Object Tab (Shift+F11). Alternatively, you can click on an active Secondary Editor tab to minimize it. |
 |
Maximizes the Secondary Editor within the Object Tab (Ctrl+F11). |
 |
Duplicates the currently selected Secondary Editor tab in a floating window. An instance of the tab remains in the Secondary Editor. |
To use keyboard shortcuts in any of the editors:
Click anywhere in either the upper or lower pane to designate the editor as the active editor. The active editor is indicated with a more prominent rectangular outline. When multiple tabs are present in the Secondary Editor, click the tab corresponding to the editor for which you want to use keyboard shortcuts.
Any keyboard shortcuts that apply to the editor can be used, including the F1 key (or Help button), which opens the reference topic pertaining to the active editor.
The following table describes each of the icons in the title bar of an Object Tab Group.
|
Interface Element |
Description |
|---|---|
|
|
Returns to the previously selected object (Backspace). |
|
|
After selecting the back arrow, the forward arrow returns to the original object (Shift+Backspace). |
 |
Click and drag to initiate the docking of a floating Object Tab Group as a whole. Note, this icon only appears in the title bar of a floating Object Tab Group that includes more than one Object Tab. |
 |
Sync with Any Selection Channel: Syncs the Object Tab Group to objects selected in the Designer layout's Project Explorer and Event Viewer regardless of the Selection Channel of those views. |
 |
Pinned: Disables synchronization with objects selected in the Project Explorer and Event Viewer. Subsequent selections in those views are not reflected in the Object Tab Group. |
    |
Sync with Selection Channel 1-4: Syncs the Object Tab Group to the Project Explorer and/or Event Viewer of a particular Selection Channel (1-4). This means the object selected in the tab always matches the object selected in the corresponding Project Explorer and/or Event Viewer. |
 |
Loads a previously saved Preset. |
 |
Saves the current state of all values within the selected Object Tab to a Preset. |
 |
Displays the online help pertaining to the active editor, either primary or secondary. Clicking anywhere in either editor designates the editor as active. The active editor is indicated by a more prominent rectangular outline. When multiple tabs are present in the Secondary Editor, the online help corresponding to the selected tab opens. |
 |
Closes the Object Tab Group. |
Right-click any Object Tab to access the following shortcut menu:
Back: Returns to the previously selected object (Backspace).
Next: After selecting Back, Next is available to return to the original object (Shift+Backspace).
Keep Open: Converts the Object Tab from a Recycle tab to a Keep Open tab (Ctrl+P). The recycling icon is removed from the tab, and the tab no longer updates to reflect selections in the Project Explorer.
Duplicate: Opens a second instance of the Object Tab within the same Object Tab Group (Ctrl+D).
Detach: Detaches the Object Tab from the Object Tab Group. The tab is then displayed as a new Object Tab Group in a floating window. It can be dragged back into the original Object Tab Group.
When the last remaining Object Tab is detached from an Object Tab Group, the Object Tab Group is closed unless it is the only Object Tab Group remaining in the Designer layout. In this case, an empty Object Tab Group remains in the layout.
Split to the Right: Opens an Object Tab Group to the right of the current Object Tab Group containing only the selected Object Tab. This creates a second instance of the selected tab, including both the Primary and Secondary Editors (when present). This makes it possible to view and edit different tabs within the Object Tab at the same time.
Close: Closes the Object Tab.
Close Other Tabs: Closes all other Object Tabs in the Object Tab Group.
Close Tabs to the Right: Closes all Object Tabs to the right of the Object Tab in the Object Tab Group.
Was this page helpful?
Need Support?
Questions? Problems? Need more info? Contact us, and we can help!
Visit our Support pageTell us about your project. We're here to help.
Register your project and we'll help you get started with no strings attached!
Get started with Wwise