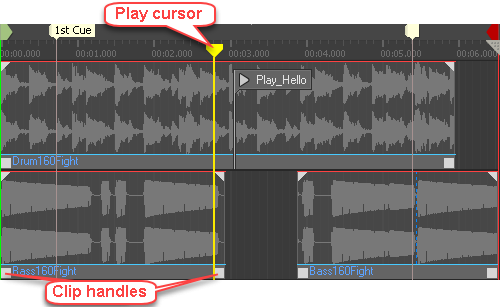
Using the various tools for clips in the Music Segment Editor, you can edit your clips easily along a timeline. You can move clips from one track to another by dragging them up or down and overlap one clip over another. You can make a clip shorter by dragging one of its handles inwards, or extend it by dragging the handle outwards. When you extend a clip, it repeats itself. Each repeat is called a loop.
The following table lists the various clip tools and indicators you will use when working with clips in the Music Segment Editor.
You can easily loop your clips using the clip handles in the Music Segment Editor.
To loop a clip in the Music Segment Editor:
Click the clip handle and drag the handle to extend the clip.
Extend the clip until the clip indicator appears in the timeline.
A clip loop is created. You can continue extending the clip to add as many loops as needed.
To help layer and arrange your music, you can move a clip in a track. You can line up and overlap the clips in the Music Segment Editor in any way you want to mix your music. Using the snap functionality you can accurately align the clips along the timeline. See Snapping to increments in the Music Editor.
To move a clip:
Select a clip in a track and drag it to the new location.
![[Tip]](/images/2023.1.3_8471/?source=Help&id=tip.png) | Tip |
|---|
You can also use standard Windows cut, copy, and paste commands to move clips and entire tracks. |
You can split the clips in the Music Segment Editor. This can be useful when, for example, you want to isolate a single bass drum hit so that you can repeat it for an entire measure or insert it into another track. You could add this isolated drum bass clip to tracks anywhere and thus rearrange and even re-compose your music.
To split a clip:
Drag the play cursor to the location where you want to split the clip.
In the track, right-click the clip that you want to split and select
Split on Play Cursor from the shortcut menu.
The clip is split at the position of play cursor. You can now edit the clips as needed.
When you are overlapping your clips, it can be useful to change how your clips are stacked particularly when you want to view sync points for a clip that has been overlapped. You can do this using the Bring to Front and Send to Back commands on the shortcut menu.
To change the stacking order of clips:
In a music track, right-click the overlapping clip, and select
Send to Back.
The order for the clips is reversed and the clip that was underneath is now on top.
![[Note]](/images/2023.1.3_8471/?source=Help&id=note.png) | Note |
|---|
Alternatively, you can also change the stacking order of the clips by right-clicking the visible section of a clip and selecting Send to Front. |
Tell us about your project. We're here to help.
Register your project and we'll help you get started with no strings attached!
Get started with Wwise

![[Note]](/images/2023.1.3_8471/?source=Help&id=note.png)
![[Tip]](/images/2023.1.3_8471/?source=Help&id=tip.png)