Table des matières
-
-
Lessons
-
![[Note]](/images/wwise301/?source=wwise301&id=note.png) | |
|
Notice that this section is a Bonus Section, so you will not get any questions in the Certification Exam related to this section. Furthermore, the microphone input implementation is a fairly advanced topic, so the script itself will not be covered in the exercise steps. |
While you can play sounds based on in-game mechanisms, like posting the Player_Footsteps Event once the Player's foot is on the ground, you can also do the opposite by driving in-game mechanisms with audio, like using the input signal from your microphone to make the Player swing a weapon. The process of playing a sound and opening your microphone is fairly similar. When you need to play a sound, you post an Event connected to a game object and an Audio Source will be played. When you need to receive input from your microphone, you also need to post an Event connected to a Wwise Object with an Audio Source, however, this time the Audio Source is a Wwise Audio Input. This lets your microphone send a signal directly into the Wwise Audio Input's Wwise Object, where you can measure it using a Wwise Meter Effect plug-in.
In Unity, the script design is more advanced than just posting an Event, but as a stepping stone we've constructed the AkMicrophone script.
In the following steps, you will add this script in a scene, create a Sound SFX Audio Object in Wwise for receiving the Microphone input, and use the microphone volume level to activate the player's attacks when the input of your microphone exceeds -48 dB.
| |
|
Warning: In the following steps, we recommend using a pair of headphones, as the use of speakers might cause the output to feed into the microphone. |
-
In the Unity menu, go to Audiokinetic > Certification > 301 > Lesson 4 and select Posting Audio Input.
-
In the Hierarchy, select the Player game object.

-
In the Inspector, click Add Component, then search for AkMicrophone and select it.

To get the Audio Input from the Microphone, you have to activate it, just like pressing record on a digital audio recorder. First off, you need to create a Sound SFX in Wwise and add the Wwise Audio Input Audio Source to it.
-
In Wwise, go to Project Explorer > Audio > Actor-Mixer Hierarchy, right-click Default Work Unit, then select New Child > Sound SFX.

-
Name it Microphone.

The Microphone will be displayed in red, as you have not yet added an Audio Source to it. Here you can add the audio input from your system as an Audio Source, using the Wwise Audio Input.
-
In the Contents tab, click Add Source >> and select Audio Input.

Here you can set the volume of your Wwise Audio Input, should your microphone be too low.

When pressing play in the Transport Control, your Microphone will now activate, and you will be able to hear it. However, you only need the microphone input to trigger the Player Attacks, and you don't want to be listening to the input, so let's mute the output. This is not something we would want to do at the Actor-Mixer Hierarchy level, as it would also hinder us from measuring the input volume level. Instead, we can assign the Microphone Sound SFX to an Audio Bus and simply turn the Bus Volume down.
-
In the Project Explorer's Master-Mixer Hierarchy, right-click on the Master Audio Bus > Non-World Audio Bus, go to New Child, and select Audio Bus.

-
Name it Microphone.

-
In the Audio Bus Object Tab's General tab, set the Bus Volume to -96.

The Audio Bus is now ready, but the Microphone remains to be assigned to it.
-
Select the Microphone Sound SFX, and in the Sound Property Editor's General Settings tab, click browse (...) in the Output Bus group box.

-
Select the Microphone Audio Bus.

You are now sending the Output of the Microphone Sound SFX to the Microphone Audio Bus but, as the Microphone Audio Bus is completely inaudible, you won't hear it in game. Next, you should connect an RTPC to the Input Volume. For this you can use the Wwise Meter, which allows you to connect an RTPC to the measured volume. Let's add a preconfigured Wwise Meter Effect ShareSet and add the RTPC to it.
-
In the Effects tab, click +, and go to Meter > Meters and select the MicrophoneMeter Effect ShareSet.

-
Click Edit to open the Wwise Meter Effect Editor.

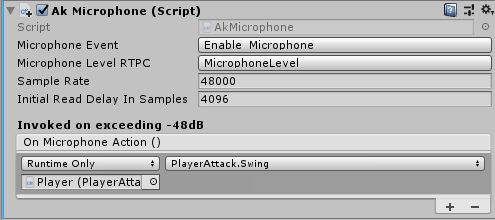
In the AkMicrophone script you will find a Microphone Level RTPC Property Drawer. This RTPC will be monitored while the AkMicrophone script is active, and when the RTPC value exceeds the Output Game Parameter Min property value (-48, the default value in the Wwise Meter) the OnMicrophoneAction() UnityEvent(s) should be called.
The UnityEvent property allows you to call any function or set any variable directly from the Inspector, rather than having to call it from a script. If you want to learn more about UnityEvents, go to https://docs.unity3d.com/Manual/UnityEvents.html.
Let's connect the Wwise Meter to the RTPC and select it in the AkMicrophone script.
-
In the Output Game Parameter group box, click the Selector, go to Generic and select the MicrophoneLevel RTPC.

![[Tip]](/images/wwise301/?source=wwise301&id=tip.png)
This property is premade for the Wwise Adventure Game and if you are implementing this script in your own game, you should make a new Game Parameter.
Next, you need to tell the AkMicrophone script that it should be listening to the Microphone Game Parameter. This is somewhat reversed of how you might normally use Game Parameters; Game Syncs are not necessarily just a one-way communication from Unity to Wwise, but a two-way connection between the two applications is also possible.
-
In Unity's Inspector, go to the AkMicrophone script and select the Microphone Level RTPC.

If you do not see the Enable_Microphone Event, you might have the original Wwise Adventure Game Wwise Project referenced in the Unity's Wwise Settings. If so, go to Edit > Wwise Settings and change the Wwise Project Path.
-
Expand the Generic Work Unit, select the MicrophoneLevel Game Parameter and click OK.

You have now connected the Game Parameter, but no Event has been selected. To start receiving an Audio Input, you need to call the Wwise Audio Input Audio Source from an Event. As such, let's make one.
-
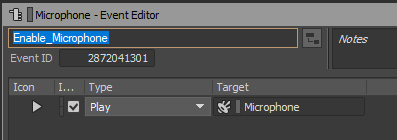
In Wwise's Project Explorer, right-click on the Microphone Sound SFX, go to New Event, and select Play.

Give the Event a name that describes what it does.
-
In the Event Editor, rename the Microphone Event to Enable Microphone.
As the SoundBanks are referencing the Work Units in the Project Explorer's Event tab, the Event will automatically be added to the General SoundBank. So all you need to do now to get it into Unity is to Save the Wwise Project and Generate SoundBanks.
-
In the Wwise menu, go to Project and select Save.

-
Select the SoundBank layout to access the SoundBank Manager, and click Generate All.

-
In Unity's Inspector > AkMicrophone script, open the Microphone Event Property and select the Events > Default Work Unit > Enable_Microphone Event.

That's it for setting up the Microphone Audio Input. Next, you need to connect it to a functionality or mechanic, in our case, the player's attacks. When the Adventurer attacks, the weapon is swung in a three-step sequence. If the weapon's Trigger collides with any other Triggers, it will post the Player_WeaponImpact Event. As such, all you need to activate is the Adventurer's swing, which is called in the PlayerAttack script.
-
In the AkMicrophone component, click on the plus sign (+) to add an item to the list.

-
Drag the PlayerAttack component into the Object property.

You can now select any public function in that script, but let's use the Swing() function.
-
In the No Function property drawer, go to PlayerAttack and select Swing().

You have now completed all steps for the Wwise integration, but microphone input in Unity is not allowed unless the Unity audio engine is also active. For this exercise, let's temporarily enable Unity audio, but for any other sound integration methods, we recommend that you don't use both engines at once, because it causes two audio soundscapes unaware of each other. This example is only used for audio input, not playback.
-
From the menu bar, select Edit > Project Settings, and in the Audio section clear Disable Unity Audio.
That's it! Let's head into the game and try it out.
-
Enter Play mode, run over to a crate and clap your hands to swing and attack it.

| |
|
If you experience any loss of audio input, try to change the AkMicrophone's Sample Rate or Initial Read Delay in Samples property. |
You have now successfully set the player to attack on Microphone peaks above -48 dB. We encourage you to try it out and to add other functions to the OnMicrophoneAction() list. The AkMicrophone script is specially designed to be reusable in any Unity project using Wwise, so you're welcome to use it for your own forthcoming projects.